Webhook Connection for Cloud SOAR
Cloud SOAR can receive alerts from Sumo Logic Monitors and Scheduled Searches to create Incidents. First, you'll need to create a Cloud SOAR connection. Then you can use the connection as the Connection Type in a Monitor or the Alert Type in a Scheduled Search.
- You need to have Cloud SOAR enabled on your account for this connection to be available.
- You'll need the Manage connections role capability to create webhook connections.
You can configure a webhook connection to allow you to send an alert from a scheduled search to Sumo Logic Cloud SOAR using an incident template.
-
New UI. In the main Sumo Logic menu select Monitoring > Connections. You can also click the Go To... menu at the top of the screen and select Connections.
Classic UI. In the main Sumo Logic menu, select Manage Data > Monitoring > Connections. -
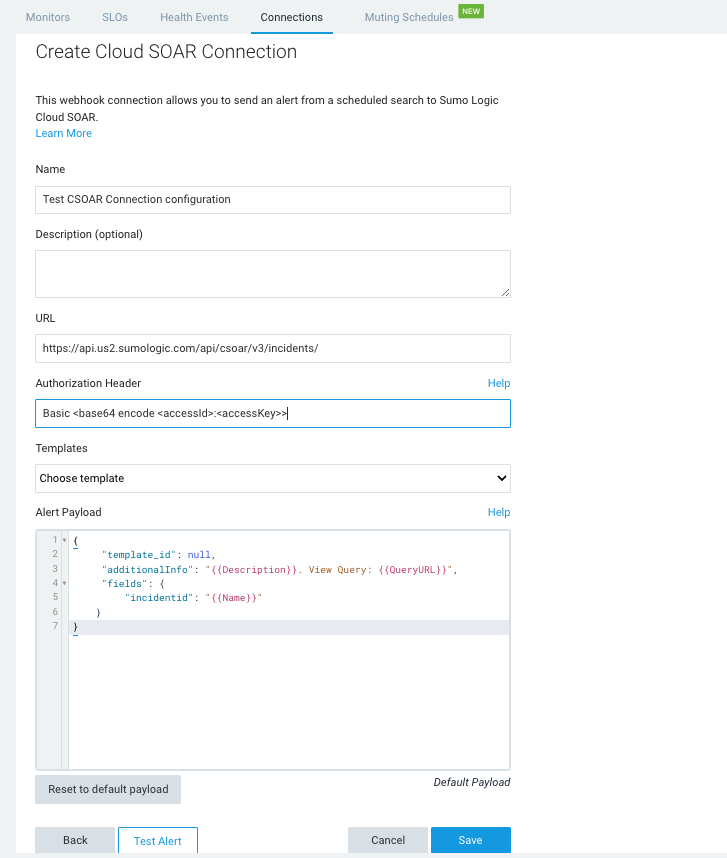
Click + and choose Cloud SOAR as the connection type. The Create Cloud SOAR Connection dialog is displayed.

-
Enter a Name and give an optional Description to the connection.
-
The URL field shows your Sumo Logic API endpoint followed by
/csoar/v3/incidents/. For example,https://api.us2.sumologic.com/api/csoar/v3/incidents/ -
In Authorization Header, enter your basic authentication access information for the header. For example,
Basic <base64 encode <accessId>:<accessKey>>. For more information, see Basic Access (Base64 encoded). -
Click Save. After save, the Templates dropdown shows a list of all incident templates by name configured in your Cloud SOAR environment.
-
Select a Template.
-
The default payload synchronizes with the selected template, and the Alert Payload field shows the associated
template_idfield automatically defined in the default payload. Atemplate_idis required in the payload in order to configure the connection:{
"template_id": <Template ID>,
"fields": {
"incidentid": "Incident Id"
}
}You can add additional variables. For example:
{
  "fields": {
    "description": "string",
    "additional_info": "string",
    "starttime": "ISO-8601 datetime string",
    "incident_kind": <ID incident kind>,
    "incident_category": <ID incident category>,
    "status": <ID incident status>,
    "restriction": <ID incident restriction>
  }
}note- For details on variables you can use as parameters within your JSON object, see Configure Webhook Payload Variables.
- For information on additional fields, please refer to the Cloud SOAR APIs documentation.
- The preceding example shows an
ISO-8601 datetime string. For information about how to configure it, see parser documentation.
-
Click Save.