Introduction to Sumo Logic APIs
Sumo Logic has a host of useful APIs across all products that let you access data and perform actions without using the Sumo Logic UI. API calls can be used for to gather data, automate processes, and create custom reports.
This article is for users who are familiar with Sumo Logic features (collectors, queries, and security tools, for example), but new to working with APIs. You don’t need a development background to follow along. We’ll cover the basics so you can start making API calls to run queries and perform tasks.
In this article, you'll learn how to:
- Create a Sumo Logic access ID/key.
- Access Sumo Logic APIs.
- Use APIs with Sumo Logic's Cloud SIEM.
Create an access key
To use the Sumo Logic APIs you need a Sumo Logic access ID and access key. To do this, you need to log in to the main Sumo Logic web interface with a Sumo Logic user account that has the Create Access Keys role capability.
In this section, we'll walk you through creating a personal access key that you can use to access the API in the subsequent sections.
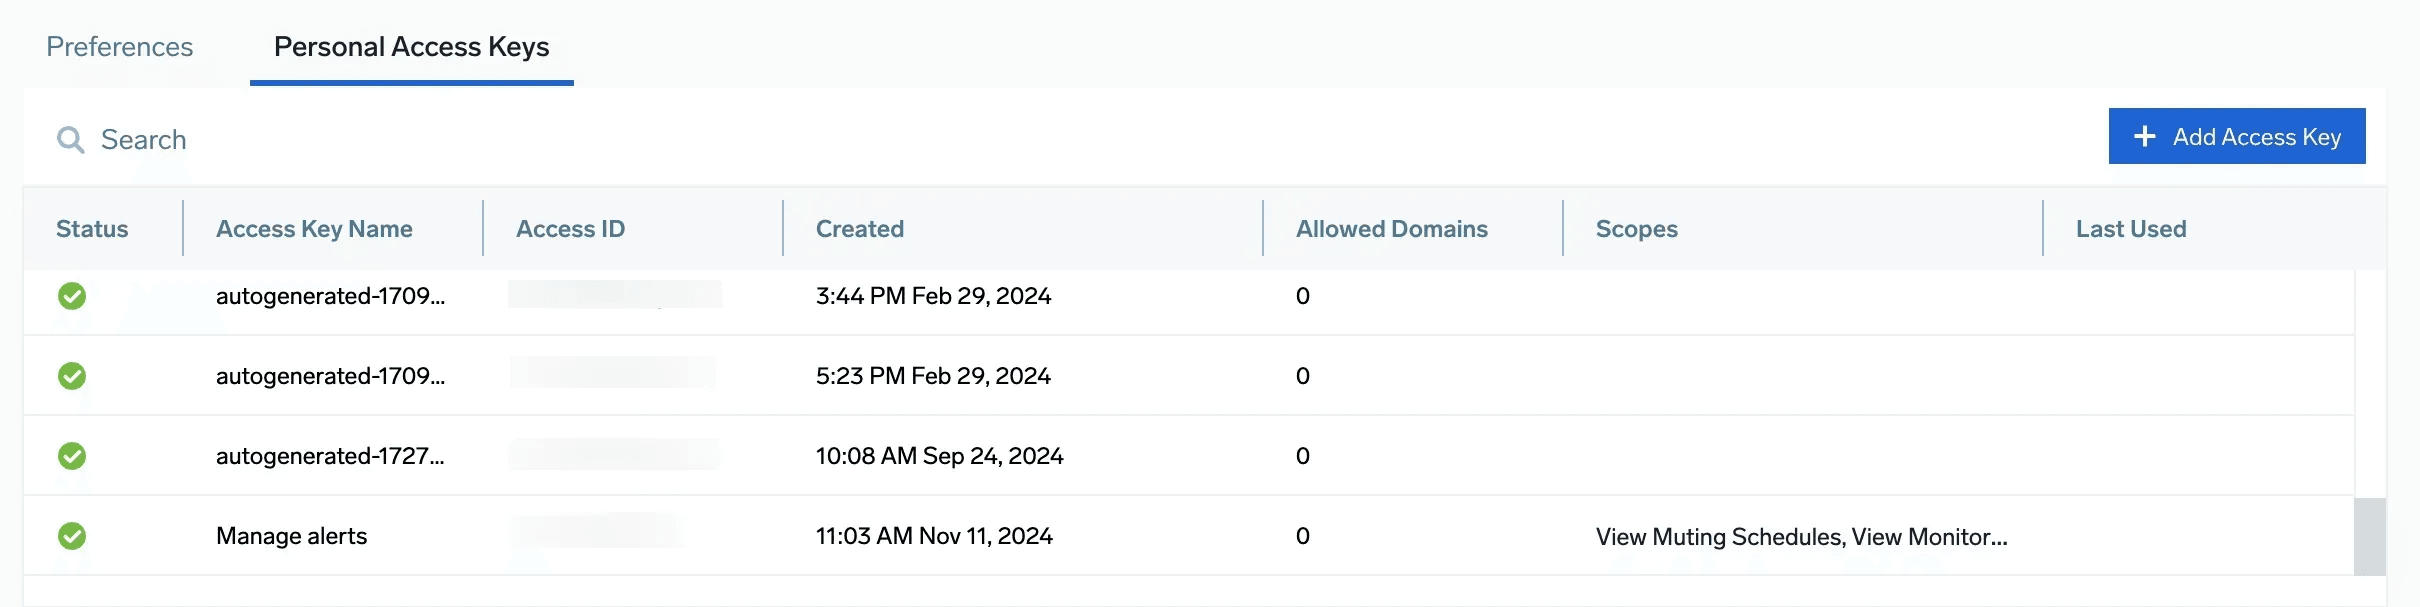
- In the main Sumo Logic menu, select your user name and then Preferences > Personal Access Keys.
- On the Personal Access Keys tab, click +Add Access Key in the upper right.
- Fill in a name for the Access Key on the following window.
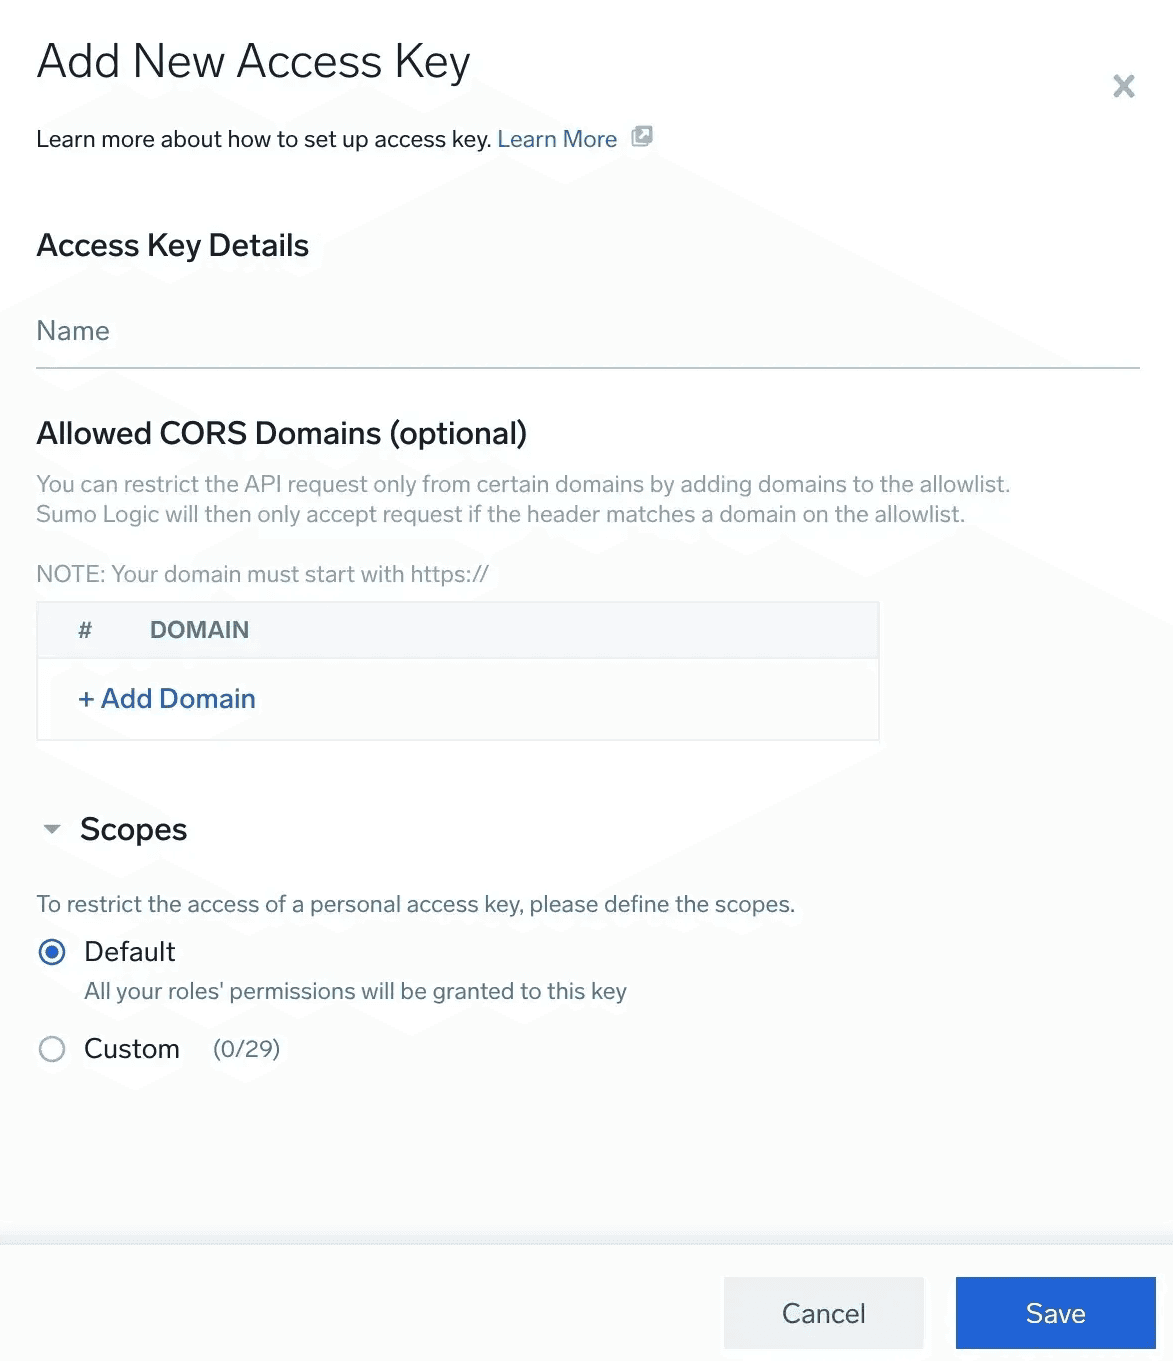
Note that the access key has the same privileges as the user creating the key. In other words, if your user account is not able to access certain products or areas of functionality in the Sumo Logic web site, you are not be able to access those functions through the API either.
You can reduce the privileges available to the access key by using the Scopes section to select a subset of the user account privileges to grant to the access key for API use. To do so, click Custom and select the desired set of View and Manage privileges from the list of user permissions given. - Click Save when finished.
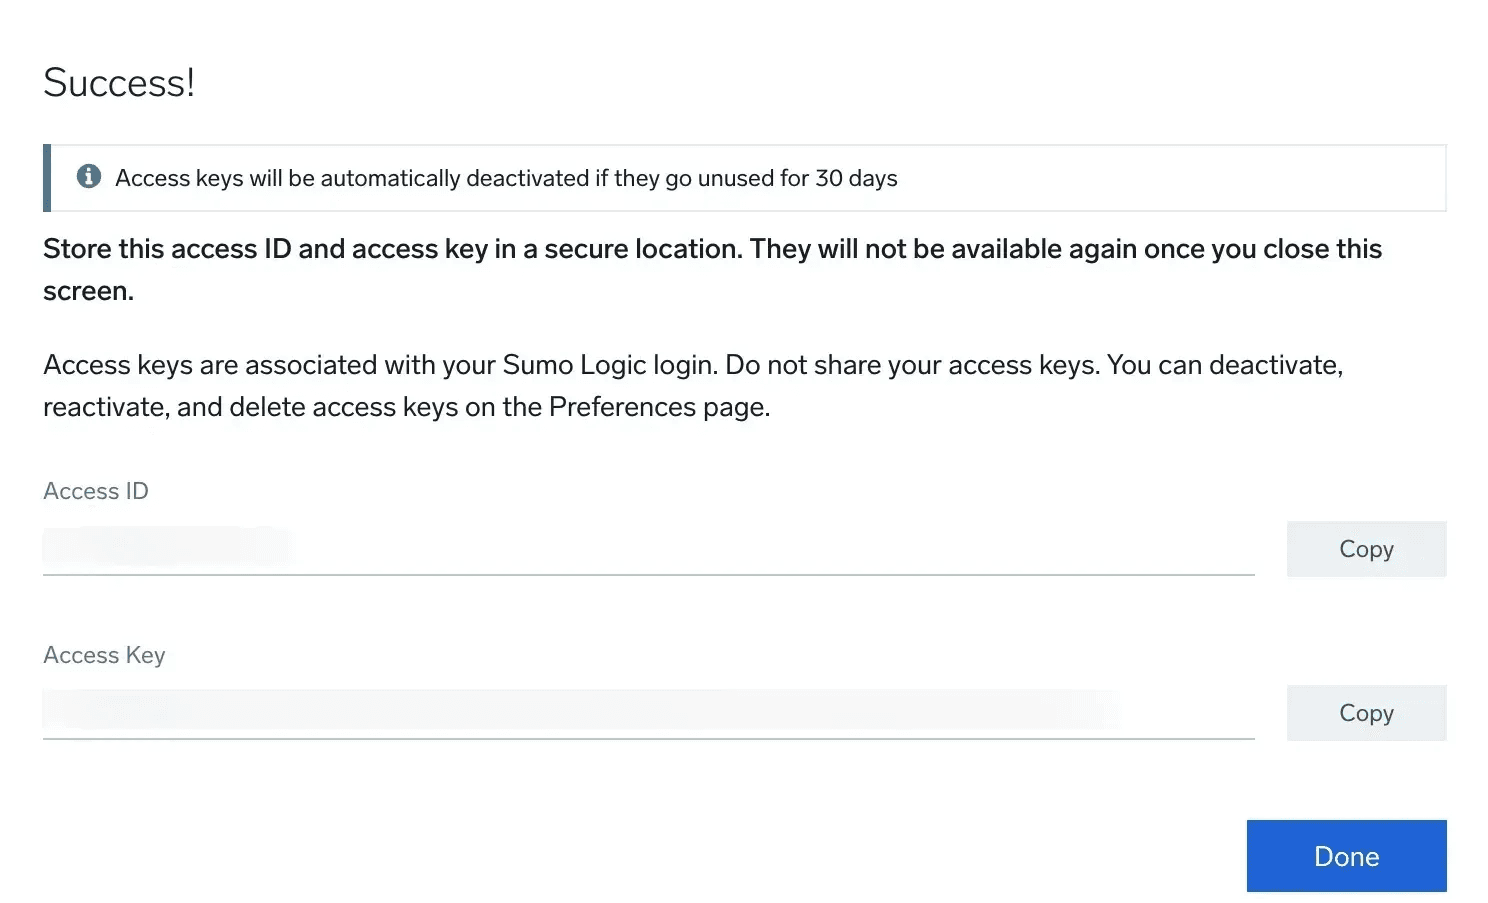
- On the following popup screen after clicking Save, your access ID and access key are displayed. These will not be available again once this screen is closed, so make sure you copy both the ID and key to another text file for reference before closing the popup. If you miss copying either the access values, find your access key in the list, delete it, and then recreate it.
A user with the Manage Access Keys role capability can create and manage access keys for other users in your organization. As an administrator, you can use the general Access Keys page instead of the Personal Access Keys page.
- New UI. In main Sumo Logic menu select Administration, then under Account Security Settings select Access Keys. You can also click the Go To... menu at the top of the screen and select Access Keys.
Classic UI. From the left menu, click Administration > Security, then select the Access Keys tab. - Click +Add Access Key in the upper right and create it using the same steps as above.
As with the personal access key popup, any displayed ID/key will not be available again once the display screen is closed, so make sure you copy both the ID and key to another location for reference before closing the popup. If you miss copying either of the access values, find your access key in the list, delete it, and then recreate it.
Making an API connection
Once you have an access ID and key, we can start making API connections and see the type of data we can access. First you need to determine the proper API endpoint for your area of the world.
Check API Authentication, Endpoints, and Security to find the proper endpoint URL to use. For instance, US users would use either https://api.sumologic.com/api/ or https://api.us2.sumologic.com/api/.
This article uses the standard US base URL for expediency, although if you are from a different area of the world, substitute your local base URL for api.sumologic.com in the example API calls throughout the following sections.
Sumo Logic API calls take the following form:
<API URL>/<version>/<command name>/<optional sub commands or parameters>
The <version> parameter looks like "v1" or "v2". Some command functions can only be run using a specific version number. Other commands can be run under multiple versions, although using the most recent version listed in the documentation is recommended, to provide the most up-to-date data fields and optimizations.
Check the API docs for a command in order to see the required (or recommended) version number to use. For instance, the complete command to retrieve a list of collectors in your system (in the US) would look like: https://api.sumologic.com/api/v1/collectors
Executing API calls
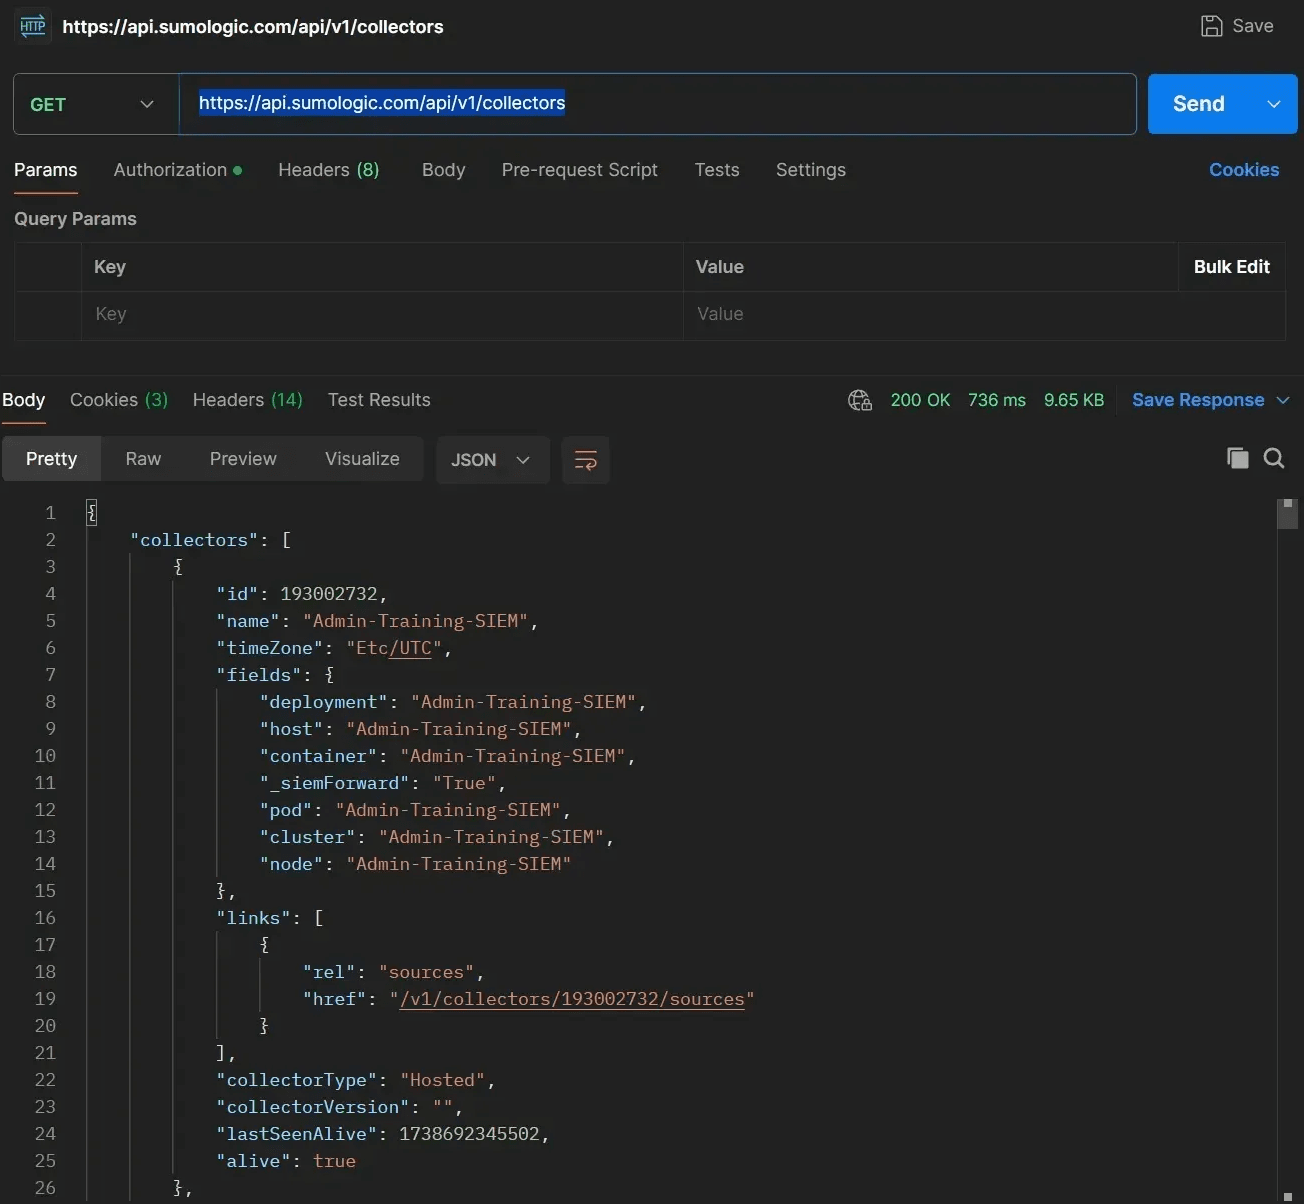
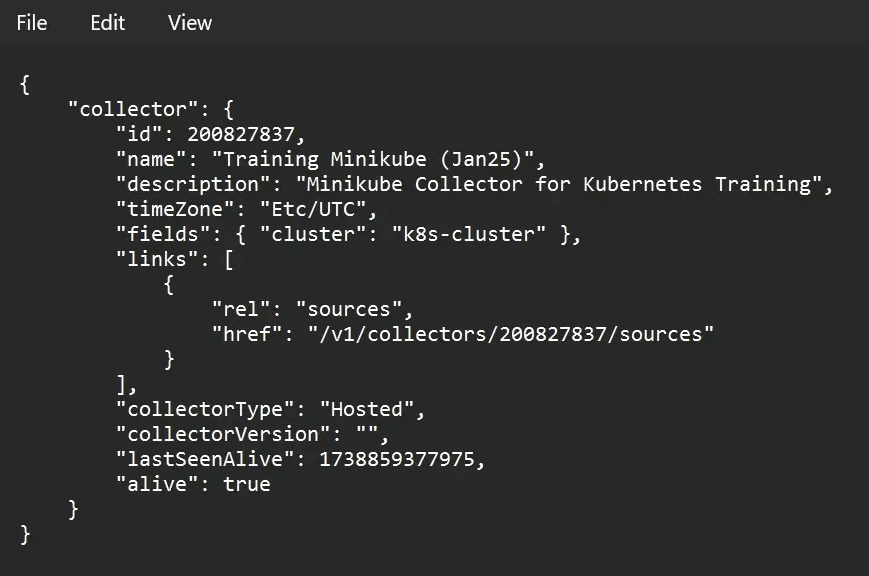
It is possible to make API calls from a standard web browser, just like visiting a website. Copy and paste the above URL to a web browser and press enter. Instead of bringing up a web page, you get a prompt asking for a username and password. Enter the access ID you created as the "user name" and the access key as the "password". If the access ID/key is valid, you'll see something similar to the following output:

Each collector is listed in detail within the API return data, which is in name/value JSON format. All the collector info such as ID, name, type, and version is listed for collectors in your system. This info can be parsed and saved elsewhere, or used as a reference for future queries or reports.
However, most API users do not use a traditional web browser for API calls, other than perhaps one-off queries for quick informational purposes. It would be tedious to have to manually enter the URL along with the user name and password each time if successive calls are to be made. More commonly, users make API calls through a command line interface (CLI), through an application designed for API testing, or through programming code or scripts.
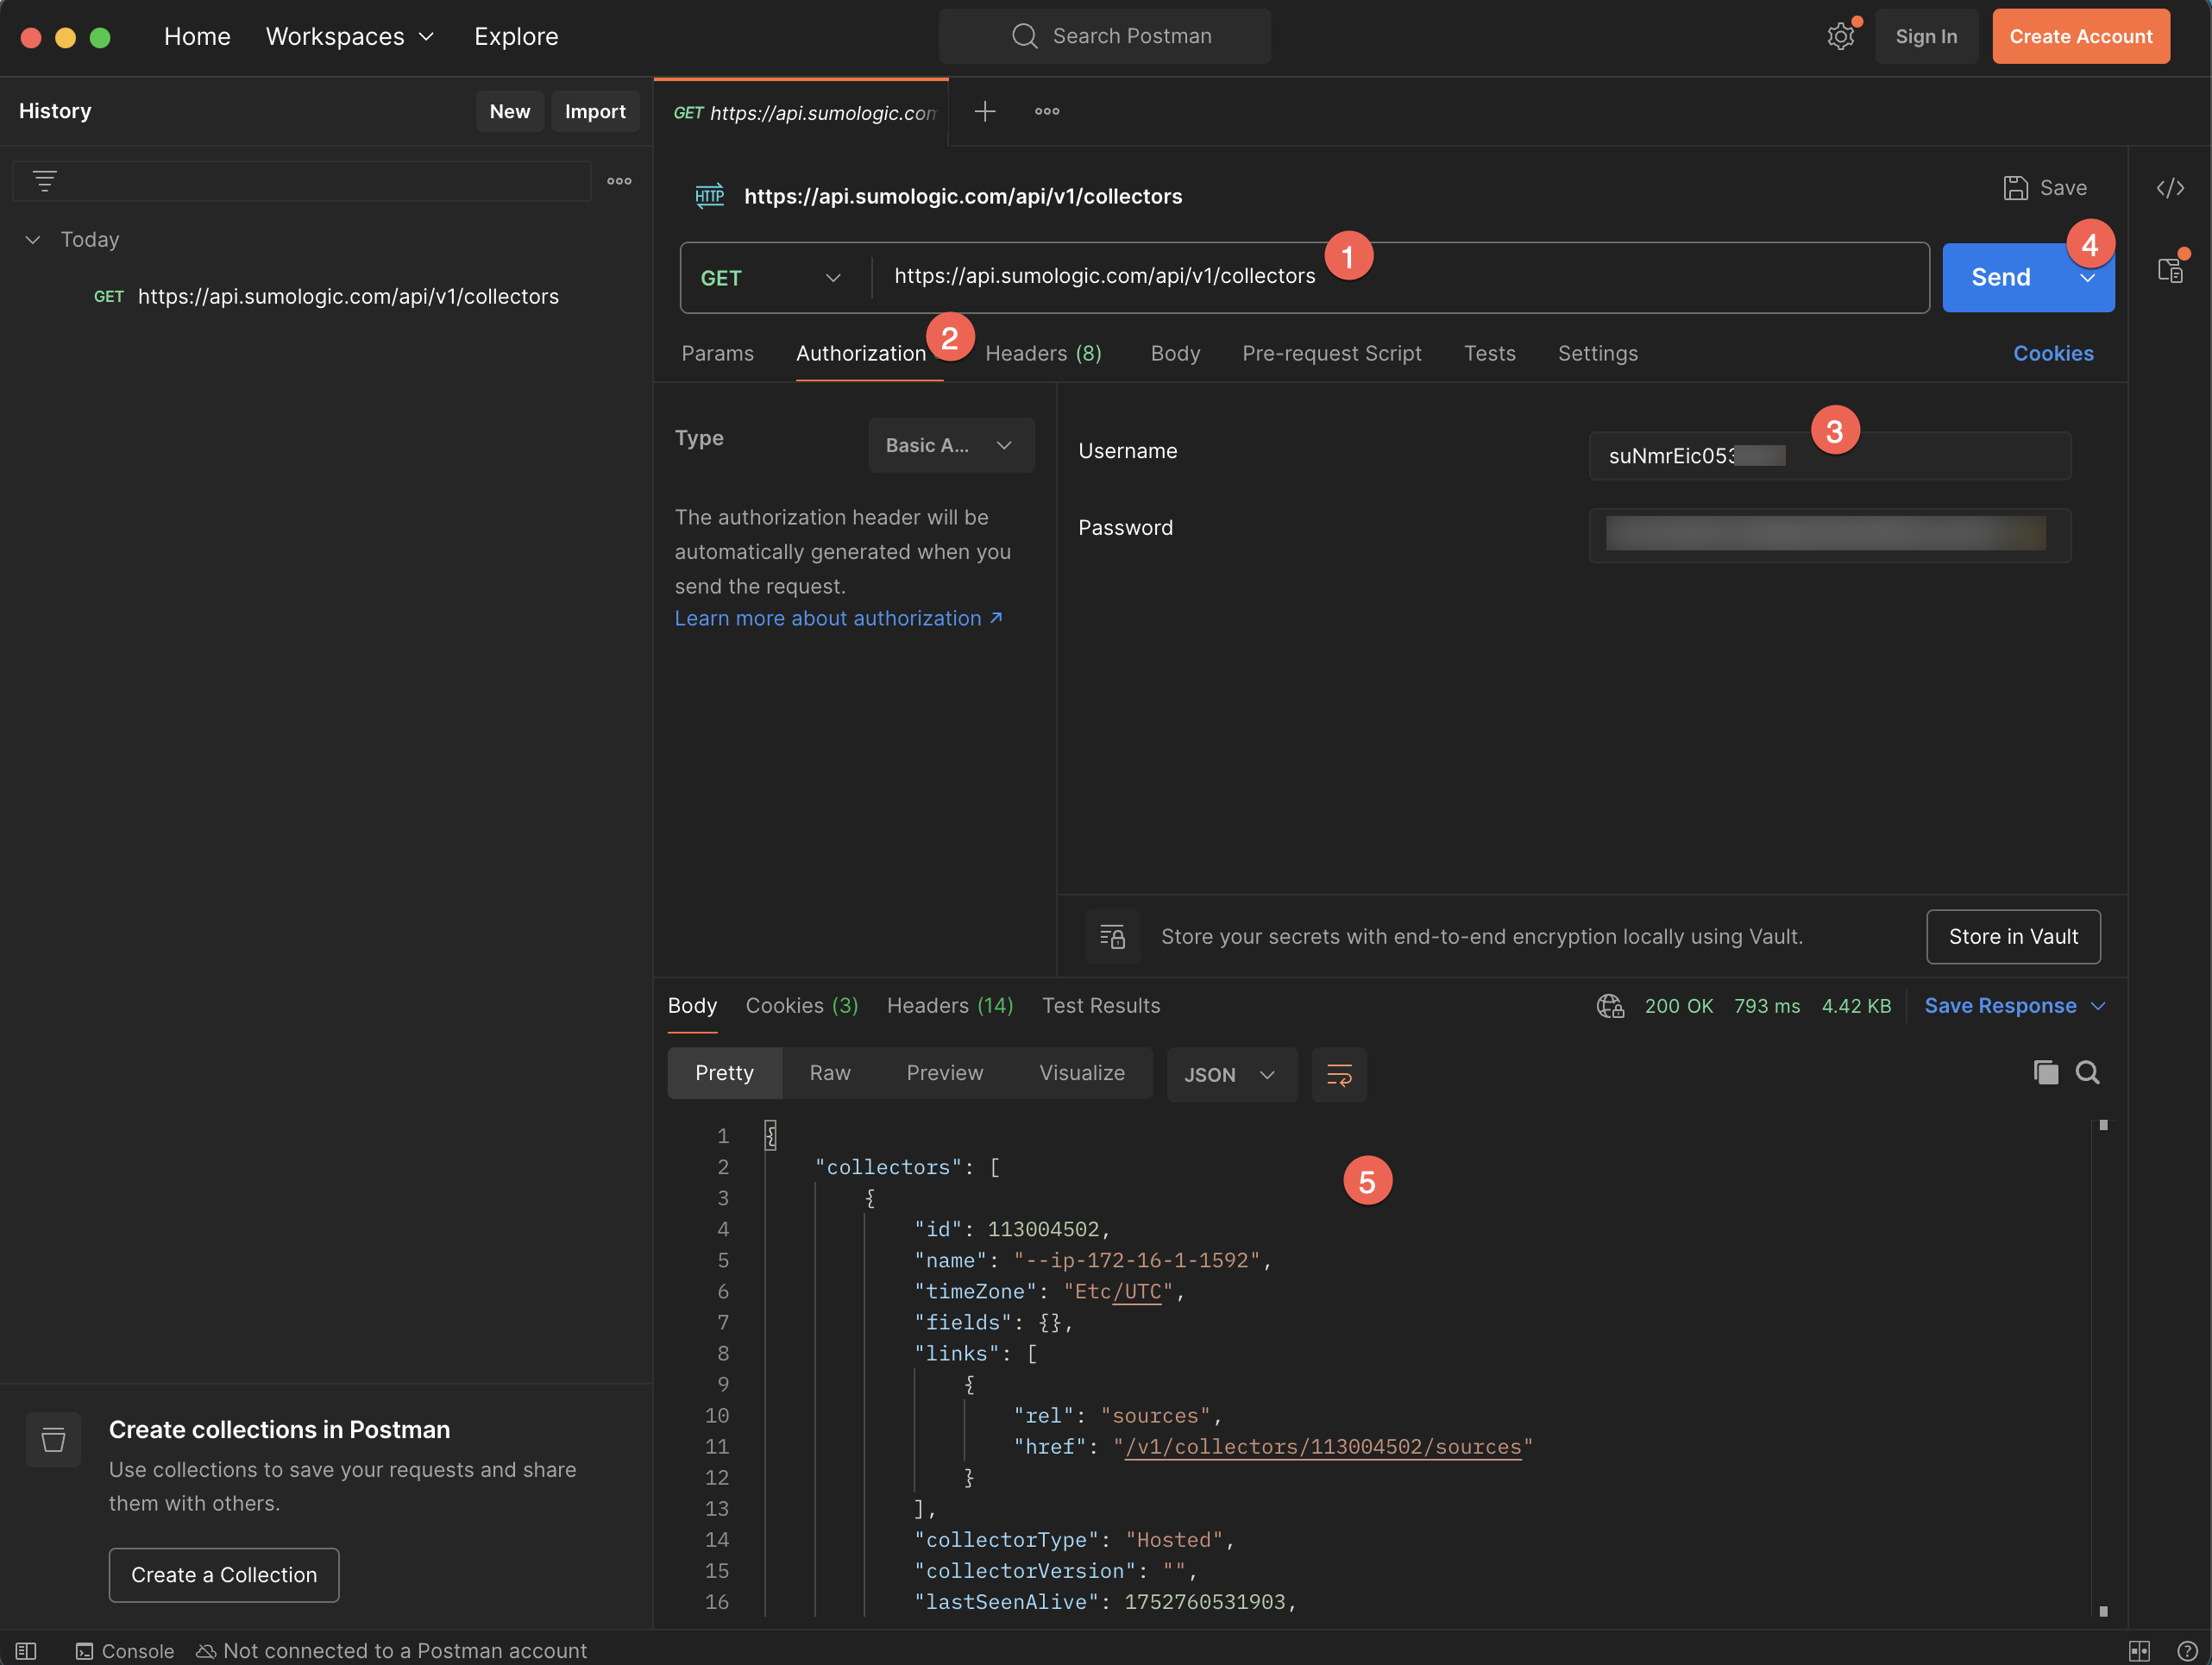
An open source application such as Postman can be a convenient tool for testing and developing with API calls. To use Postman, download and install the app. Then:
- Enter the URL for the API call.
- Click the Authorization tab.
- Fill in the username and password fields with your Sumo Logic access ID and access key, respectively.
- Click Send when finished.
- You see the JSON output (or error messages if there is a problem) in the bottom panel.
Most programming and scripting languages provide modules and libraries for making web service and API calls in code. For instance, the following Python code can make the same "get collectors" call programmatically using the requests library:
import requests
def get_collectors():
    url = 'https://api.sumologic.com/api/v1/collectors'
    try:
        response = requests.get(url, auth=('<ACCESS ID>', '<ACCESS KEY>'))
        if response.status_code == 200:
            collectors = response.json()
            return collectors
        else:
            print('Error:', response.status_code)
            return None
    except requests.exceptions.RequestException as e:
        print('Error:', e)
        return None
def main():
    collectors = get_collectors()
    print(collectors)
if __name__ == '__main__':
    main()
As you are learning how APIs work, we recommend setting up an API test program, then follow along with the API examples shown in the following sections. To execute API commands, you can use Postman as shown above, another API test application, or set up a quick code snippet in Python or the programming language of your choice.
Download the OpenAPI Specification
Optionally, you can download the OpenAPI Specification for the Sumo Logic API and import it to your API test application. This lets you view the full specification for all Sumo Logic APIs and run them directly from your testing tool.
- Select the API documentation URL for your deployment from the Documentation section of the API Authentication, Endpoints, and Security article. For instance, US users would access either https://api.sumologic.com/docs/ or https://api.us2.sumologic.com/docs/.
- Click the Download button at the top of the page.
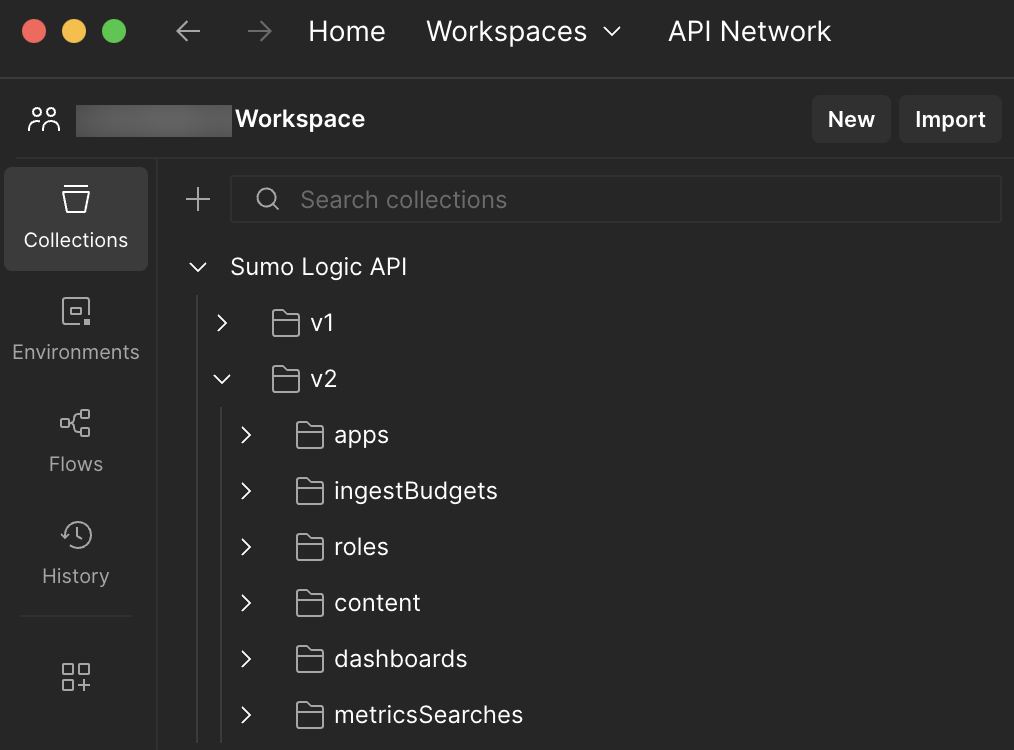
- Import the downloaded file to your API test application. For example, to import the file to Postman, select File > Import.
- The imported specification appears. Select any API to run it.
- You can also download the API specification for Cloud SIEM or Cloud SOAR from the following locations. Simply select the API documentation URL for your deployment and click the Download button at the top of the page:
Basic API GET commands
Retrieving system data and configuration is one of the most common use cases for utilizing platform APIs. These data retrieval operations are generally known as GET commands in reference to the "GET" verb used by the HTTP protocol. Data retrieved through API calls can be processed by outside applications and scripts for report generation and advanced analytics, extending functionality beyond that offered by the Sumo Logic website.
Let's examine the GET example shown in the previous section, where we requested the list of all collectors in the organization through the URL https://api.sumologic.com/api/v1/collectors.
(This article uses the standard US API URL for the examples. If you are in other areas of the world and want to perform these calls yourself, remember to substitute api.sumologic.com with the URL appropriate for your region.)
Note that the data retrieved can give us a lot of information about the collectors in our system: name, type, whether it is active (alive), etc. Taking note of the collector ID allows us to make targeted API calls to get only the info about specific collectors. We can do this by appending the ID to the URL as an additional parameter:
https://api.sumologic.com/api/v1/collectors/<collectorID>
Note the first ID from your list or the sample ID shown above from the Sumo Logic environment. Create a new API call using the above URL format with the chosen ID in place of <collectorID> and run it.

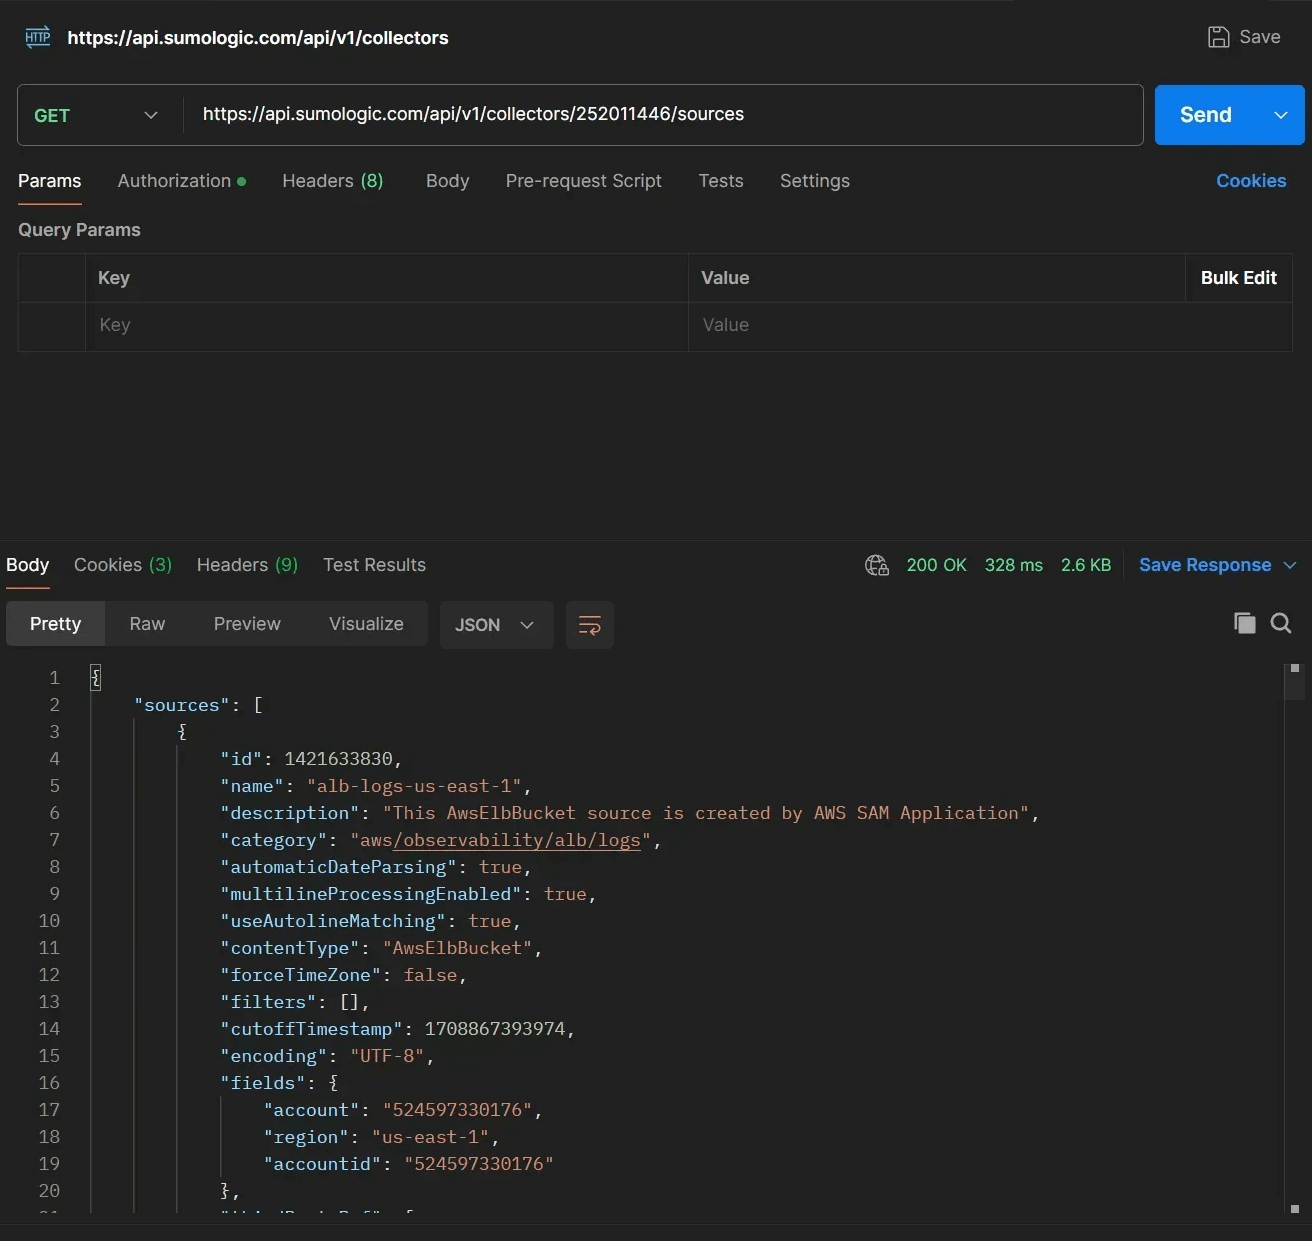
Note that the collector data itself also contains a helpful follow-up link to analyze the sources currently configured for our chosen collector. Follow up by clicking on (or copying into the URL field) the given URL for sources:
https://api.sumologic.com/api/v1/collectors/<collectorID>/sources
This set of API calls allows for configuration collection through code or scripting. For instance, you might:
- Get the list of collectors with an API call.
- Save the list for backup purposes and note the collector IDs listed in the JSON feed.
- Use the individual IDs to query some or all of the collectors for source information.
- Generate custom reports or answer configuration questions:
- Do I have any collectors or sources that aren't working (
alive = "false")? - Which collectors or sources are using a particular auth type or account credentials?
- Do I have any collectors or sources that aren't working (
Using API calls for custom reports can save time (and thus money) by automating data queries without requiring operators to manually look up collector data or status through the web interface.
Sorting and filtering
"GET" calls through the Sumo Logic API have the ability to do sorting and filtering through query parameters directly through the URL. Query parameters are extra values added to the end of an API call using the following syntax:
<URL>?<name>=<value>
Multiple parameters can be appended to the end of a URL using the ampersand (&) character:
<URL>?<name1>=<value1>&
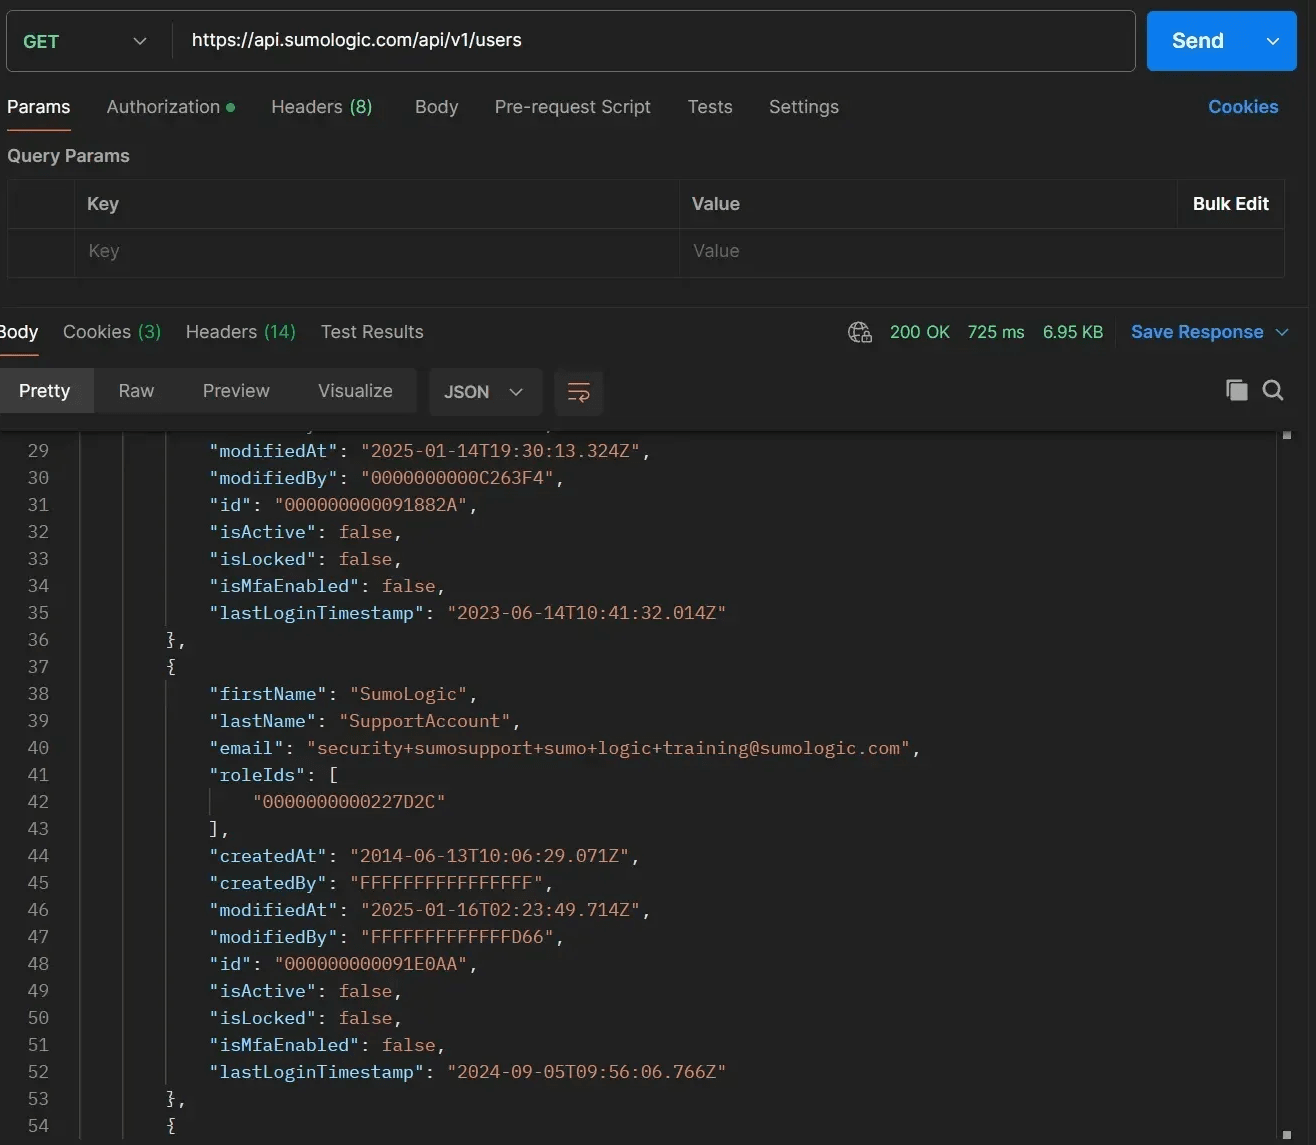
As an example, let's look at another common API call, to get the list of current users. We'll use the following base URL for this GET call:
https://api.sumologic.com/api/v1/users

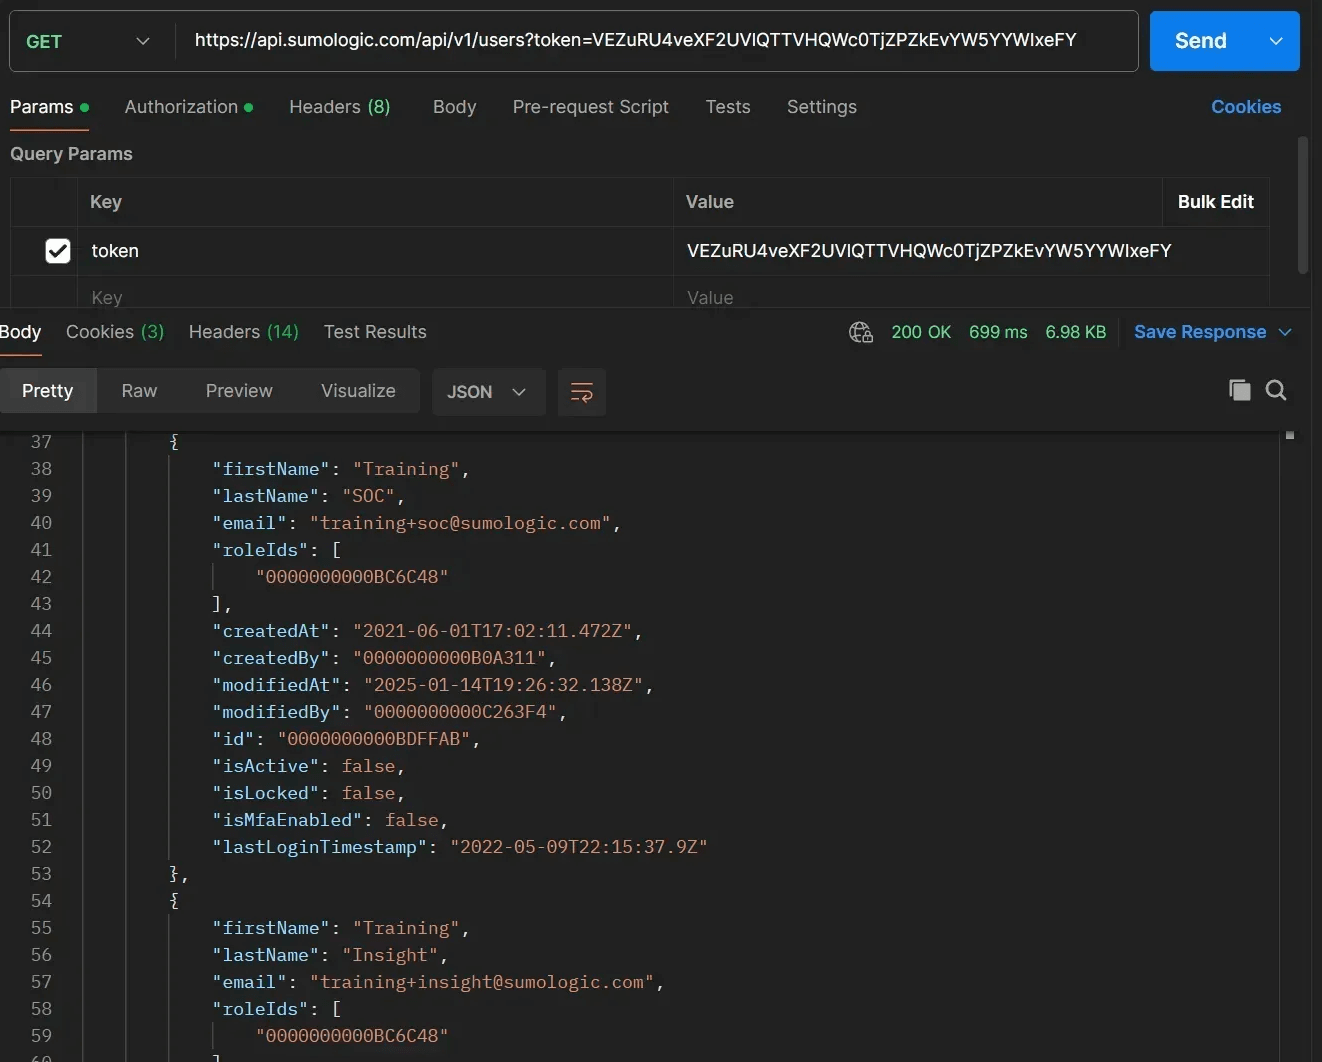
In order to ensure it processes and returns in a timely manner, an API command has an internal limit to the number of data entries to return, in cases where the source data is very large. The specific limit differs depending on the API command. The limit is 100, for instance, when querying users, but 1000 for collector queries. If the total number of entries exceeds the limit for the API command, the response returns in "page" form, where the first N entries (up to the limit) are returned, with a special "next" token added to the JSON response at the end.
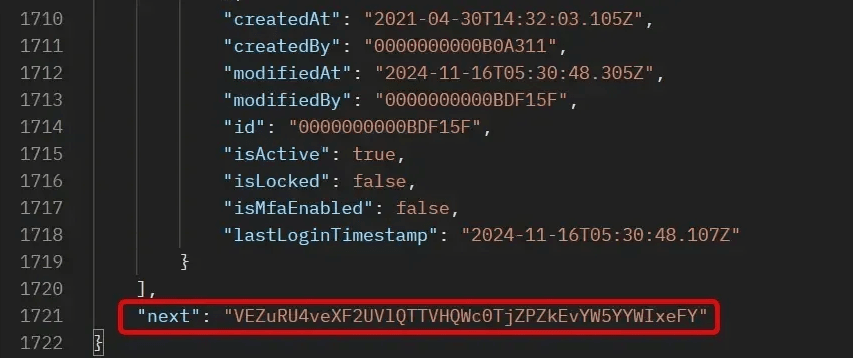
Add this token value to the following API call to get the next "page" of data, up to the limit again:
<URL>?token=<next token>
In the screenshot below, we are using the provided "next" token from page 1 to get page 2 of the users (users #101 - 200)
Once you've reached the last page, the "next" value will be null, marking the end of the available data. Using this process, you can code or script a series of API calls in sequence to gather large amounts of data, page by page, using each "next" token in sequence until data is completed.
If the number of entries returned per page is still too large and unwieldy for certain operations, you can change the page limit manually by adding a query parameter limit:
https://api.sumologic.com/api/v1/users?limit=20
With this command, the API response returns only 20 users per page.
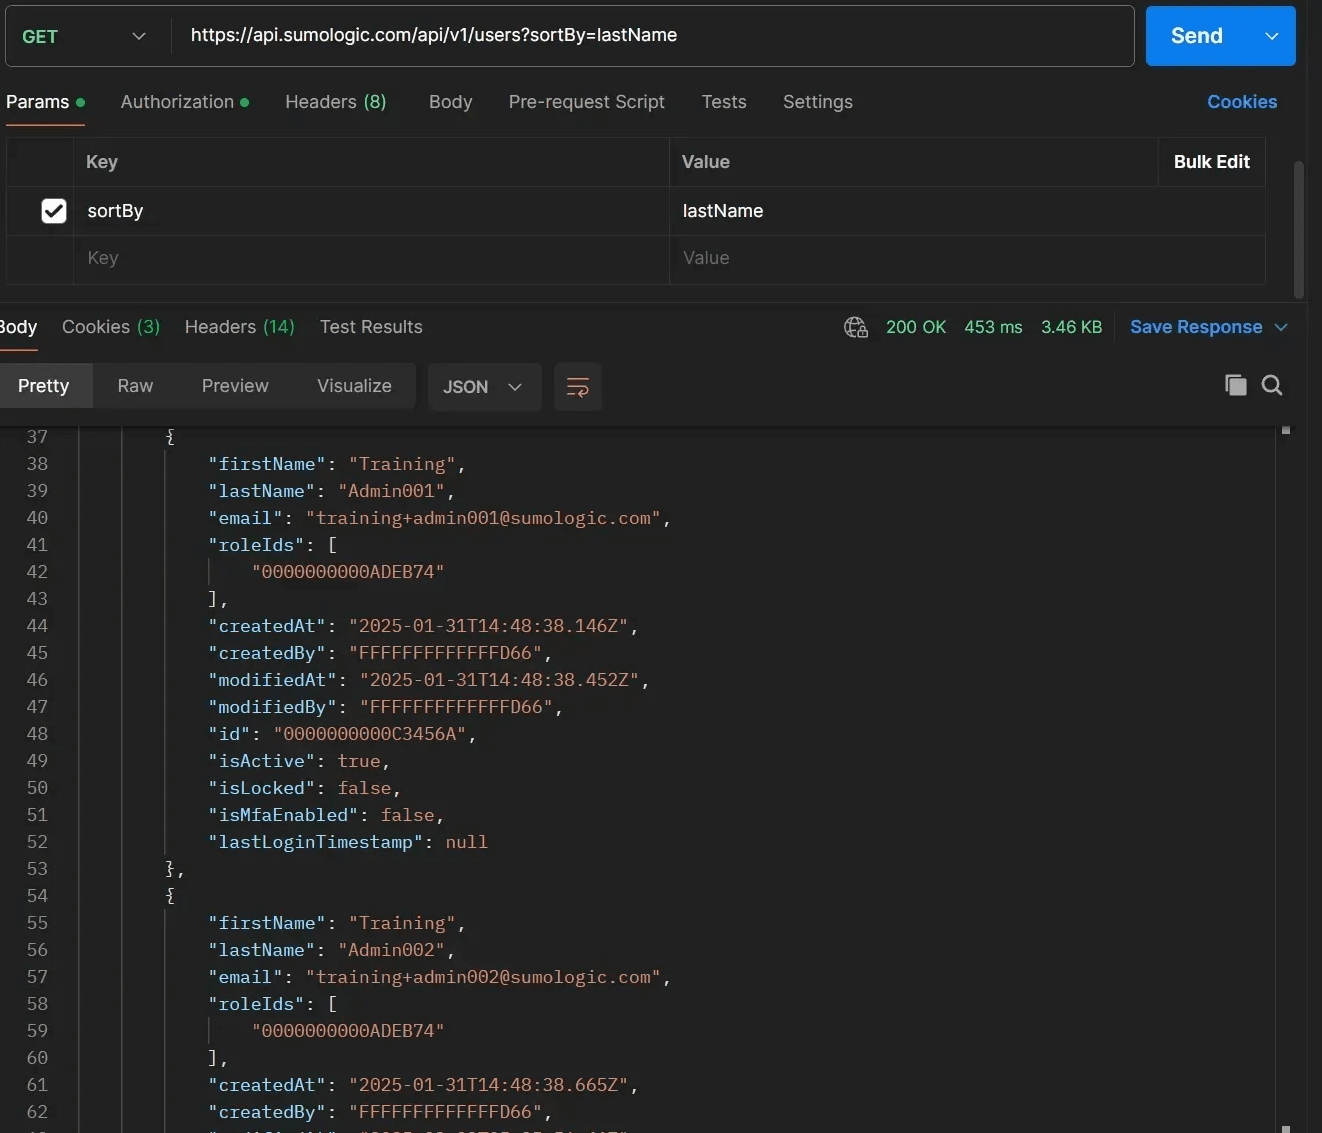
Return values can be sorted by adding a sortBy parameter with a field name. (Not all fields are supported for sorting. Check the Sumo Logic API documentation for your specific command to see the sorting options).
https://api.sumologic.com/api/v1/users?sortBy=lastName
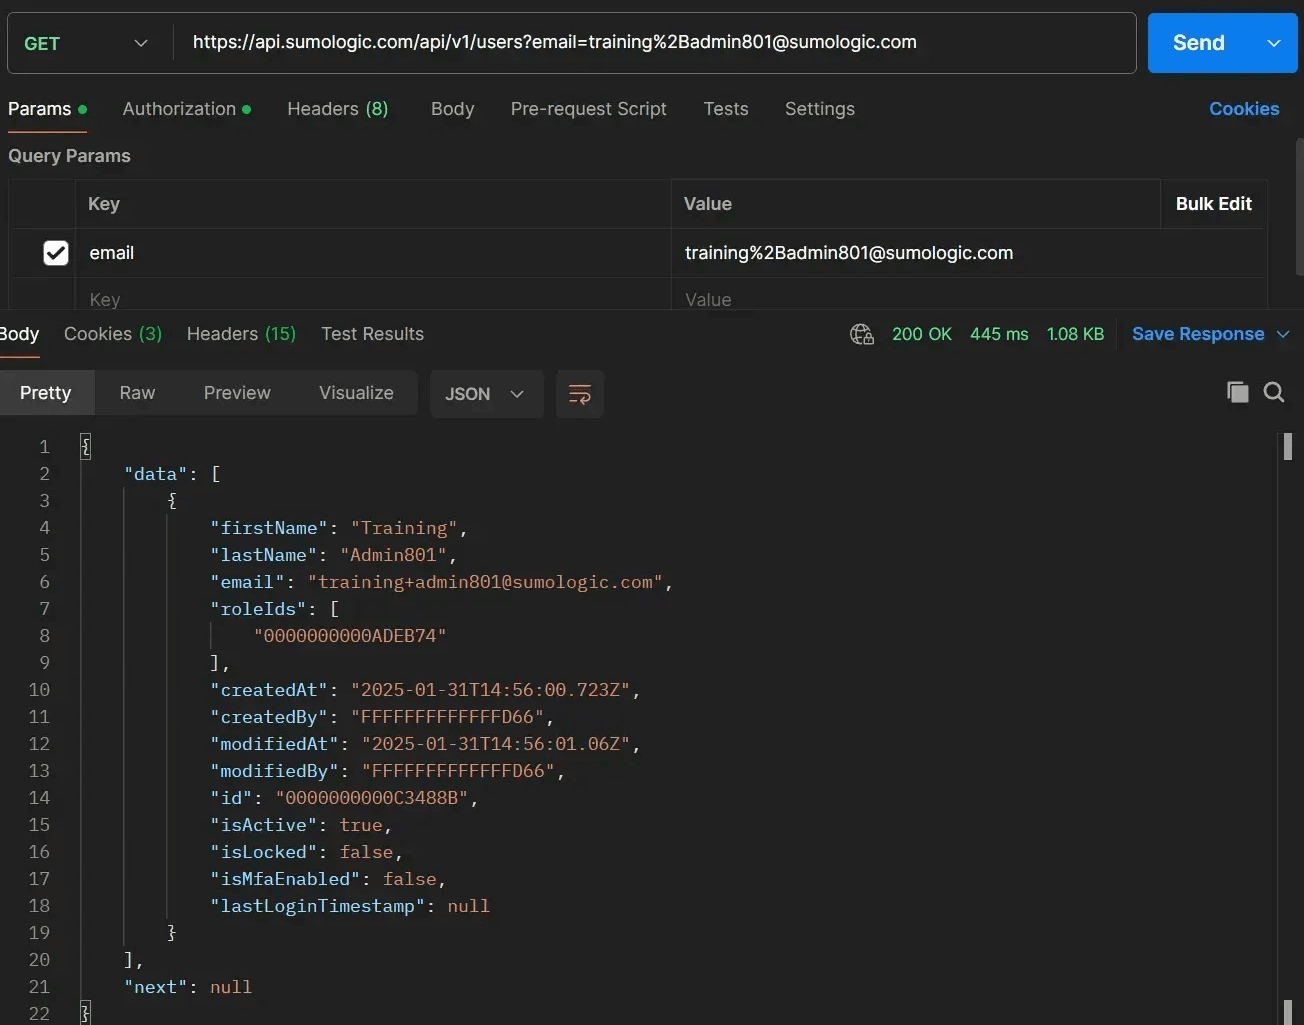
You can search for entries that match specific values by including the field name and the value to search for as a query parameter. For instance, to search for the user entry for a specific email, you would use the URL:
https://api.sumologic.com/api/v1/users?email=<email to find>
- Not all fields in a data object are eligible to search for directly. See the Sumo Logic API documentation for the fields that can be used for searching.
- Search parameters need to use proper HTML encoding for special characters including spaces. For instance, use
%20to represent a space and%2Bto represent a "+".
Modifying an existing object
While GET commands to retrieve data represent the most common use case for APIs, you may have need to change existing objects in your system. Modify operations can also be done through API commands, although the preparation and process is a little different.
If you want to edit objects through the API, you need to have the proper privileges through the regular Sumo Logic website. If you don't have access or permission to change something in the main web interface, you won't be able to do it through the API either.
Modifying a collector
For an example, let's suppose we want to change the name and description of an existing collector in our system. We've seen we can request the current configuration details of a collector through the following URL:
https://api.sumologic.com/api/v1/collectors/<collectorID>
And here's the URL to use if we want to modify an existing collector:
https://api.sumologic.com/api/v1/collectors/<collectorID>
Wait...isn't that exactly the same URL? How can we use the same URL for two different and distinct operations within an API?
The difference is with the HTTP protocol. Retrieving data from an API call uses an HTTP "GET" command. GET is one of the most common HTTP "verbs", but not the only one. When we are modifying data rather than requesting data, we use the HTTP "PUT" verb instead, to indicate that we want to "PUT" new configuration data in place of that collector ID rather than "GET" the current data. Labeling our HTTP command with an alternate verb allows the API to differentiate our intent, even though the target URL is the same.
Before we can do that, though, the first step to modifying a collector is to perform a normal GET command and retrieve the current configuration for that collector:

When we are changing configuration details, we don't make individual requests for each field like name or description, but we provide the new (complete) configuration for that collector in its entirety. This means we can make multiple changes (if needed) to our collector at the same time without making multiple API calls. We will be providing the entire configuration which will overwrite any and all fields from the original configuration that are different.
To do this, we need to provide a correctly formed JSON configuration for the collector to modify. Because it can be easy to make a formatting mistake or typo when creating collector JSON, it is recommended to copy the original configuration JSON from our GET command to another text editor to make our changes:
In the text editor, we can make one or more changes to the configuration (even including adding fields that weren't present in the original configuration), while keeping the original JSON format and structure intact. In the above example, we've changed the name of the collector, added a description field, and added a cluster value to the "fields" property.
Understanding ETags and object integrity
We're almost ready to change our collector configuration in the API. However, we are still missing one important piece of information.
Many modern APIs (including Sumo Logic) provide protection against multiple sources changing object configurations at the same time. It is possible that during the brief period of time between when we executed our GET command to retrieve the current collector configuration and when we execute our PUT command to change the configuration, some other source has used the API or the website to change the collector configuration in other ways. The Sumo Logic API is configured so that you need to guarantee that the collector configuration has not changed in the interim before it will allow any new changes to be accepted.
We do this through a unique ETag value that is provided whenever an individual data object is retrieved using a GET command. The data object's ETag will change whenever the object configuration changes, so matching ETags between the GET and PUT commands ensures that the object has not changed in the interim.
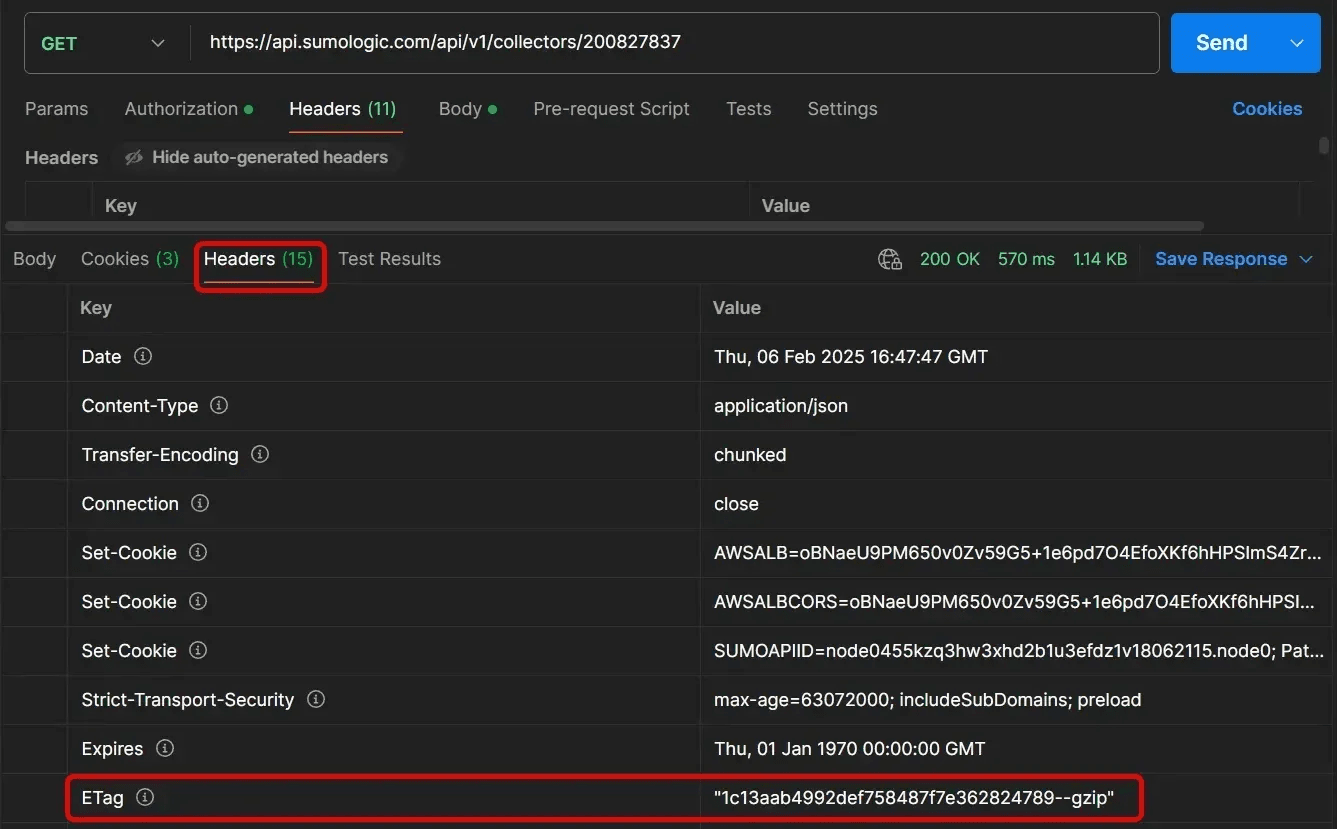
The ETag for a GET command in Postman can be found in the Headers section of the HTTP response, as shown in the screenshot below. If you are using other methods to make API calls, you need to access the ETag in the response object through code or script statements, or if you are using CLI commands you need to execute your GET command with the proper flags (such as -v) according to your CLI documentation to provide and view the ETag.
For reference, copy the given ETag (including the double-quotes) to a separate text editor to use momentarily.
Creating a PUT command
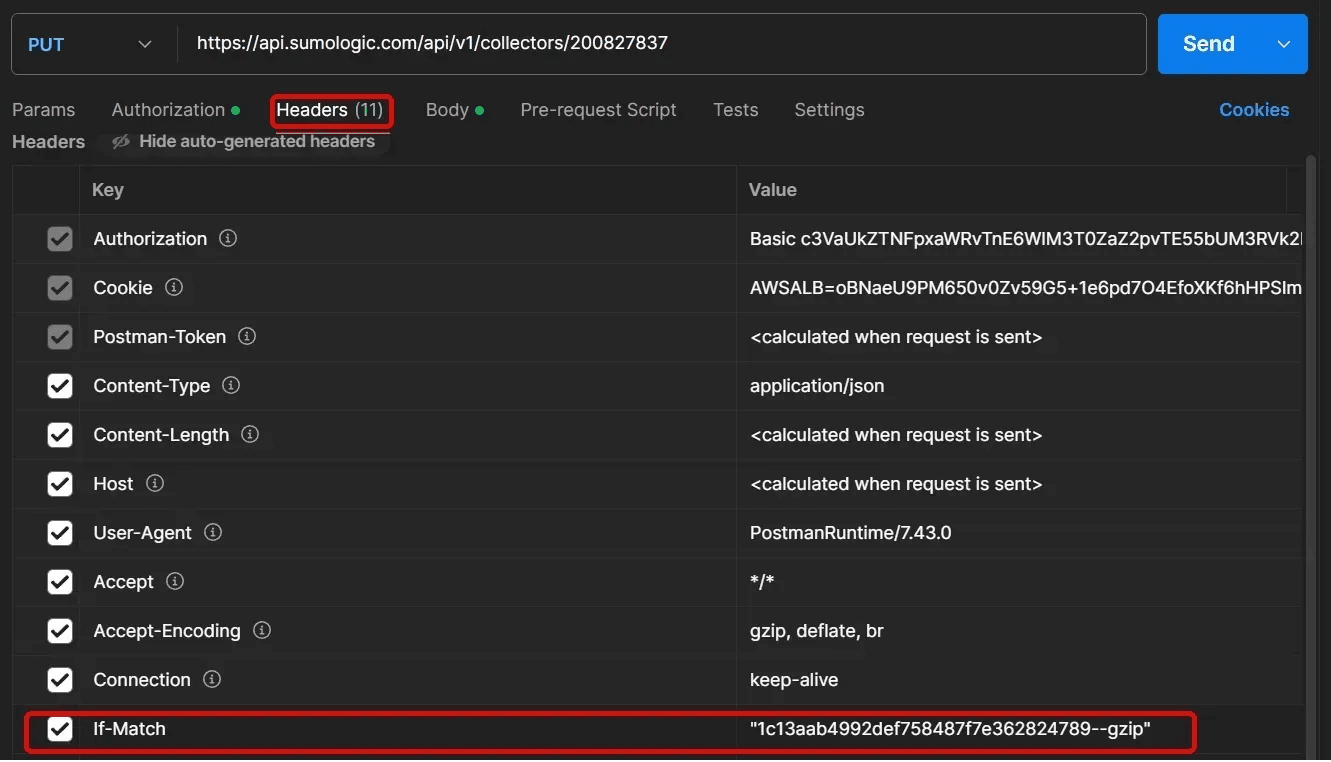
We are now ready to execute our modify command. Set the HTTP verb (in code, in your app, or in your CLI command) to "PUT". (Remember the URL is exactly the same as the GET command, just with a new HTTP verb.)
We'll need to provide in our HTTP request the new configuration for this collector object. We'll do this by copying the JSON from our text editor with our desired changes into the body of our request.

As discussed earlier, we need to provide the ETag from our GET command to ensure that there are no interim changes that would cause our modifications to be rejected. Either through code or through the app, we will add an IF-MATCH header to our PUT command with the ETag value (remember to keep the double-quotes).
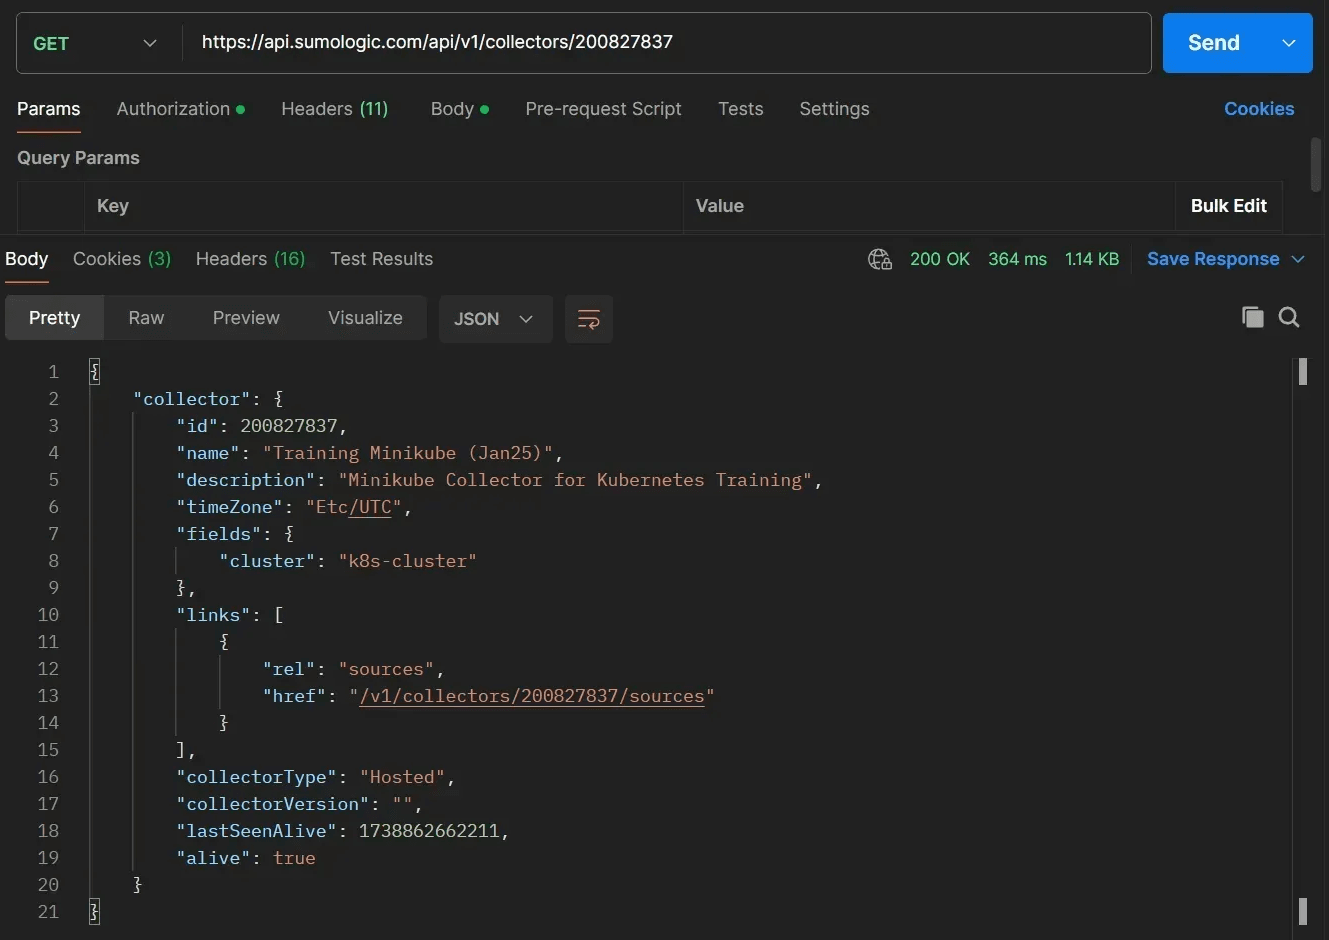
With these elements in place, we are now ready to execute the PUT command. If the command is successful, we will receive an "echo" of the new configuration as the response body. If something is not configured correctly (the new configuration is not properly formed, or the ETag doesn't match, for instance), you will see an error message as the body of the response instead. You can always check the changed configuration through another GET command (or through the website) to ensure that the changes were accepted.
Creating a new object
API users frequently want to create their own data objects through the API in addition to modifying the existing ones. Sumo Logic supports object creation through the API in the same way as viewing and modification. In this instance we will be using the "POST" HTTP verb. Sumo Logic conforms to general API standards across the software industry where POST is used for creation commands, while PUT is for modification commands. Note, however, that some commands don't fit nicely into one category or another so always check the Sumo Logic API documentation for the official verb to use when sending a command.
As an example let's look at creating a new user. We saw in an earlier section that we can retrieve the list of users in the system through the following URL:
[GET] https://api.sumologic.com/api/v1/users
As we've learned, we can use the same URL for multiple commands just by changing the verb. In this case, we will use the same URL to create a user, just with the POST verb instead.
When we edited an existing data object, it was easiest to do a GET query and copy the exact format and fields in order to make modifications (and in addition we needed the GET ETag in order to get the system to accept our changes).
When creating a new object we don't need to worry about object integrity, so ETags aren't necessary. Also, many fields in the user object (such as the ID, createdAt, lastLoginTimestamp, etc.) are created and managed by the system, and are not required (nor available) to be set by the operator. Thus when creating a new object, there are usually only a limited number of fields that need to be provided, with the system generating and updating the rest.
We can check the Sumo Logic API documentation for the "Create a new user" command for the exact details we need:
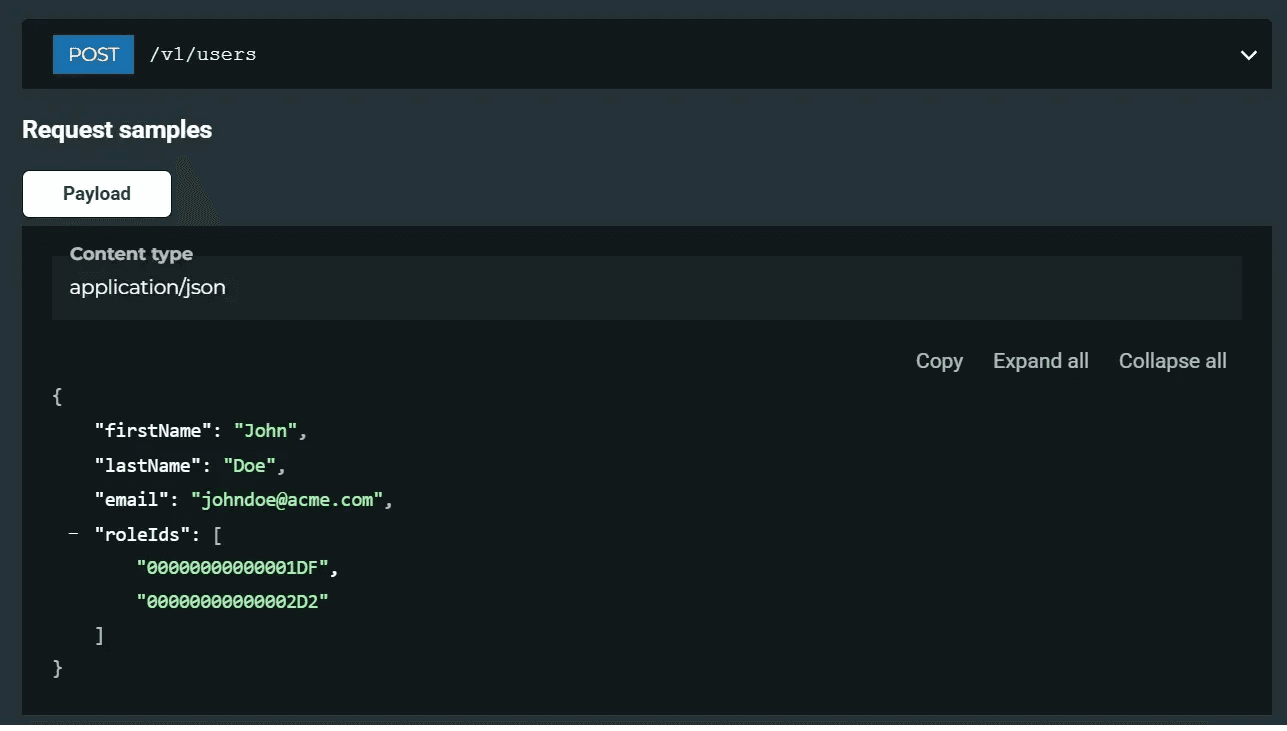
It can be helpful to copy the exact format from the documentation to a separate editor in order to fill in the proper fields, in this case, first name, last name, email, and any role IDs.
How do we determine the role IDs? The list of available roles in the system can be fetched through another API call:
[GET] https://api.sumologic.com/api/v1/roles
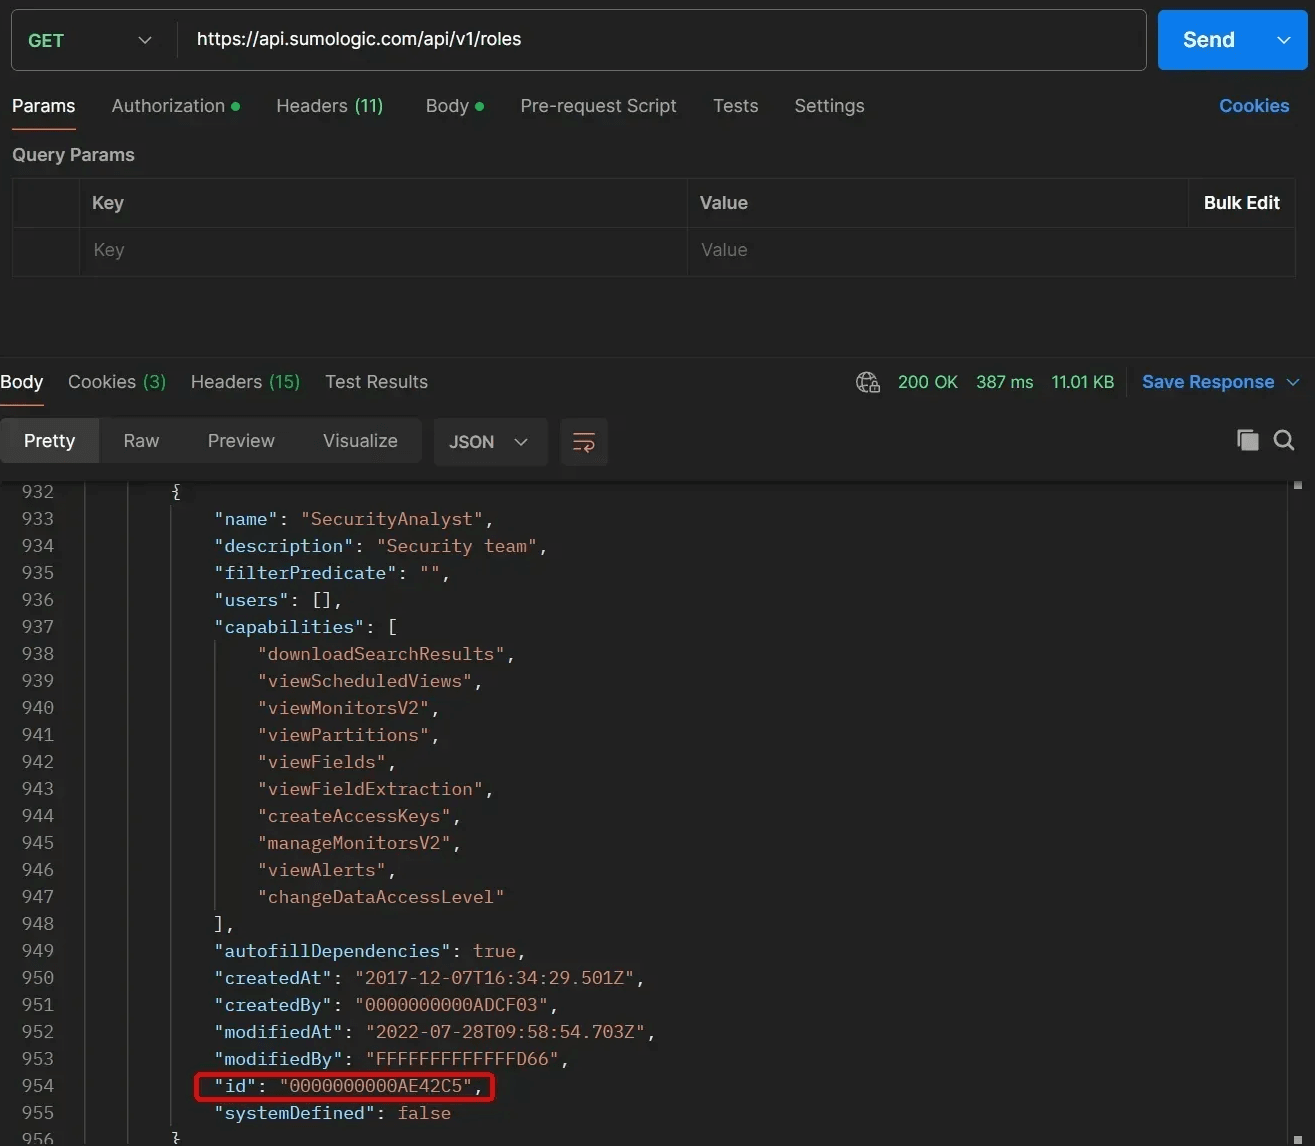
With this query you can find the appropriate roles for the new user and copy the IDs. Alternately, you can find an existing user that has the same permissions as you want the new user to have and copy the same role IDs from their user record.
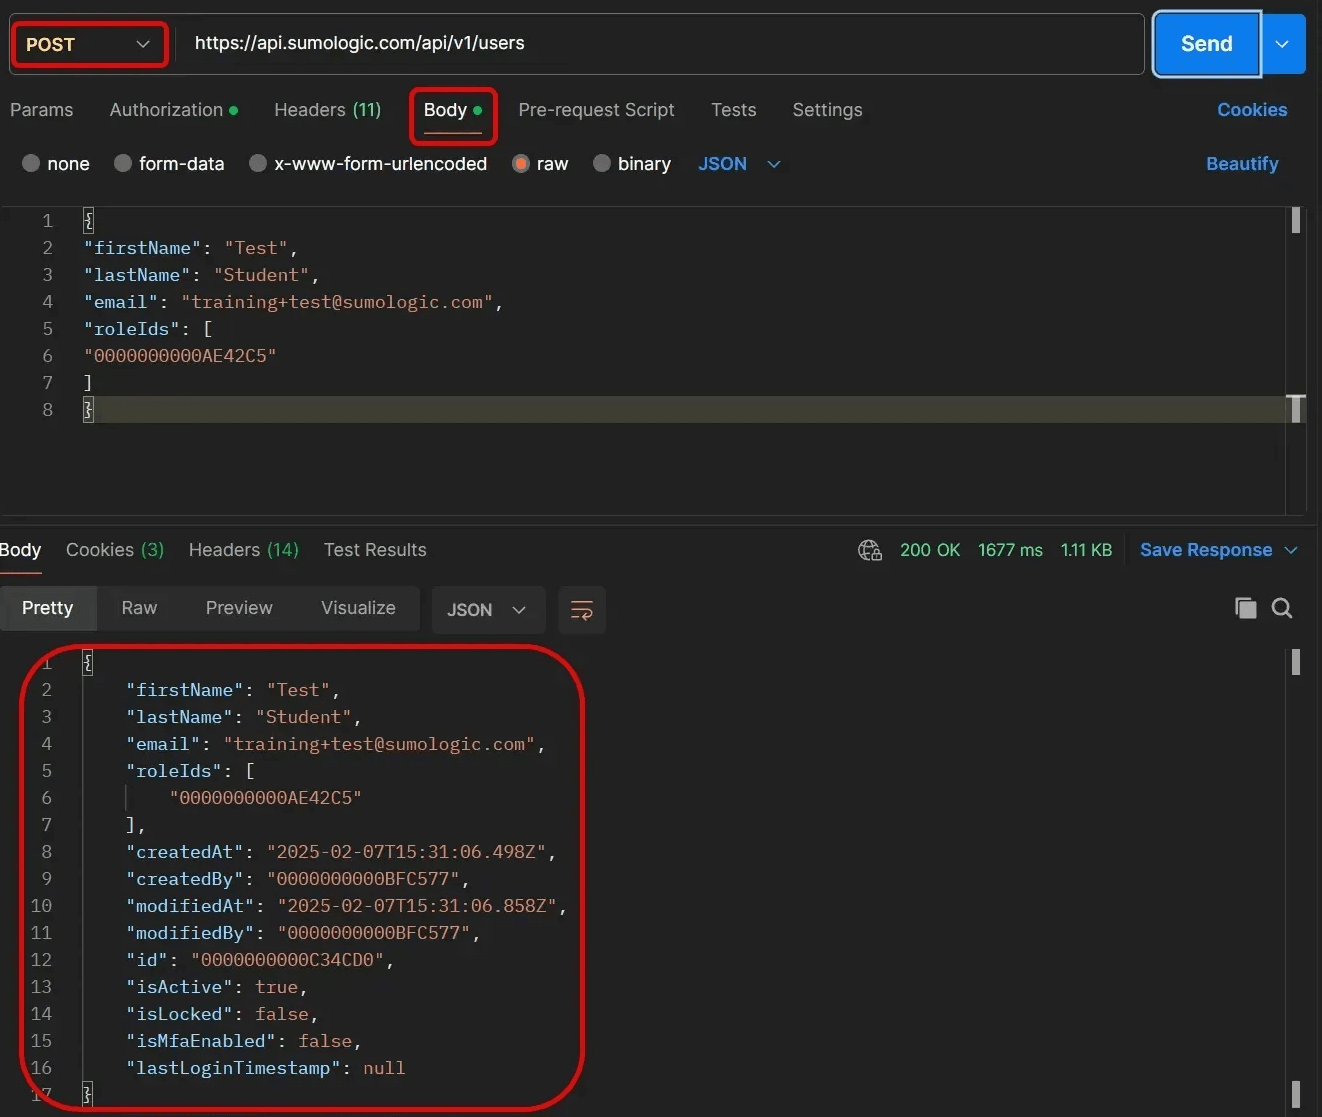
Using this info, we can formulate the JSON with the new user details, and paste it into the body portion of our new request. (Remember to set the HTTP verb to "POST") If the command succeeds, you will see the new full user record in the body of the response, with the additional fields (including the new user's ID) filled in by the system.
A few important notes to keep in mind if you plan on creating and managing new users through the API:
- New users will still require account activation, whether they are created through the API or through the website. Sumo Logic will send an activation email to the email address specified in the new user entry to activate the account. The email will be sent automatically if the "create user" POST command succeeds.
- If for some reason you need to resend that activation email, you do not need to delete and recreate the user entry in the API. Sumo Logic supports a separate API command to resend confirmation emails, provided you know the user ID (which you can get through the API response to the POST command above):
[POST] https://api.sumologic.com/api/v1/users/{userID}/resendWelcomeEmail - Existing user details can be modified through the API through a PUT command sent to:
[PUT] https://api.sumologic.com/api/v1/users/{userID}
Note that only first name, last name, and role ID(s) can be changed through this command. If you need to change a user's email address, this is done through a separate API command:
[POST] https://api.sumologic.com/api/v1/users/{userID}/email/requestChange
Using this command triggers another activation email, sent to the new email address designated in the body. - Password resets for users can be done through another separate API command:
[POST] https://api.sumologic.com/api/v1/users/{userID}/password/reset
Check the Sumo Logic API documentation for "Users" for the proper body format for each of the above POST and PUT commands, to ensure that the right fields are included and in the right JSON format.
Deleting objects
API commands can be used to delete data objects from the system just like creating or modifying objects. Deleting data objects typically use the HTTP "DELETE" verb, using the same process (and often the same URLs) as the other HTTP verbs.
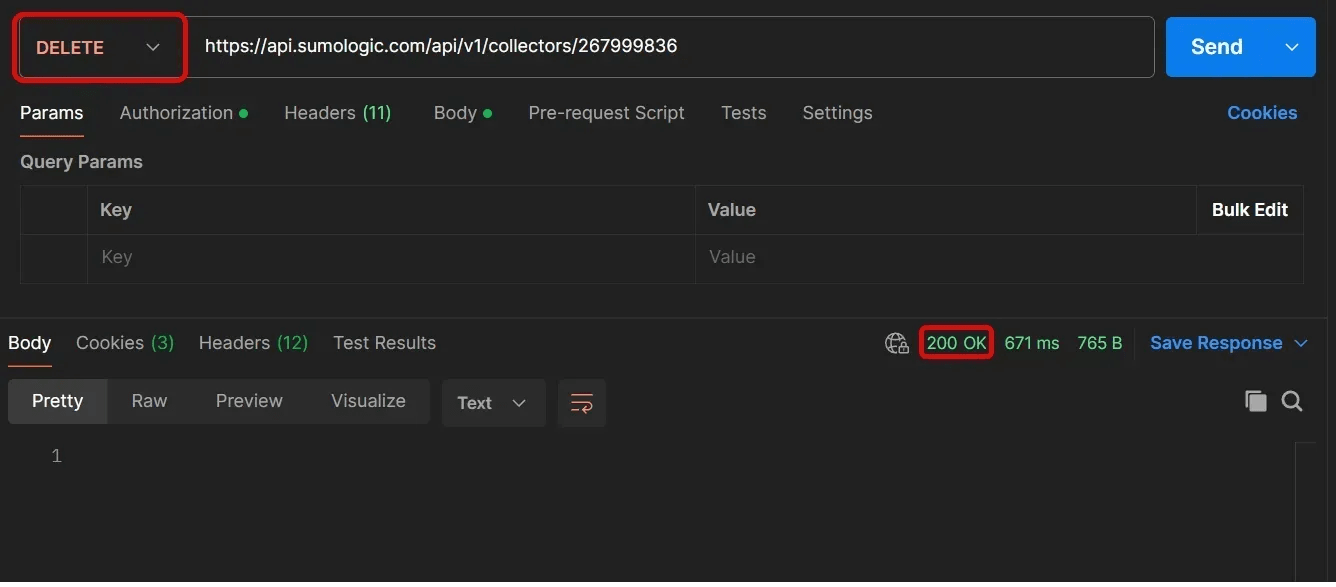
For instance, removing a collector from the system uses the same API as the GET command, just with a DELETE verb instead:
[DELETE] https://api.sumologic.com/api/v1/collectors/[collectorID]
If the operation succeeds you won't see anything in the response body. Instead you can check for the standard HTTP 200 OK response code indicating that the command was completed.
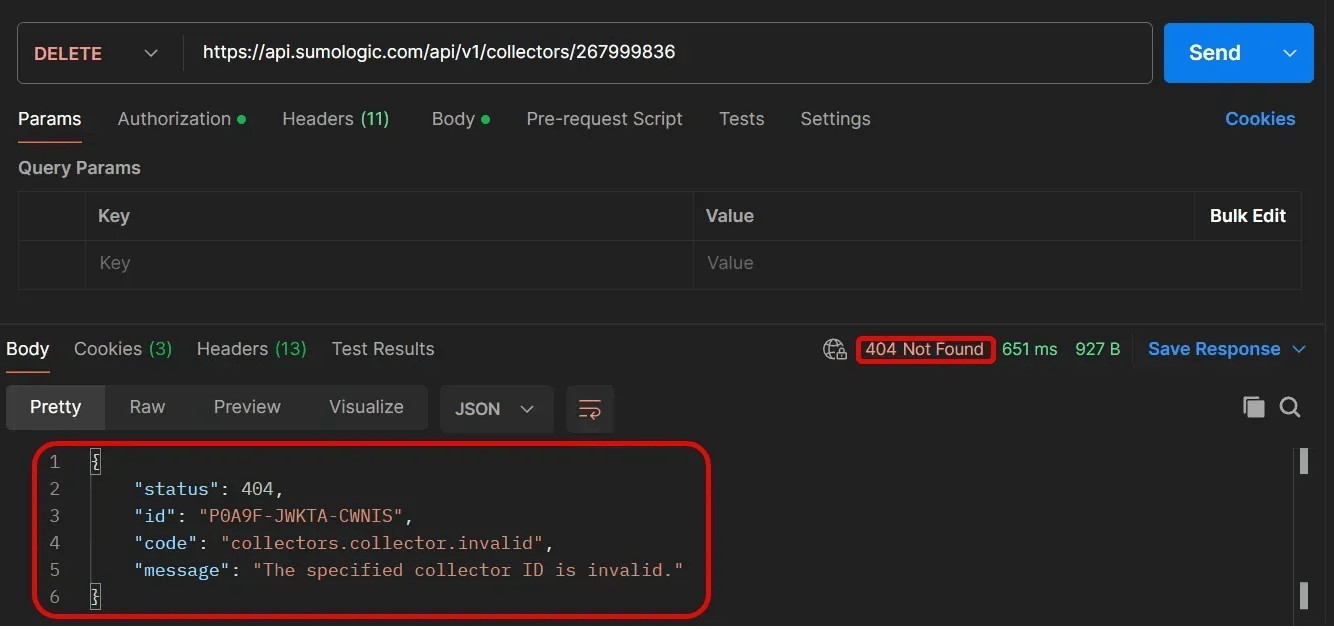
If the operation fails, you see a 400 or 500 level HTTP error code (depending on the specific error), along with a response body containing more detailed error information (such as an invalid collector ID).
Deleting collectors or other data objects through the API cannot be undone. We recommend saving a backup copy of the collector configuration (through the API GET commands) so that in case of a mistake, the collector can be recreated through the API using the same original configuration.
In a similar fashion, deleting users from the system can be done through the same URL structure:
[DELETE] https://api.sumologic.com/api/v1/users/[userID]
When users are deleted from the system, you need to decide whether to also delete any of their created content in the Sumo Logic system. The default setting is "no". Any created content by the deleted user remains in the system assigned now to the user who executed the API command.
To delete all user created content in addition to the user record, use the deleteContent query parameter, set to true:
[DELETE] https://api.sumologic.com/api/v1/users/[userID]?deleteContent=true
Alternately, you can specify a different user to inherit the created content after the original user is removed; to do this, include a transferTo parameter:
[DELETE] https://api.sumologic.com/api/v1/users/[userID]?transferTo=[transferUserID]
Using the Sumo Logic APIs with Cloud SIEM
Sumo Logic's Cloud SIEM has a supported API that works similarly to the regular Sumo Logic service APIs. Users with an active access ID and key can send commands to Cloud SIEM with the same GET/PUT/POST/DELETE functionality.
The Cloud SIEM API documentation can be found here. The biggest difference to remember is that the base API URL has an sec included before the version for all Cloud SIEM API commands:
https://api.sumologic.com/api/sec/[version]/[commandName]
For instance, you can query the list of current Cloud SIEM insights using the following URL:
[GET] https://api.sumologic.com/api/sec/v1/insights/all
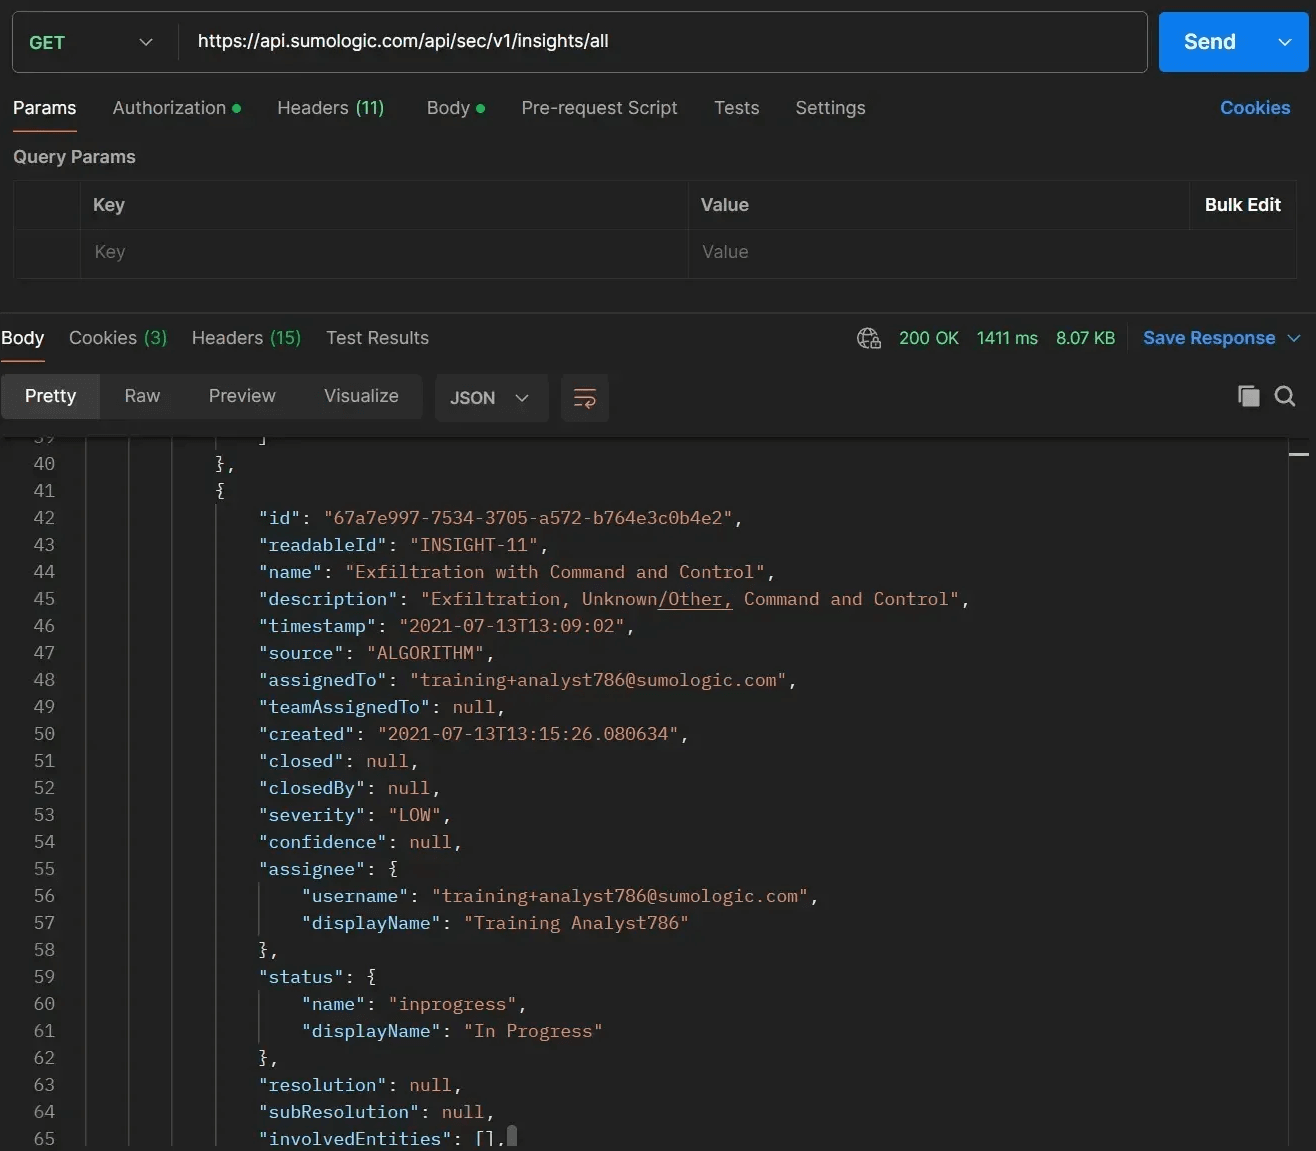
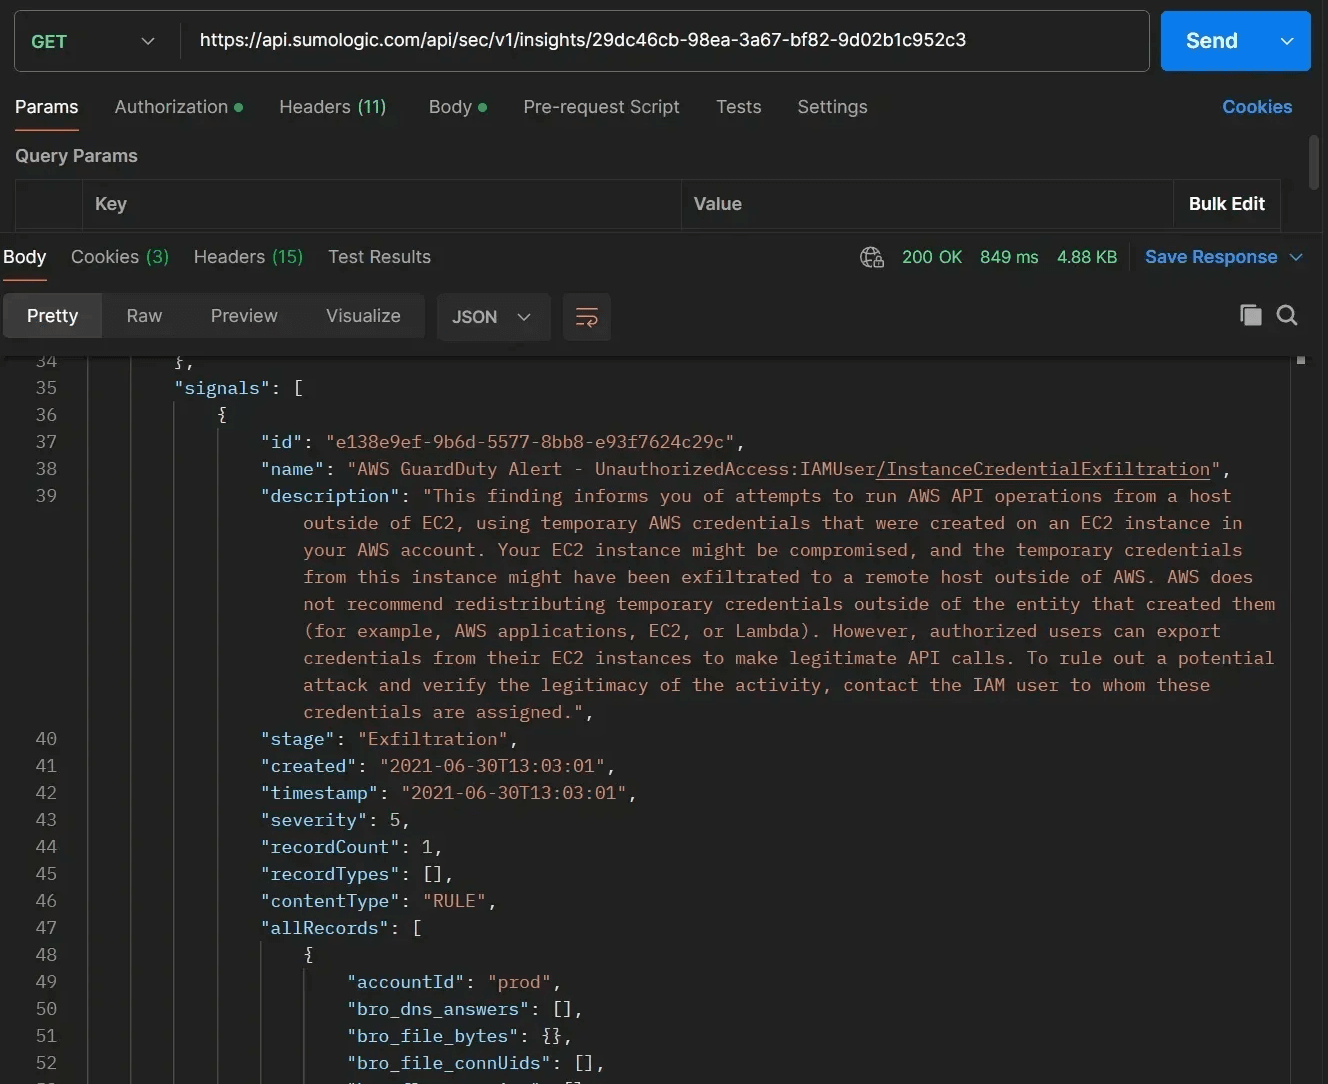
Note that the all command for insights only retrieves a subset of info and configuration details about each insight, as shown in the query above. For full details on the insight, including the complete list of composite signals in the insight, query the insight details directly using the insight ID:
[GET] https://api.sumologic.com/api/sec/v1/insights/[insightID]
You can also use the insight ID to access other configuration tools, such as changing the status of an insight:
[PUT] https://api.sumologic.com/api/sec/v1/insights/[insightID]/status?status=[newStatus]
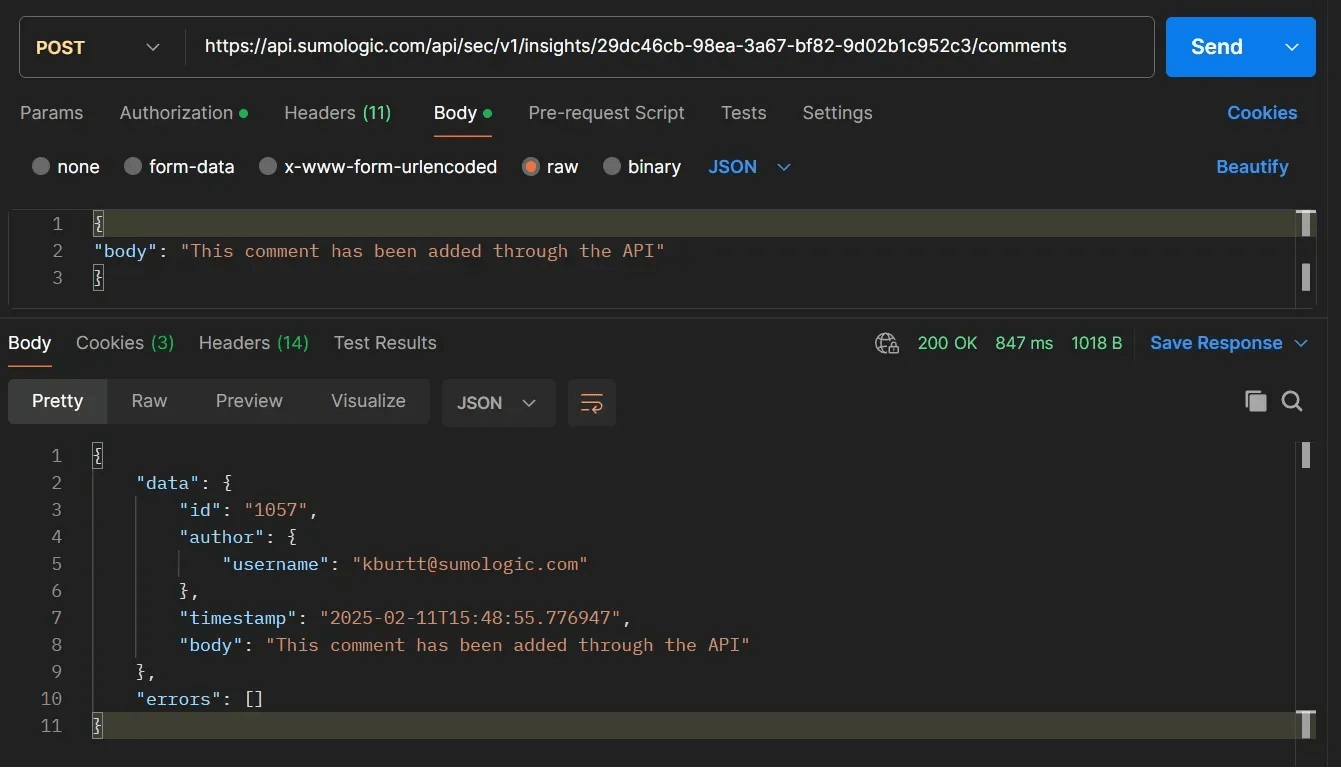
Or add a new comment to an existing insight by creating comment text in the request body:
[POST] https://api.sumologic.com/api/sec/v1/insights/[insightID]/comments/
All elements of Cloud SIEM functionality are available through the API, including rules, match lists, automations, tags, and custom actions. Users can even use the API to generate their own insights based on a custom selection of signals.