
Cloud SOAR Overview

Cloud SOAR fully automates triage, investigation, and remediation of threats for any security professional. The open integrations framework allows you to connect to a multitude of third-party applications. The platform provides full incident response lifecycle management with machine learning and threat hunting, accelerating mean time to respond (MTTR).

Why Cloud SOAR?​

Cloud SOAR is a security operations technology platform that empowers MSSPs, SOCs, and security teams by providing collaborative and automated real-time incident management and threat response. Make quick and insightful decisions during security response with workflow automation.

  • All-in-one platform for minimizing the response time
    • Integrates disparate technologies focusing analysts on real threats.
    • Makes the most of automation, orchestrating several tools in Standard Operating Procedures (SOPs).
    • Measures success and improves communication.
  • Better collaboration
    Cloud SOAR’s native orchestration capabilities boost the collaboration within the SOC team, ensuring efficient synergy during each phase of incident response. Automation of the full incident lifecycle eases the burden on security analysts, while helping to successfully pinpoint real threats and coordinate an effective response across tools and team members.
  • Customizable reports
    Quickly assemble highly customizable reports and dashboards to easily navigate and assess your security intelligence portfolio. Use relevant templates to capture workflow processes, job functions, and response timeframes, including critical indicators of compromise (IOC) and corrective actions taken. Use reports to create greater visibility for KPIs and make collective improvements across the SOC team.
  • Speed incident response
    Cloud SOAR improves incident response time with flexible workflow automation across tools and teams. Machine learning distinguishes real threats from false positives to reduce alert fatigue.
  • Connect disparate tools
    Cloud SOAR acts as the connective tissue between your existing tools to automate processes across the SOC and derive relevant insights throughout your security portfolio.
  • Close the skill gap
    Automated workflow processes help analysts function at an optimal level and reduce the skills gap that exists from the lack of qualified cybersecurity professionals.
  • Comprehensive security portfolio
    Cloud SOAR comprises both the Automation Service, which allows Sumo Logic to leverage the power of automated playbooks, and the full Cloud SOAR. Cloud SOAR combines automation with case management, among many other capabilities aimed at helping your organization modernize security operations.

Cloud SOAR highlights​

Cloud SOAR helps secure operations and automate incident response through integrations with leading third-party threat intelligence vendors. Following are some of the highlights.

For more information about these features, see Cloud SOAR Incident Management and Triage.

Triage​

Cloud SOAR provides automated investigation of indicators of compromise (IoCs) for cyber and non-cyber use cases.
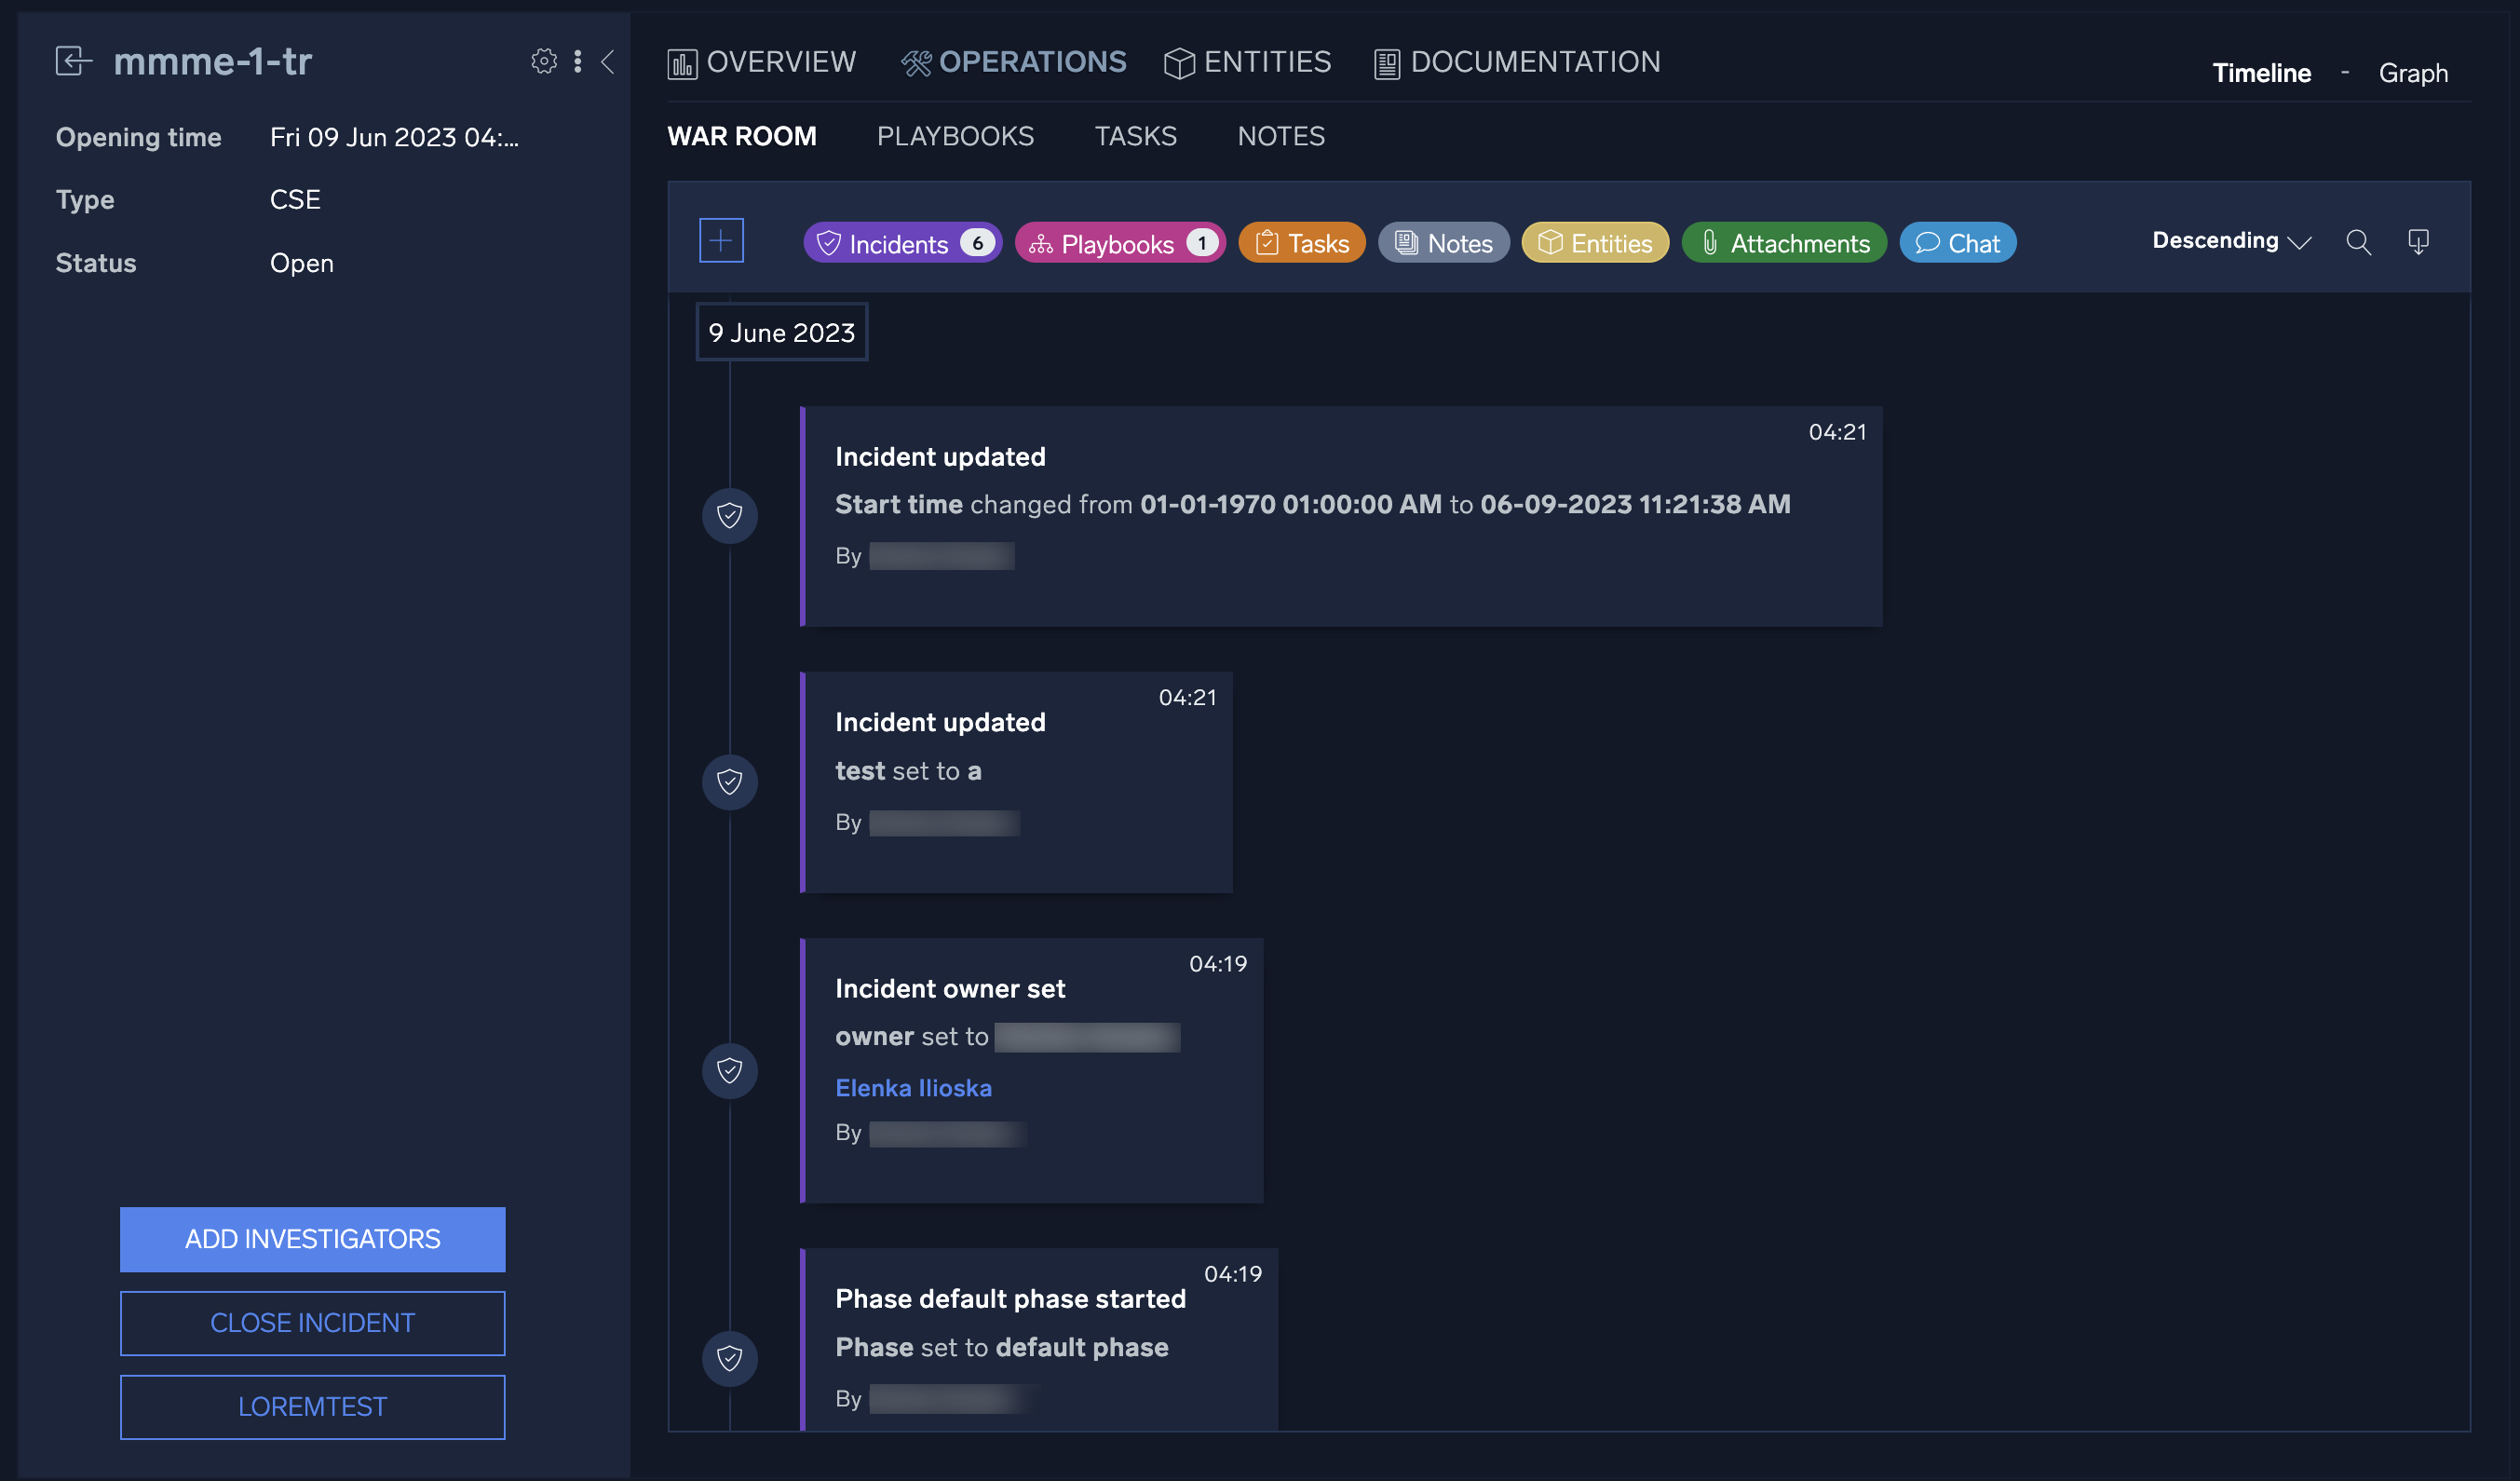
Advanced triage

War Room​

The War Room provides a complete, chronological, and detailed picture of a specific incident process. It also enables security analysts to work simultaneously on incidents with granular role-based access control (RBAC) for general and incident profiles.
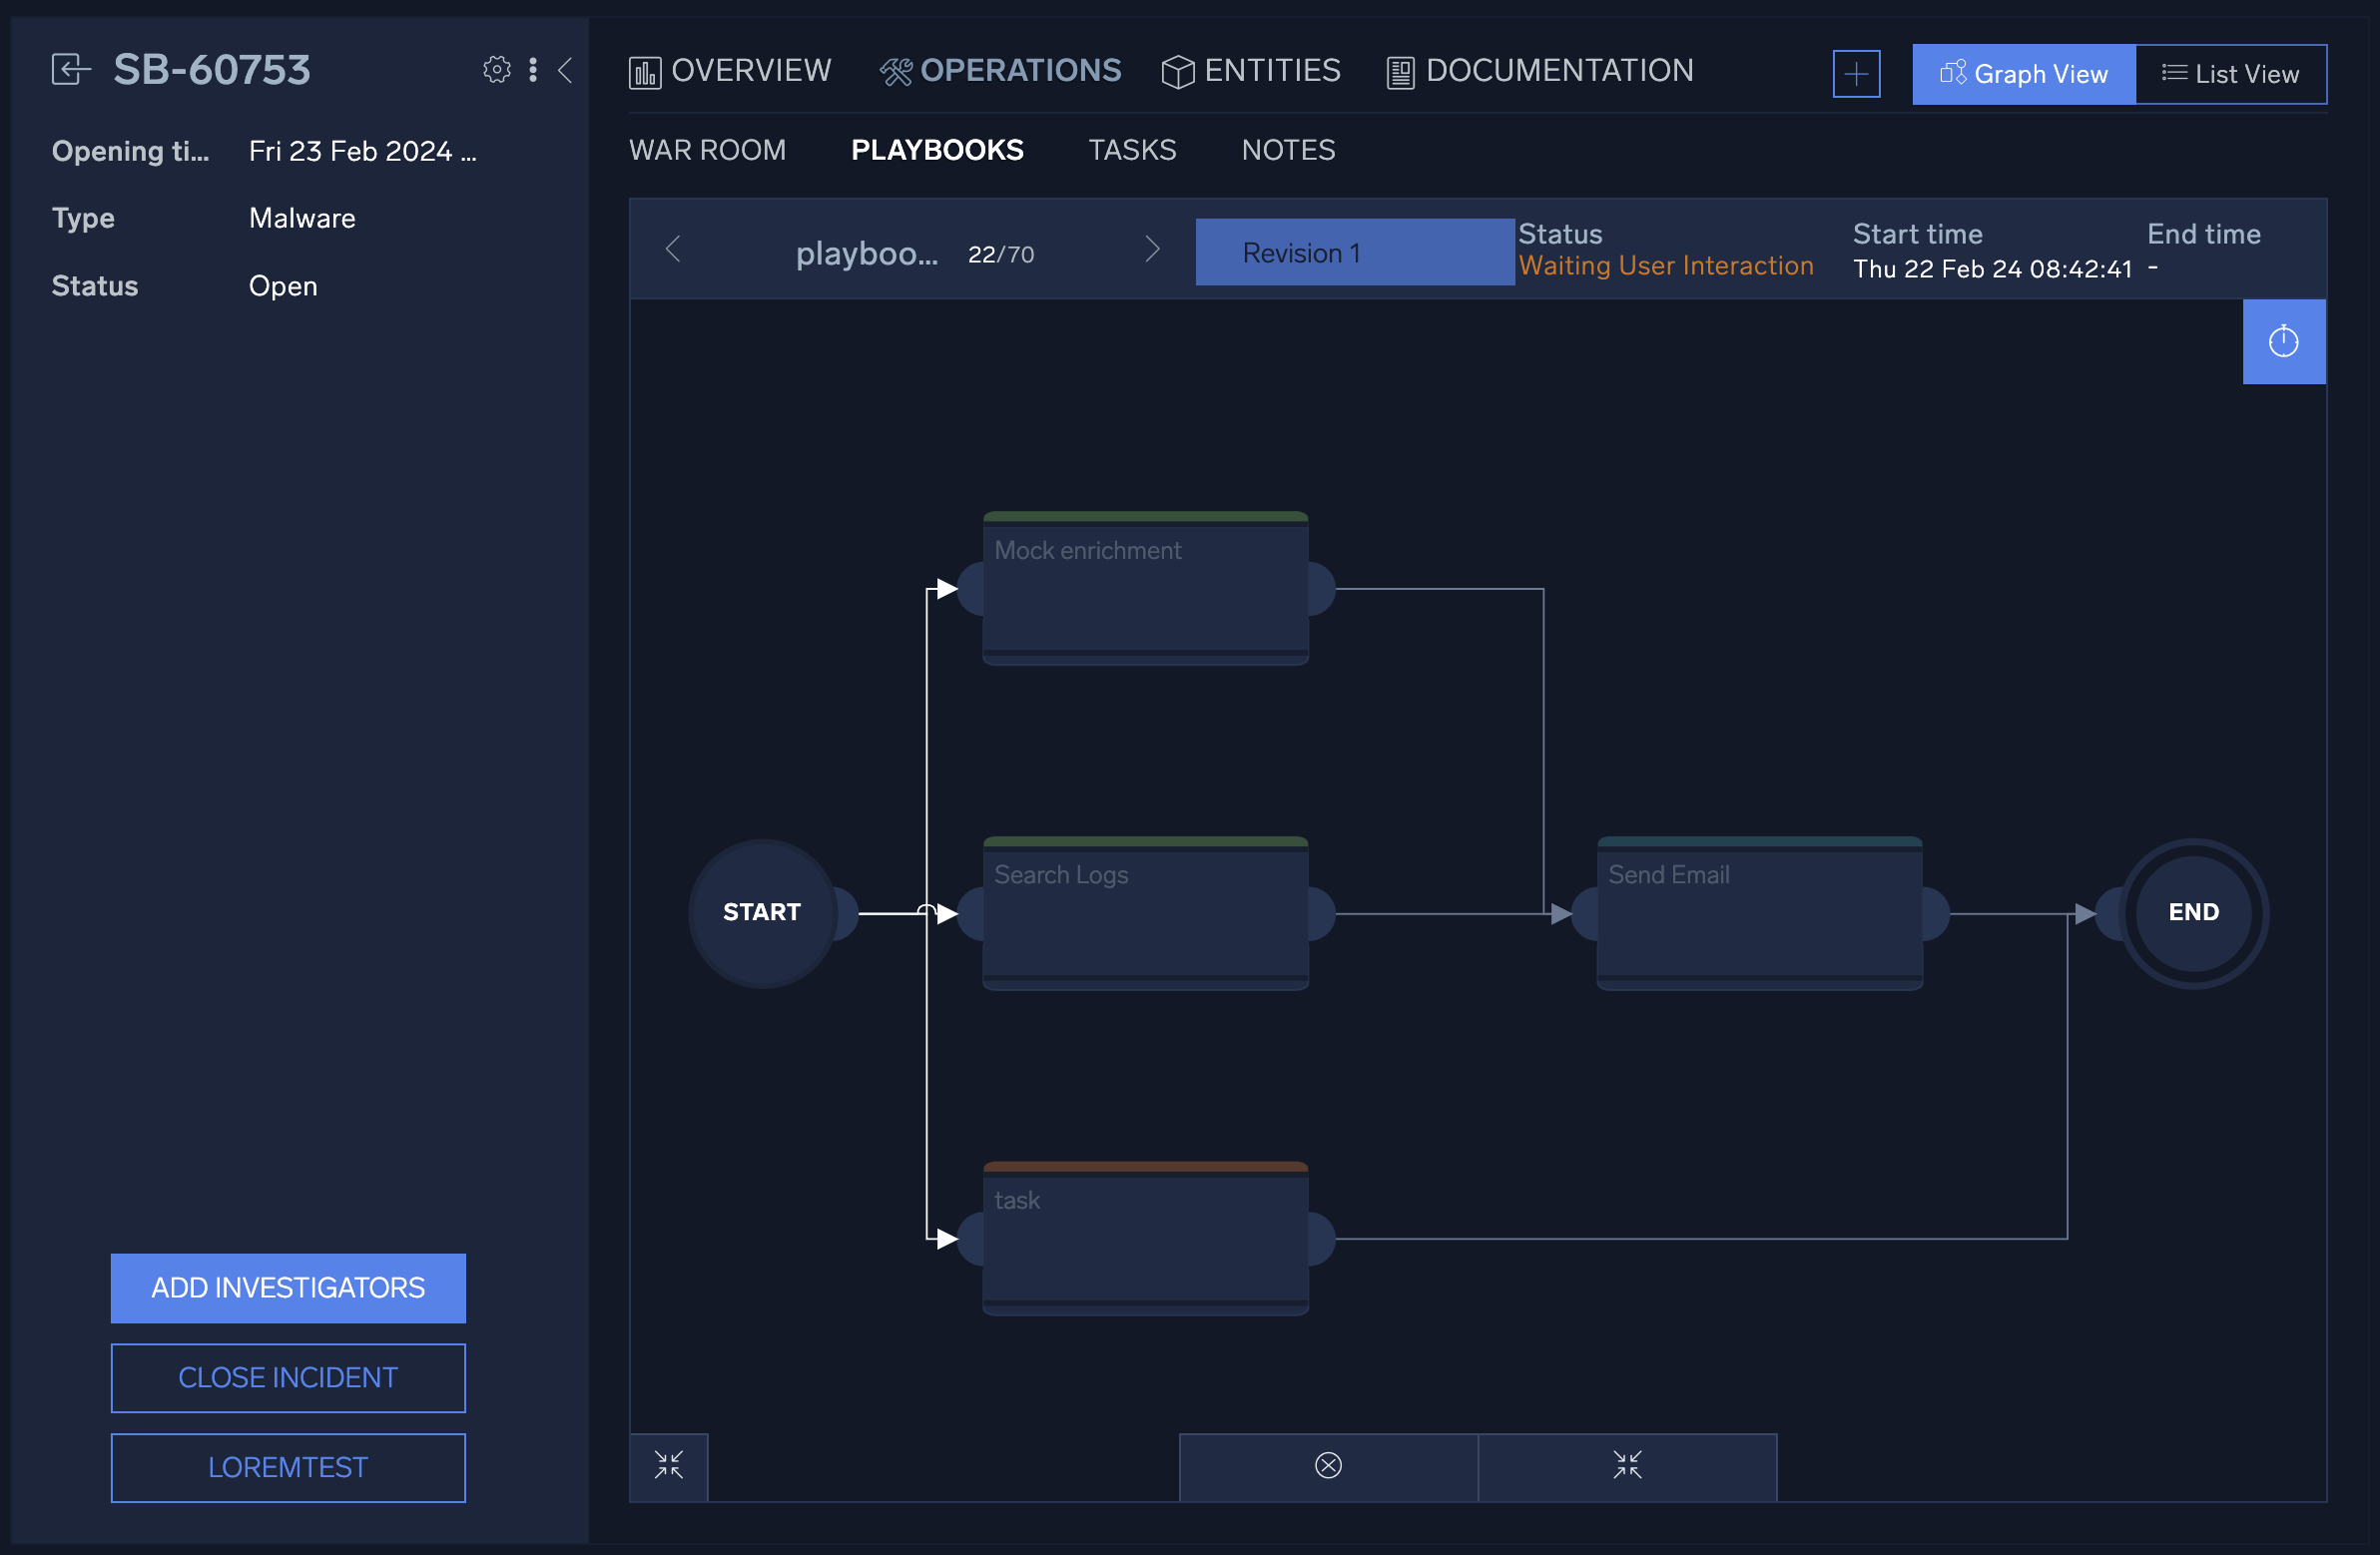
War Room

Playbooks​

Playbooks orchestrate your security operation center (SOC) team’s security stack and automate time-consuming tasks to improve your standard operating procedures (SOPs) and minimize response time.

Automated SOPs

Dashboards and reports​

Gain complete insight into incident response performance with customizable dashboards and reports. Keep track of your most important KPIs with real-time data on each phase of the incident response life cycle.

Example dashboard

Open Integration Framework (OIF)​

Choose from hundreds of out-of-the-box actions and playbooks or ask the Sumo Logic team to develop the connectors you need. Anyone can access the API code to quickly integrate tools without any coding experience required. For more information, see Integrations and Integration Framework.

Integrations

User interface​

Access Cloud SOAR​

To access Cloud SOAR, click Cloud SOAR in the Sumo Logic navigation menu.

Cloud SOAR must be enabled by Sumo Logic before it is accessible to users in your organization. If you would like to use Cloud SOAR in your organization, contact your Sumo Logic account representative.

Theme​

You can view the user interface in a dark theme or a light theme:

  1. Classic UI.Click your user name in the main Sumo Logic navigation menu and select Preferences.
    New UI. Click your user icon in the upper right corner of the screen and select Preferences.
  2. Scroll down to Theme and select Dark theme or Light theme.

For more information, see Setting Account Preferences and Credentials.
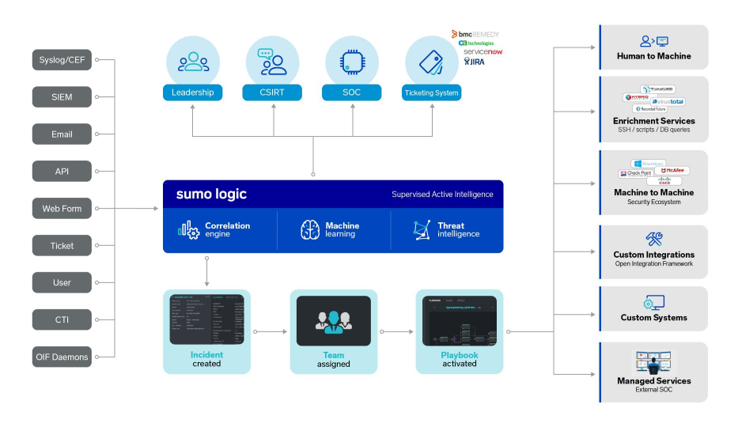
Cloud SOAR menus​

Classic UI​

The classic UI is the traditional way to navigate in Sumo Logic. For more information, see Tour the Sumo Logic Classic UI.

Top menu​

This menu appears at the top of the Cloud SOAR screen:
Top menu bar

Use the top menu to access:

  • Incidents. Manage security incidents that require investigation and action.
  • Entities. Manage entities identified across incidents.
  • Support menu icon Support. Access help, including documentation and support contact information.
  • Settings menu icon Settings. Configure Cloud SOAR settings.

Settings menu​

The Settings menu allows you to configure Cloud SOAR settings. To access the menu, click Settings menu icon on the top menu.
Settings menu

Use the Settings menu to access:

  • Automation. Configure Cloud SOAR's automation and orchestration features.
  • Settings. Configure Cloud SOAR settings.
  • Report. Configure reports.

New UI​

The new UI provides a streamlined way to navigate in Sumo Logic. For more information, see Tour the Sumo Logic UI.

Cloud SOAR sidebar menu​

Click Cloud SOAR in the main Sumo Logic menu to open the sidebar menu.
Cloud SOAR sidebar menu

Use the Cloud SOAR sidebar menu to access:

  • SecOps & Dashboard. Open the home screen of Cloud SOAR.
  • Incidents. Manage security incidents that require investigation and action.
  • Triage. Triage events which may be unverified or have a low confidence level before they are converted to incidents.
  • Entities. Manage entities identified across incidents.
  • Report. Configure reports.

Automation sidebar menu​

Click Automation in the main Sumo Logic menu to open the sidebar menu.
Cloud SOAR sidebar menu

Use the Automation sidebar menu to access:

  • App Central. Add new integrations and playbooks to your environment.
  • Playbooks. Create playbooks to run automated actions.
  • Template. Create incident templates.
  • Integrations. Manage integrations with vendors.
  • Rules. Create automation rules.
  • Bridge. Configure a bridge to run custom actions or integrations.

Top menu​

This menu appears at the top of the screen:
Top menu bar

Use the top menu to access:

  • Go To icon Go To... Launch Sumo Logic features, including for Cloud SOAR.
  • Help icon Help. Access links to documentation, support, community, release notes, and system status.
  • Configuration icon Configuration. Configure Sumo Logic features, including for Cloud SOAR.
  • Administration icon Administration. Administer Sumo Logic features, including for Cloud SOAR.
  • Profile icon Profile. View your notification and preference settings.

Go To... menu​

The Go To... menu allows you to launch Sumo Logic features, including for Cloud SOAR. To access this menu, click Go To icon on the top menu.
Go To menu bar

Use the Go To... menu to access these Cloud SOAR features:

  • Bridge. Configure a bridge to run custom actions or integrations.
  • Entities. Manage entities identified across incidents.
  • Fields. Customize fields to better suit your environment.
  • General. Configure general Cloud SOAR settings.
  • Groups. Create a group of users and assign a role to all the users in the group.
  • Incidents. Manage security incidents that require investigation and action.
  • Incident Labels. Define labels for the different types of incidents that will be investigated.
  • Notifications. Configure notifications to Cloud SOAR users as well as other external users.
  • Report. Configure reports.
  • SecOps & Dashboard. Open the home screen of Cloud SOAR.
  • Triage. Triage events which may be unverified or have a low confidence level before they are converted to incidents.

Configuration menu​

The Configuration menu allows you to configure Sumo Logic features, including for Cloud SOAR. To access this menu, click Configuration icon on the top menu. Scroll down the menu to see Cloud SOAR configuration options.
Cloud SOAR options on the configuration menu

Use the Configuration menu to access:

  • Incidents. Manage security incidents that require investigation and action.
  • Fields. Customize fields to better suit your environment.
  • Incident Labels. Define labels for the different types of incidents that will be investigated.

Administration menu​

The Administration menu allows you to administer Sumo Logic features, such as for for account, users and roles, and account security. You can also administer Cloud SOAR features. To access this menu, click Administration icon on the top menu. Scroll down the menu to see Cloud SOAR administration options.
Cloud SOAR options on the administration menu

Use the Administration menu to access:

  • General. Configure general Cloud SOAR settings.
  • Notifications. Configure notifications to Cloud SOAR users as well as other external users.
  • Groups. Create a group of users and assign a role to all the users in the group.

Settings​

The following sections detail the various setup and configuration options for the Cloud SOAR platform. Although initial configuration can be performed in any order, the following sections are ordered in the suggested order for initial configuration.

General​

Classic UI. To access general settings, click the gear icon Settings menu icon in the top right and select Settings.

New UI. To access general settings, in the top menu select Administration, and then under Cloud SOAR Settings select General. You can also click the Go To... menu at the top of the screen and select General.

General Settings

System​

  • Use Proxy. Enter settings if you need to use a proxy for Internet access.
  • Sticky Alert. Set the number of seconds to display an alert in the Cloud SOAR UI when an incident generates an alert.
  • Date/Time Format. Set the date and time format.

Incidents​

Use these settings to configure how Cloud SOAR handles incidents.

  • Duplicates.
    • Prohibit duplicate naming. Select this checkbox to prevent incidents from being named identically.
    • Default suffix for duplicated incident name. Select the suffix to add to the end of incident names to differentiate incidents that are named the same.
    • Use suffix on non-duplicate. Use the selected suffix on all incidents, regardless of whether they are named the same.
  • Objects. Gather objects, such as IP addresses, domains and email addresses, and add them to the appropriate object's section within the incident.
    • Extract from:
      • Incident field. Gather objects from the incident properties.
      • Task field. Gather objects from the incident tasks.
      • Note field. Gather objects from the the incident notes.
    • Filename extension whitelist. Enter filename extensions to allow when gathering objects.
  • Process Phase. Configure phases for monitoring progress of incidents as they progress. Determine whether the phase is Mandatory, and the Status of the incident when the phase is reached. Select Show Deleted to show phases on deleted incidents.
  • Mandatory Closing Note. Make a final incident note mandatory before the incident can be closed.

Instant Messaging​

Use these settings to configure authentication for an instant messaging service such as Slack.

  • Integration. Enter the name of the instant messaging service to integrate with Cloud SOAR.
  • Bot Oauth. Enter the authorization token for the instant messaging service.
  • Signing secret for verify requests. Enter the signing secret for the instant messaging service.
  • Workspace. Displays success or failure of the workspace connection to Cloud SOAR.

For additional setup needed for Slack, see Configure Slack for Cloud SOAR.

Groups​

Classic UI. To access groups settings, click the gear icon Settings menu icon in the top right, select Settings, and on the left menu select User Management > Groups.

New UI. To access groups settings, in the top menu select Administration, and then under Cloud SOAR Settings select Groups. You can also click the Go To... menu at the top of the screen and select Groups.

Groups dialog

Create a group​

You can create a group of users and assign a role to all the users in the group. This makes it easy to assign a specialized role to multiple users at once rather than adding the users individually to the role.

For example, say there is a group of users with different roles responsible for customer support. Access to a specific incident with restricted privileges needs to be granted to all investigators of the incident. You can create a role with just the needed Cloud SOAR role capabilities and select it as the role (also known as a profile) for members of the group. Then when you add investigators for the incident, you can select the group rather than individual users.

  1. Click the + icon next to Groups. The Add Groups dialog is displayed.
    Add Group dialog
  2. In Name enter a name for the group.
  3. In Profile select the role to use for members of the group. These are roles already created in the system.
  4. Click Create. The empty group is displayed.
    Example group
  5. Click the + icon next to Members.
  6. Select the users to add to the group.
  7. Click Apply.

Group role assignments​

The role specified in an assigned group profile supersedes the user's role assignments in the Sumo Logic Log Analytics Platform. The group permissions are persistent until the user leaves the group, the profile is removed from the group, or the group is deleted.

UserResult
In a groupHas the assigned group role (profile)
In multiple groupsHas the sum of the roles (profiles) from all the groups it is a member of
Not in a groupHas role assignments as assigned in the core platform
In group without a role (profile)Has role assignments as assigned in the core platform

Notifications​

Classic UI. To access notification settings, click the gear icon Settings menu icon in the top right, select Settings, and on the left menu select Notifications > Event Triggers.

New UI. To access notification settings, in the top menu select Administration, and then under Cloud SOAR Settings select Notifications. You can also click the Go To... menu at the top of the screen and select Notifications.

Events Triggers dialog

Select the icon to the right of an event to trigger a notification to be sent when that event occurs.

Custom fields​

Classic UI. To access custom fields settings, click the gear icon Settings menu icon in the top right, select Settings, and on the left menu select Customization > Fields.

New UI. To access custom field settings, in the top menu select Configuration, and then under Cloud SOAR Configurations select Fields.

Cloud SOAR custom fields page

The Custom Fields page allows you to customize all fields within the Cloud SOAR platform to better suit your environment. All fields are pre-populated by default and can be revised with environment-specific variables by manually creating or updating the fields. To begin defining Cloud SOAR's custom fields, select a Cloud SOAR section from the list on the left-side of the screen to view all available fields. To edit an existing field, hover your mouse over the field and select the Edit icon icon that appears next to the field. To add a new field, click the + button at the top of the panel.

Tips for working with custom fields:

  • For considerations when you create custom fields for triage, see Triage field settings.
  • You can rename or delete custom fields that you add. However, you can only rename default fields; you cannot delete them. Although you may delete a custom field, it will not increase the number of custom fields available. Since the deleted field may contain data that was entered prior to the deletion of the field, the custom field remains reserved. You can rename internal values, but only personal values (denoted by having a trash can symbol next to the entry), can be deleted from the section's custom fields.
  • For each field, a name and a type will always be required. The only attribute of an existing field that cannot be modified once the field is created is the field Type, such as Text or Date.
  • Each section of Cloud SOAR supports different numbers of custom fields. The Incidents section, for example, supports up to 100 custom fields. The number of custom fields remaining will be displayed next to the section name at the top of the page.
  • When you edit a field, the Additional info section allows you to provide additional information or context to the field, such as how the field should be used or where the data can be located.
  • You can reorder fields in the Custom Fields section to change the order they appear on the Cloud SOAR screen. To change the order of the fields, click and hold on the six dots to the far left of the field name, then drag the field to its desired location.

A complete list of field types is listed below. Additional fields are required or optional depending on the type selected. For example, a text field allows an optional default value to be specified, while a list field provides many additional options.

Custom field types​

Field TypeDescription
CalculationPerform a calculation between two fields or between a field and a static value.
CheckboxCheckbox.
Color PickerInteractive color picker to select a color.
DateDate only picker.
Date & TimeDate and time picker.
Email AddressEmail address available to use in actions which require a email input.
FilenameFilename available to use in actions which require a filename input.
HashHash value available to use in actions which require a hash input.
IP AddressIP address available to use in actions which require a IP address input.
ListDropdown list.
Multi Select ListMultiselect list box.
Numeric TextboxAccepting numeric values only.
TagsOne or more user defined tags.
TextFree text.
Time IntervalNumeric time interval which can be used as a value in another calculated field.
TimezoneTimezone list dropdown.
URLURL available to use in actions which require a URL input.
User DetailsUser details, such as a user name. Available to use in actions which require a user details input.

Using custom fields for SLAs​

Custom fields can be used to calculate any number of custom service level agreements (SLAs). This can be achieved using combinations of Date, Date & Time, and Time Interval type fields.

In the following example, custom fields provide information on the status of an organization's notification SLA. Two of the custom fields require user input:

  • Notification SLA Requirement is used to store the SLA time interval, such as 30 minutes.
  • Customer Notified allows you to enter the date and time the customer was notified.

The remaining custom fields require no user input and are calculation fields only:

  • Notification Due By will calculate and display the date and time the notification must be conducted by adding the Notification SLA Requirement field to the start time.
  • Actual Notification Time will calculate and display the actual time taken to notify the customer by subtracting the start time from the Customer Notified time.
SLA custom fields

These custom field settings will appear in the Cloud SOAR Incident screen as follows:

SLA fields on an incident

Incident labels​

The Incident label page allows you to define labels for different types of incidents. When incidents are created by the system, incident labels are automatically applied to the incidents. You specify the incident label to be used for each incident type when you create incident templates and automation rules.

To create an incident label:

  1. Classic UI. Click the gear icon Settings menu icon in the top right, select Settings, and on the left menu select Customization > Incident labels.
    New UI. In the top menu select Configuration, and then under Cloud SOAR Configurations select Incident Labels.
  2. Click + to the left of Incident label.
    Cloud SOAR incident label page
  3. Enter the following on the New label dialog:
    1. Name. Enter a name for the label. This name will not appear in the label itself.
    2. Description. Enter a description for what the label will be used for.
    3. Value. Enter a value for the label. The fields below will be appended to this label.
    4. ADD FIELD. Double-click the following fields you want to append to the label. They will automatically generate values:
      • Day. The day of the month.
      • Month. The month of the year.
      • Year. The year.
      • Roman numeral month. The month represented as Roman numerals. For example, I, II, III, IV, V, VI, VII, VIII, IX, X, XI, XII.
      • Counter. A counter beginning at 1.
      • Counter from. A counter beginning at the number you specify. Replace the X in the field with the number to start from.
      • Counter year based. A counter based on the year.
      • Counter day based. A counter based on the day.
      • Random six digit number. A randomly-generated number.
        New label dialog

Triage​

Classic UI. To access triage configuration settings, click the gear icon Settings menu icon in the top right, select Settings, and on the left menu select Customization > Triage.

New UI. To access triage configuration settings, in the top menu select Configuration, and then under Cloud SOAR Configurations select Triage.

Cloud SOAR triage configuration page

Cloud SOAR's Triage module ingests events via the Cloud SOAR API and can be used to triage events which may be unverified or have a low confidence level before they are converted to incidents.

You can customize triage display preferences on the Triage configuration page. You can color-code triage events based on status to easily distinguish them from each other when viewing the list of triage events. You can also modify the name of the module from Triage to a name of your choosing. The new name will be displayed in all areas of Cloud SOAR, including the menu and logs.

  • Section Name. The name you want to use for the Triage section of the user interface.
  • Disable background cache generation. Prevent cache from being generated for triage events. Selecting this box may speed up page load, but slow triage event retrieval.
  • Set event row style. Set the colors to display for triage events.
  • Reassign Mail Configuration. Customize the content of emails sent to analysts when triage events are reassigned.

Architecture​

Sumo Logic Cloud SOAR provides Security Operations and Automation Incident Response Platform to facilitate and expedite timely management of Incident Response with a rich library of customizable playbooks for different threats and use cases of incident response scenarios expediting and automating response time to incident response events.

This solution additionally provides capabilities to support incident responders during the process of assessment, Investigation, data collection and correlation to help inference additional information and metrics analytics to see repetitive patterns when doing analysis. It facilitates documentation and knowledge transfer of information across the critical teams working on incident response and SOC operations team members.

Cloud SOAR Automation and Orchestration features help organizations from all sectors of the industry to manage measure and orchestrate security operations tasks including incident qualification, triage and escalation, threat hunting, analysis, threat containment and remediation. The gathering of information from different data sources and correlating this information expedites the capabilities and augments human analyst available resources.

The Cloud SOAR tool offers standard management of Incident response events across different teams in the organization with the help of the R3 Rapid response playbook engine. R3 Playbooks are created using a Visual editor supporting granular, stateful and conditional workflows to orchestrate, automate and standardize best practices on a case by case incident response events activities like incident triage, stakeholder notification, data and context enrichment, remediation and threat containment.

Cloud SOAR has been designed with Interoperability for Cybersecurity Industry standards regulatory frameworks to be able to receive data from a wide assortment of Cybersecurity industry vendors to enrich the available data gathered and correlated to offer better forensic analytics. Just to name a few of our quickly growing list of supported vendors: Palo Alto Networks, Cisco ThreatGrid and Umbrella, IBM Qradar, Splunk, McAfee, Encase Forensics.

Cloud SOAR design and architecture follows Cybersecurity Industry standards and regulatory frameworks, and adheres to best Industry practices to meet best Cybersecurity practices followed by ISO, GDPR, OASIS, NIST, Sec Regulations, and more.

Cloud SOAR offers a patent-pending Automated Responder Knowledge (DF-ARK) module which applies machine learning to historical responses and threats. It recommends relevant Playbooks, paths of action to expedite the process, and responses to manage and mitigate similar incidents with better response time.

Cloud SOAR provides static egress for Cloud executions. IP addresses can be entered into the allowlist. For a list of Cloud SOAR addresses by region, contact Support.

Cloud SOAR architecture diagram

Automation Bridge​

Cloud SOAR interacts with the platforms in your environment using a module called Automation Bridge.

Automation Bridge is a process running on a Linux-based VM (deployed inside the your environment) that interacts with your Cloud SOAR Instance and allows you to execute playbook actions on all the systems that Cloud SOAR is orchestrating in that specific environment. For more information, see Automation Bridge.

Data retention​

Default retention periods by data type​

Sumo Logic automatically deletes the following customer data according to the table retention period below, except for customers required to ensure HIPAA compliance (see second table).

Data typeRetention period
Incidents2 years
Triage2 years
Entities2 years
Playbook and action executions2 years

For HIPAA-compliant customers, we delete data following the retention periods below.

info

If you need to follow HIPAA compliance, it is important to explicitly communicate this when requesting Cloud SOAR activation.

Data typeRetention period
Incidents7 years
Triage7 years
Entities7 years
Playbook and action executions7 years

Custom retention periods​

You can request retention period times different from those declared in the tables above, as long as the retention period requested is greater than 1 day yet less than 5000 days.

In order to do that, please open a Support ticket with your request.

Status
Legal
Privacy Statement
Terms of Use

Copyright Β© 2024 by Sumo Logic, Inc.