Automations in Cloud SIEM
Cloud SIEM automations run playbooks in the Automation Service to add enrichments and create notifications for either insights or entities. You can set automations to run automatically when insights are created or closed, or you can run them manually.
The number of actions that can be run per hour is limited to prevent abuse of system resources or runaway processes. For more information, see Actions limit.
Overview: Configure an automation
This section gives you an overview of how to set up an automation in Cloud SIEM. This process assumes you want to create your own playbook to use in an automation. For examples, see Cloud SIEM Automation Examples.
Before you can configure an automation, you must configure the connection for the integration resources you want the automation to use.
Step 1: Get actions for the playbook
The first thing you need to do is decide what actions you want to use in your playbook.
- Open the integration that has actions you want the playbook to run.
- Note the names of the actions you want to use, including their resource name. You'll need these to add the actions to your playbook.
- If you want to customize an action:
- Click the duplication button on the integration to create a customizable integration. The name of the duplicated integration will end in (1).
- To customize the action in the duplicated integration, click the Edit button on the action.
Step 2: Add the actions to the playbook
Now that you have the names of the actions you want to use, you can add them to your playbook.
- Create a new playbook. When you create a playbook, you can select the Type as CSE to indicate that the playbook will be used for a Cloud SIEM automation.
- Click Add Node.
- Choose Action as the type of node to add.
- In the Action field, select the name an action you identified in Step 1.
- As soon as you choose the action, the Resource field displays the name of the resource. Verify that the name of the resource matches what you noted in Step 1.
- Fill out the rest of the fields in the Add Node dialog to configure the action to behave the way you want.
- Click Create. The node is added to the playbook.
- Repeat to add more actions to the playbook. If desired, add conditions.
- Click Save to save your changes.
- To test the playbook, click the kebab button in the upper-right of the UI and select Run Test.
- When you're ready to let the playbook be used in automations, click Publish.
Step 3: Add the playbook to an automation
Now that the playbook is configured, you can add it to an automation.
- Create a new automation.
- Select the playbook you created in Step 2.
- In Object (expects attributes for), select Entity or Insight.
- Select whether you want to automatically run the automation when an insight is created or closed, or to run it manually. (For the purposes of this overview, select Manually Done.)
- Select Enabled.
- Click Save.
Step 4: Run the automation
Now that you've created the automation, it is ready to run. If you set the automation to run when an insight is created or closed, it runs automatically.
If you configured the automation to run manually, you can run it from an insight or an entity:
-
Insights
- Open an insight.
- Click Actions.
- Select the automation from one of the following, depending on whether the automation expects attributes for insights or entities:
- Insight Automation. Displays a list of all enabled insight automations configured to run manually.
- Entity Automation. Displays a Run Automations option. Click Run Automations to open a dialog enabling you to select one or more entity automations to run.
-
Entities
- Open an entity.
- Click Automations under the entity's name.
- Select an option under Entity Automation.
noteThe number of actions that can be run per hour is limited to prevent abuse of system resources or runaway processes. For more information, see Actions limit.
View automations
- Classic UI. In the top menu select Configuration, and then under Integrations select Automation.
New UI. In the top menu select Configuration, and then under Cloud SIEM Integrations select Automation. You can also click the Go To... menu at the top of the screen and select Automation. - View the list of available automations. (If no automations display, you must first create an automation).
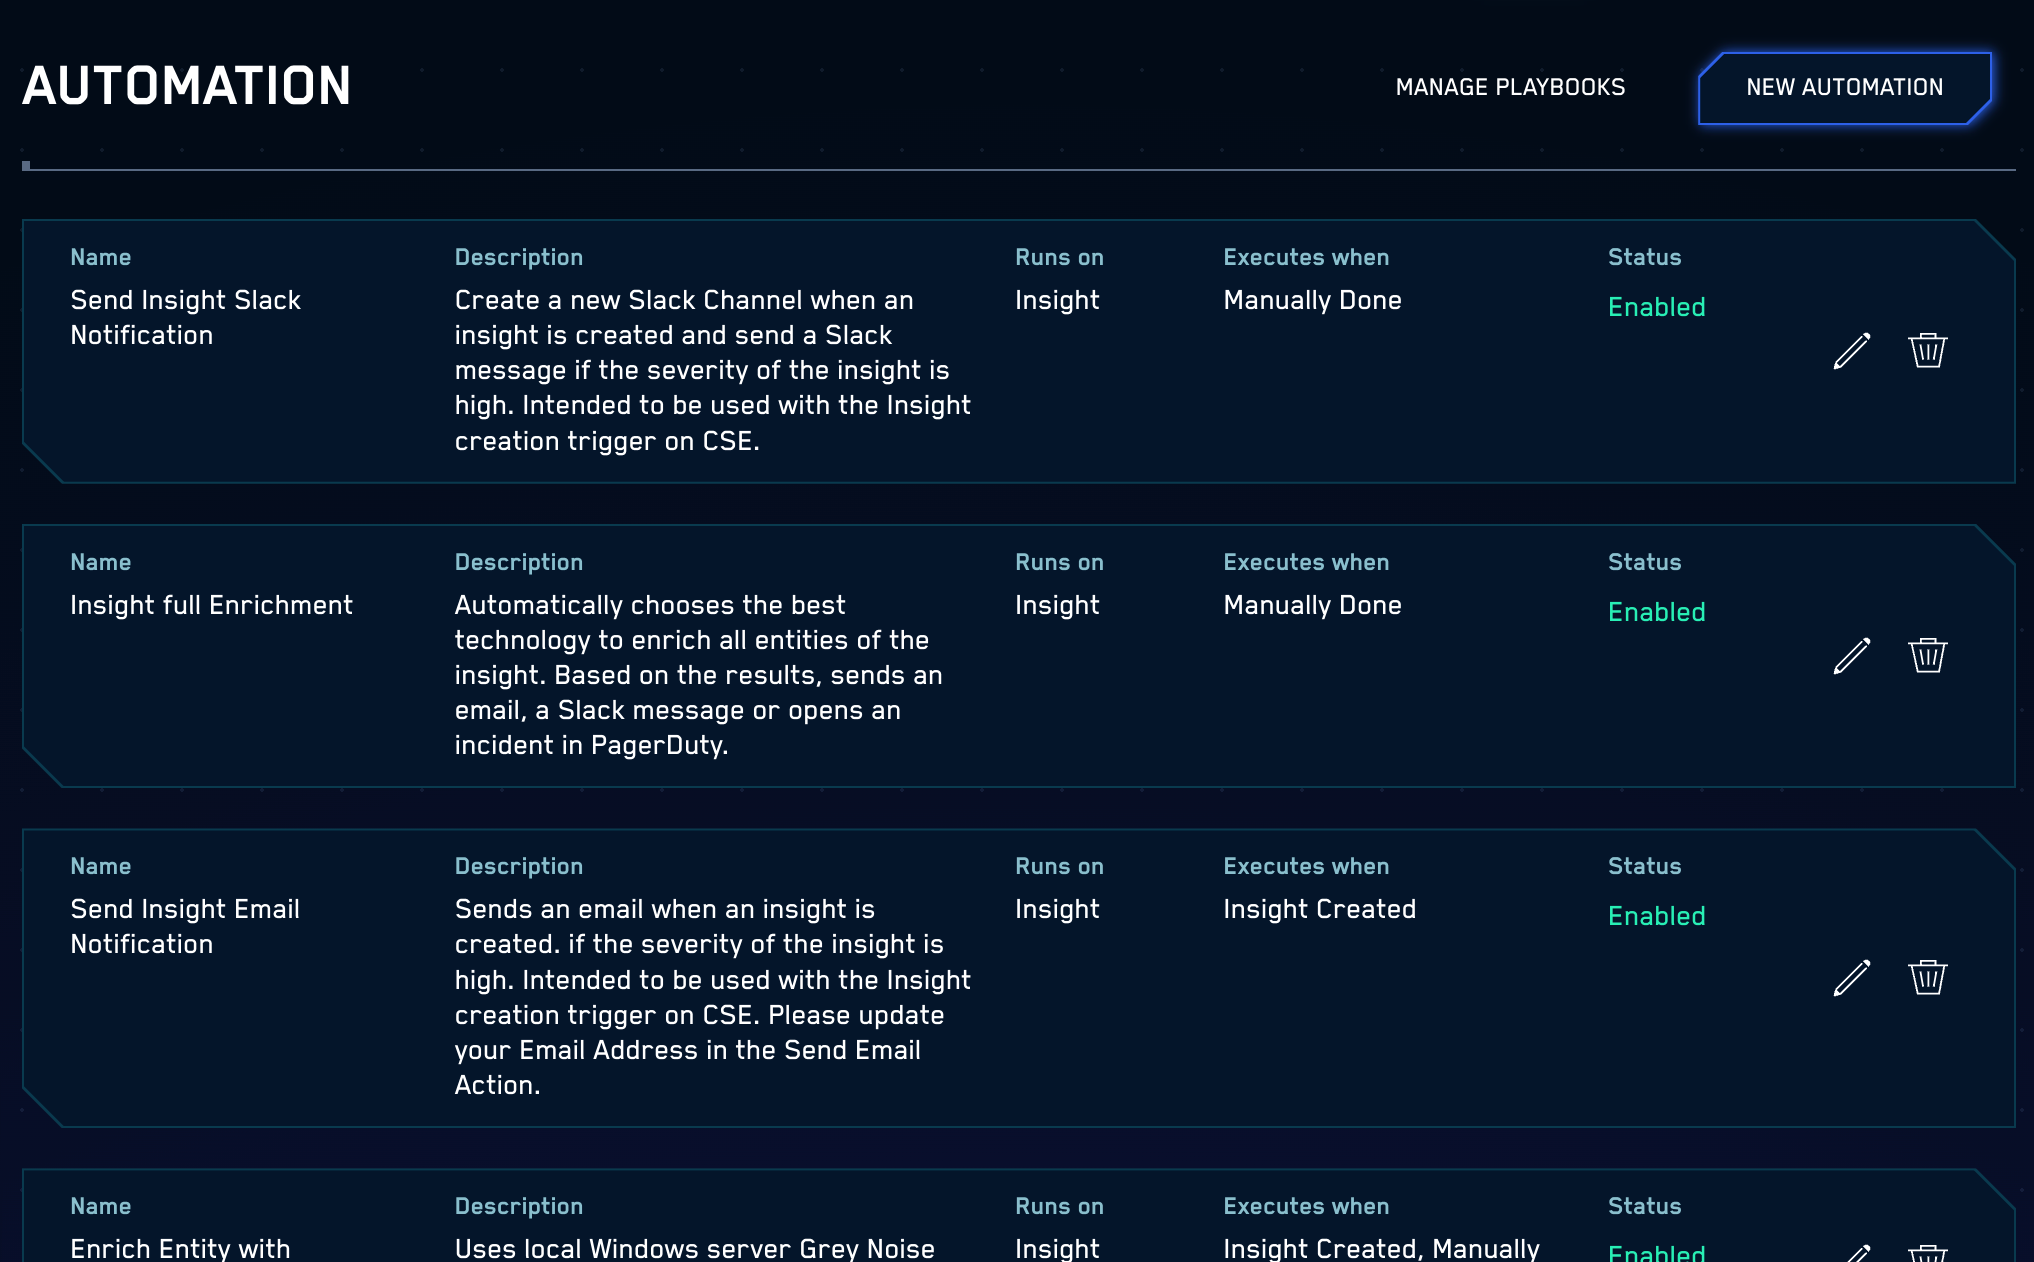
To view the automations that have run on insights or entities, see View results of an automation.
Create an automation
The following procedure provides a brief introduction to how to create an automation. For detailed examples, see Cloud SIEM Automation Examples.
- Classic UI. In the top menu select Configuration, and then under Integrations select Automation.
New UI. In the top menu select Configuration, and then under Cloud SIEM Integrations select Automation. You can also click the Go To... menu at the top of the screen and select Automation. - At the top of the Automation tab, click + Add Automation. (To modify an existing automation, select the automation and click Edit.)
- In the Add Automation dialog, select a Playbook from the drop-down list. The playbook must be defined before associating it with an automation.
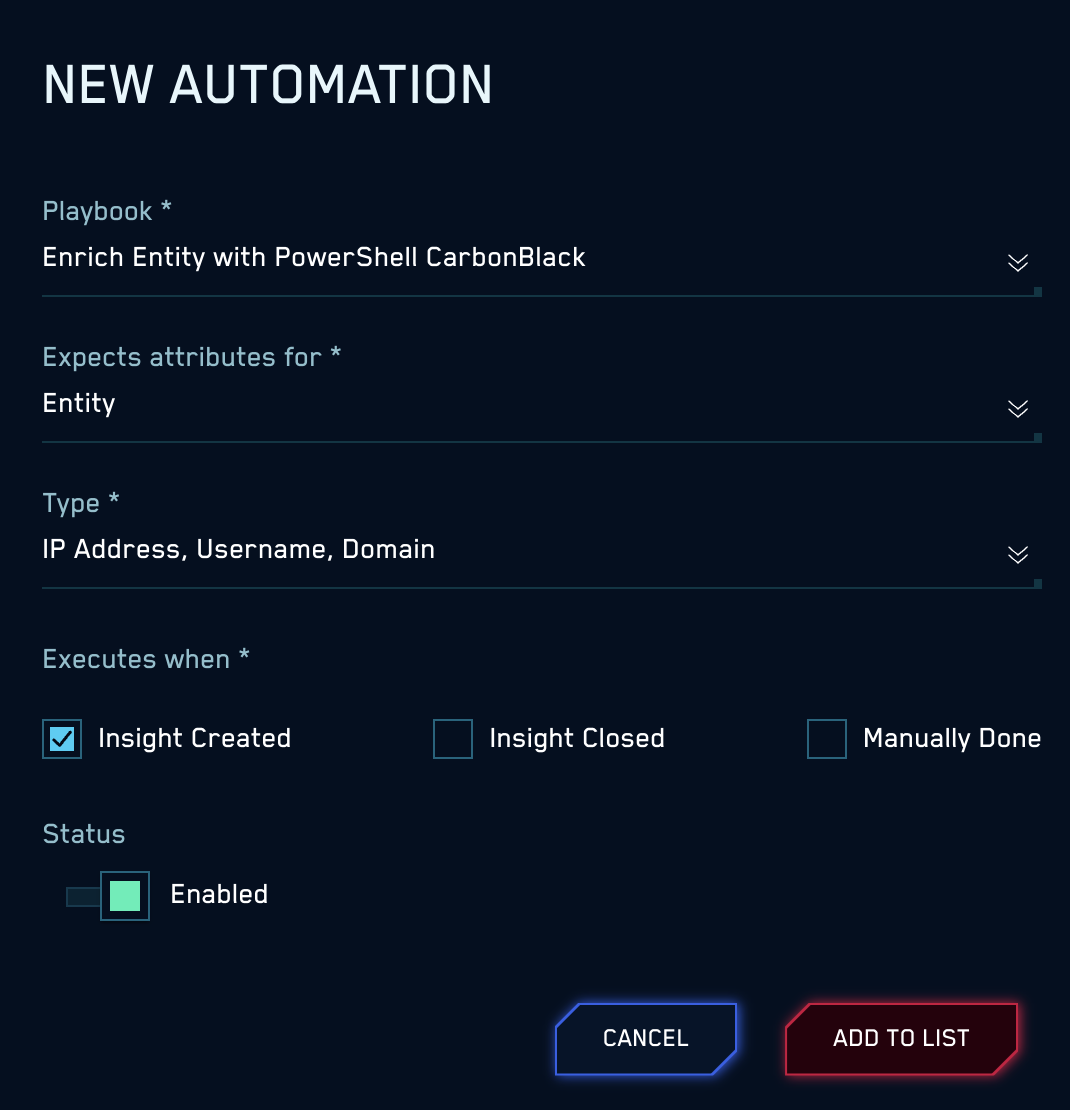
- Set the Status. Disabled automations will not run automatically and will not appear in any Actions or Automations menus.
- In Object (xpects attributes for) select whether the playbook will run on an Entity or Insight. This defines what data payload will be sent to the playbook from Cloud SIEM. If Entity is selected, in the Type field select one or more entity types. The playbook will only execute on the entity types selected.
- For Execution select when the automation runs: Insight Created, Insight Closed, or Manually Done. If Manually Done is not selected, the automation will not appear in any Actions menu on insights or Automations menus on entities.
- Click Save.
Run an automation automatically
If an automation is set to run when an insight is created or closed, it runs automatically provided that:
- The automation is enabled,
- The automation is configured to run on the trigger(s), and
- The automation is an insight automation, or
- The automation is an entity automation, and the insight contains one or more entities of the entity types configured in the automation (this includes the primary and any related entities).
Run an automation manually
Run an automation manually on insights
Automations can be run manually from the Actions drop-down menu on insight details pages:
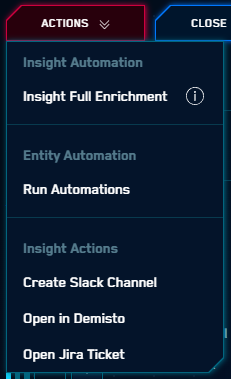
You will see three sections in the Actions menu:
- Insight Automation. Displays a list of all enabled insight automations configured to run manually.
- Entity Automation. Displays a Run Automations option. Click Run Automations to open a dialog enabling you to select one or more entity automations to run (see below).
- Insight Actions. Displays a list of all valid legacy insight actions.
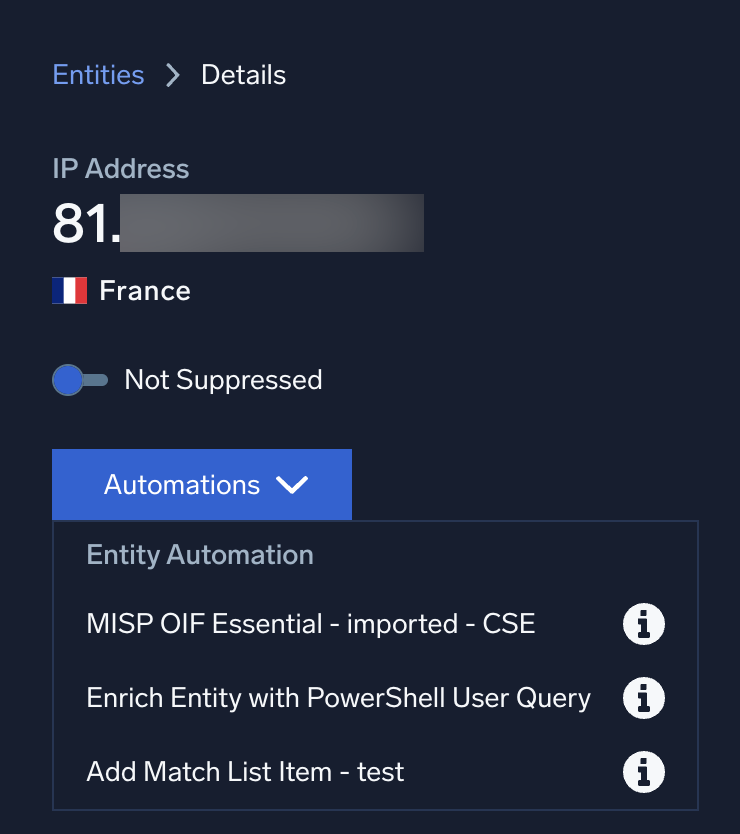
Run an automation manually on entities
On entity details pages, entity automations can be run manually from the Automations drop-down menu:
You can run the same automation more than once for a given entity or insight, but not at the same time. Additional attempts to run an automation while an instance is running will result in an error.
Select entities to run the automation on
On an insight, if you select Actions > Entity Automation > Run Automations, you will be prompted to select one or more of the entities included in the insight:
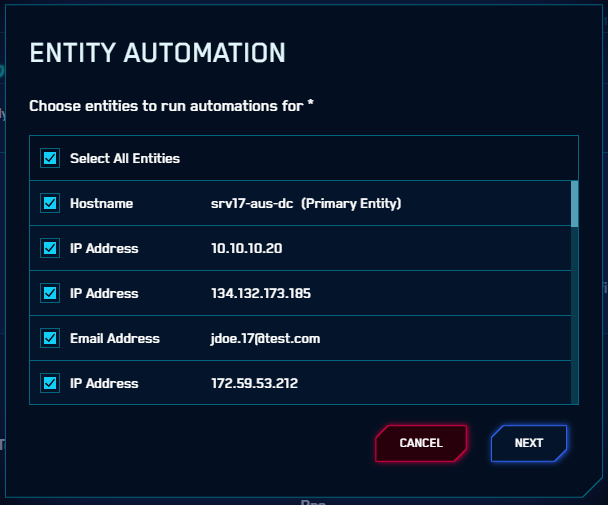
- Select one or more of the entities listed or select Select All Entities. The selected entities don’t have to be the same type.
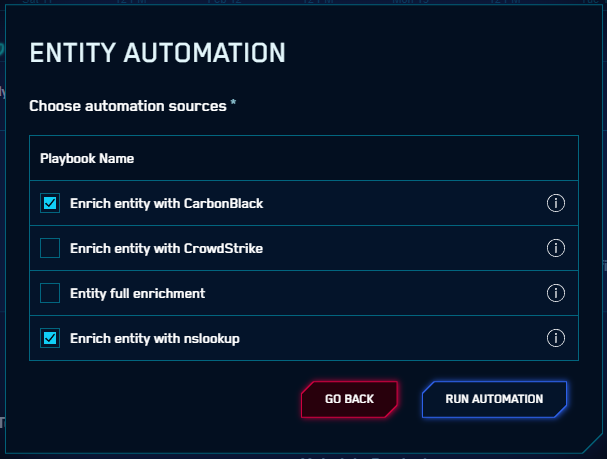
- Click Next. A list displays of all entity automations that are enabled, configured to be run manually, and configured for at least one of the entity types you selected on the previous screen.
- Select the automations you wish to run and click Run Automation. The system will automatically run the appropriate automations for the appropriate entity Types.
View results of an automation
If an automation is set to run when an insight is created or closed, it runs automatically. You can also run an automation manually.
View automations on insights and entities
When automations run, the results display on insights and entities.
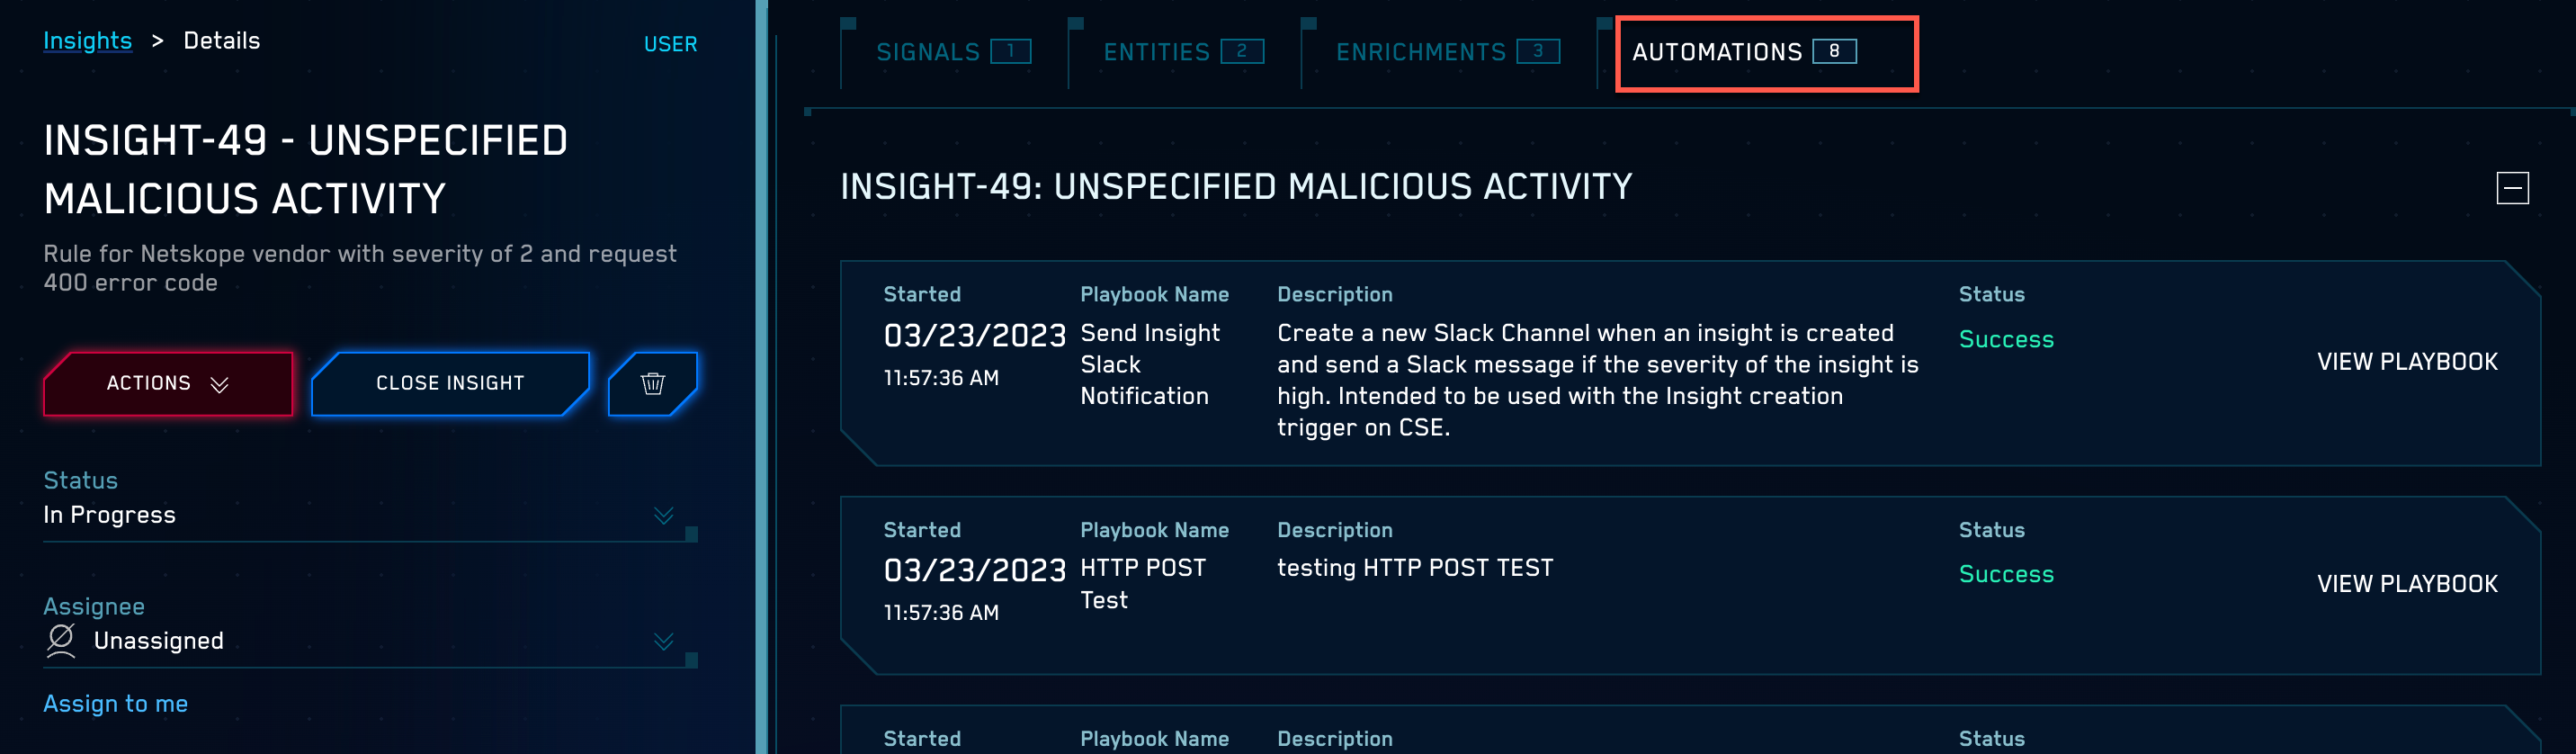
- Open an insight or entity.
- Click Automations at the top of the screen. The example below shows automations that ran on an insight. Each automation shows its result under Status. You can click View Playbook to see the playbook that the automation ran.
While viewing an insight or entity, you can run automations manually.
View enrichments provided by automations
When automations run, they can provide enrichments to insights, entities, and signals.
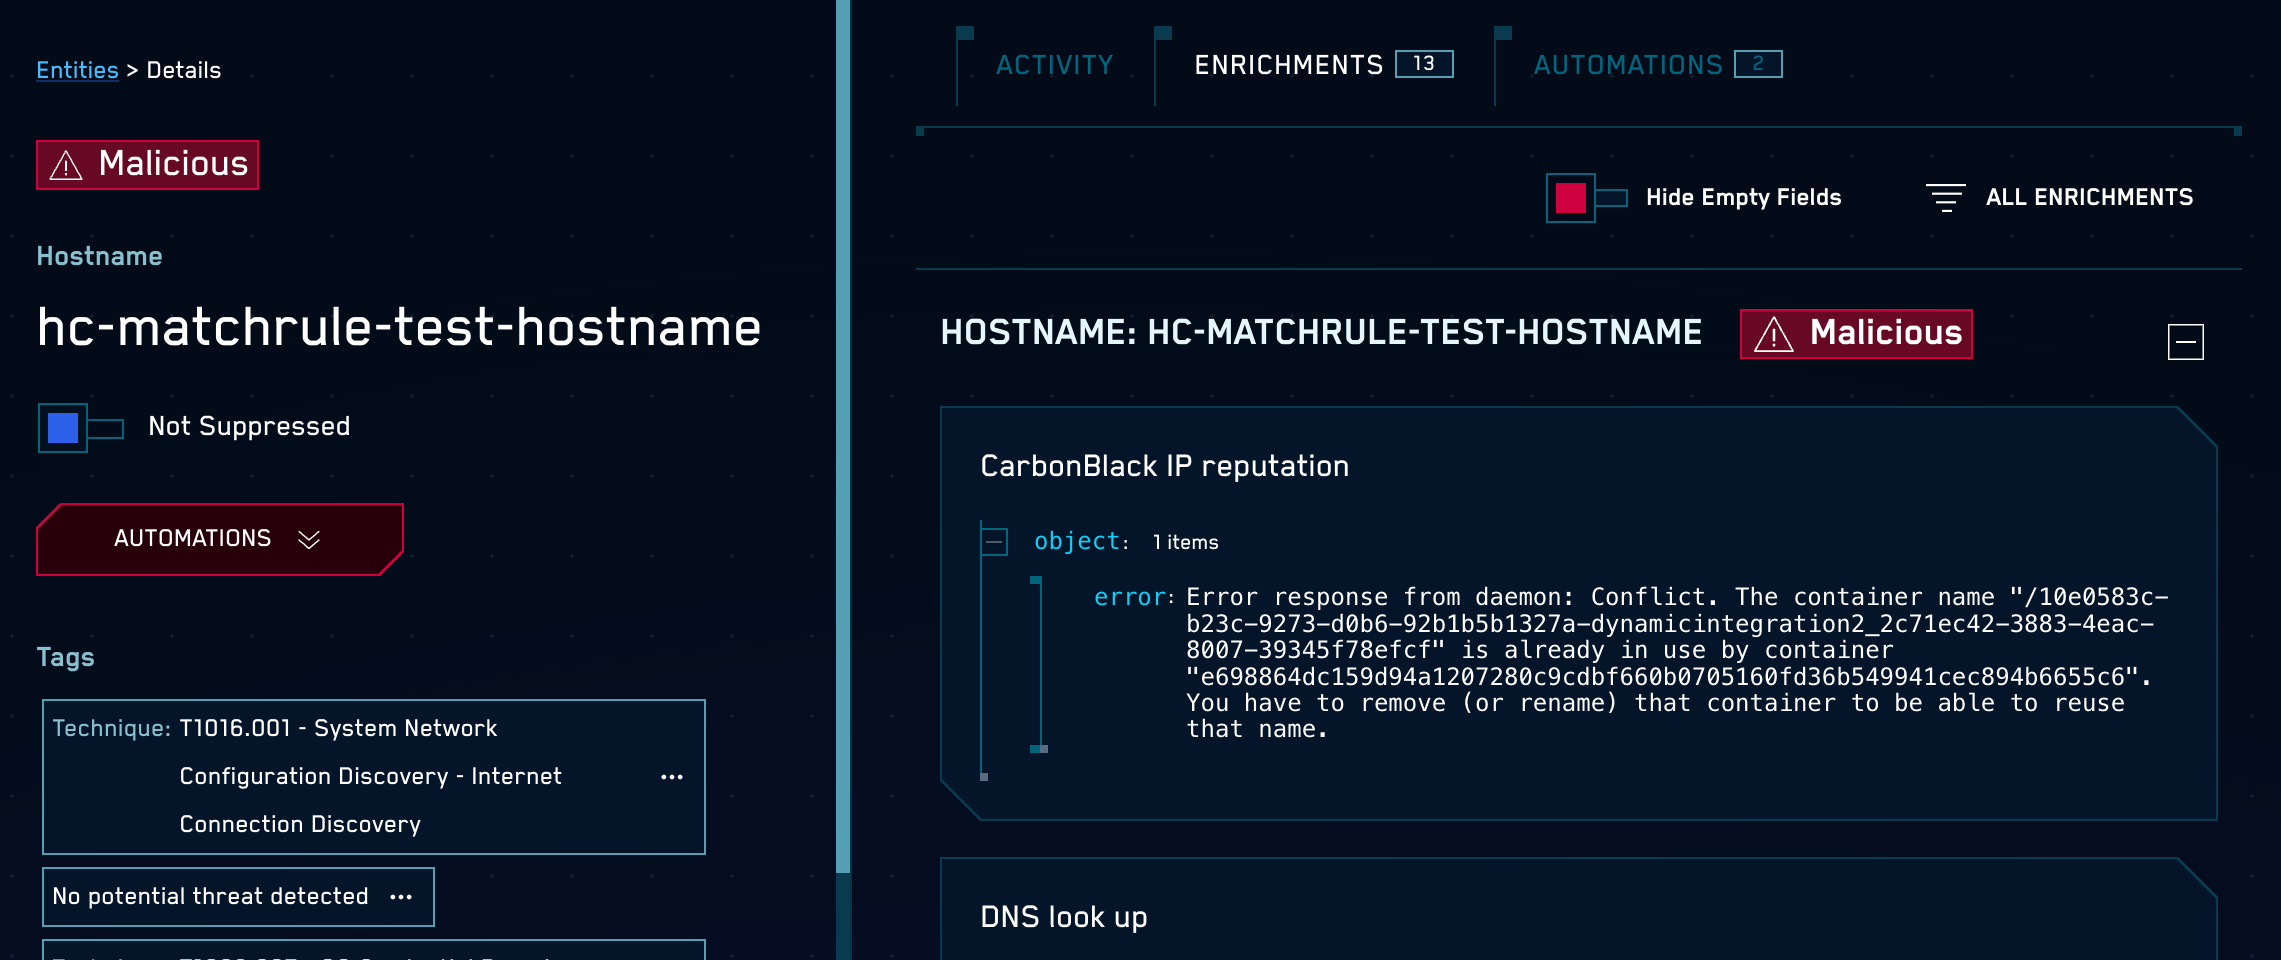
- Open an insight, entity, or signal with enrichments provided by an automation.
- Click Enrichments at the top of the screen.
- If threat indicators are set by the enrichment, they are displayed. The following example shows a Malicious threat indicator.
View an automation's status
After running an automation, you can go to the Automations tab for the insight or entity to view the automation's status.
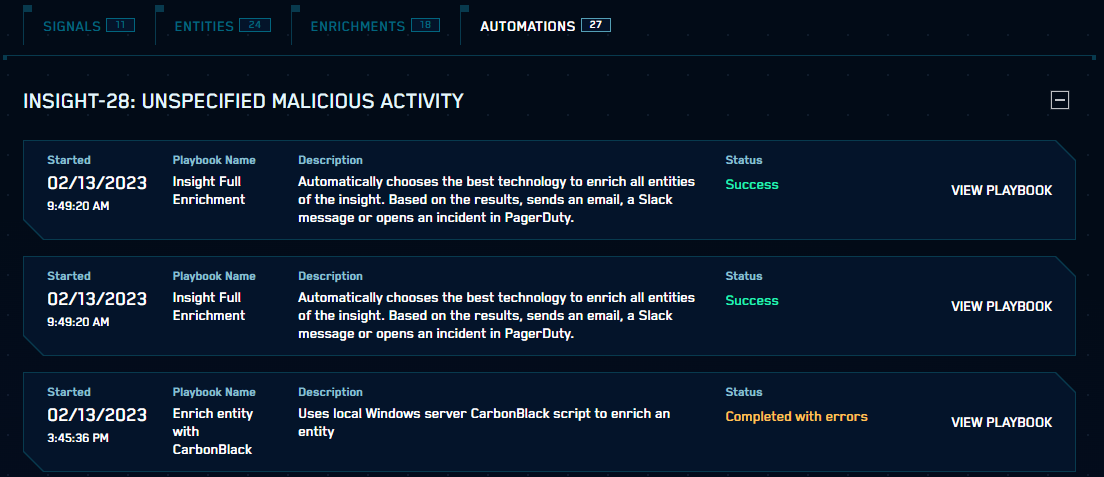
For each automation you will find:
- The time and date when the automation was run.
- The name and description of the associated playbook.
- The playbook’s current status.
- A link to View Playbook in the Automation Service UI.
You may have to manually refresh this screen to see the most current status.
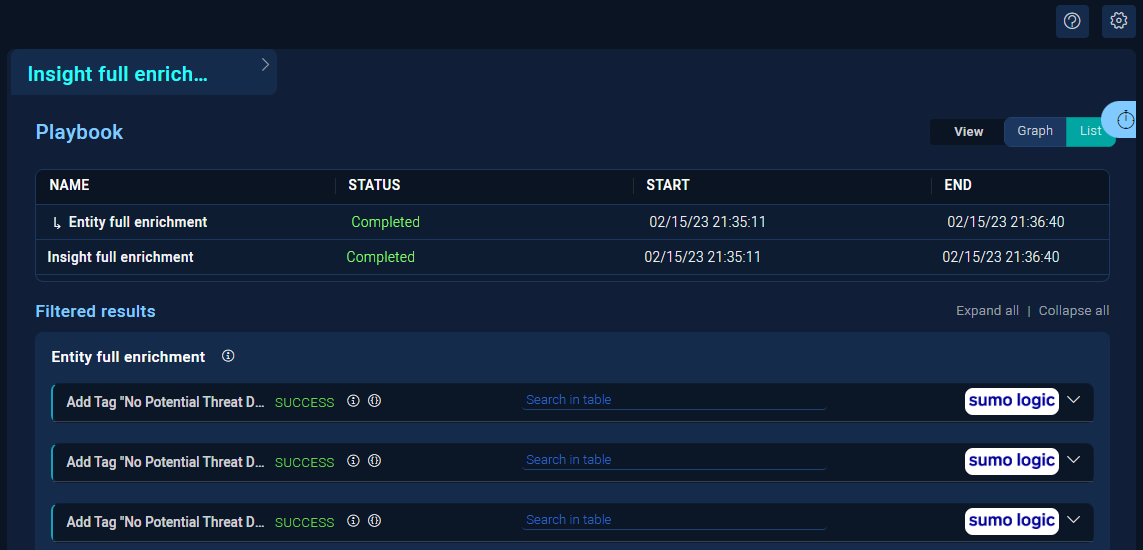
If you click View Playbook, the Automation Service UI will open to the playbook status page:
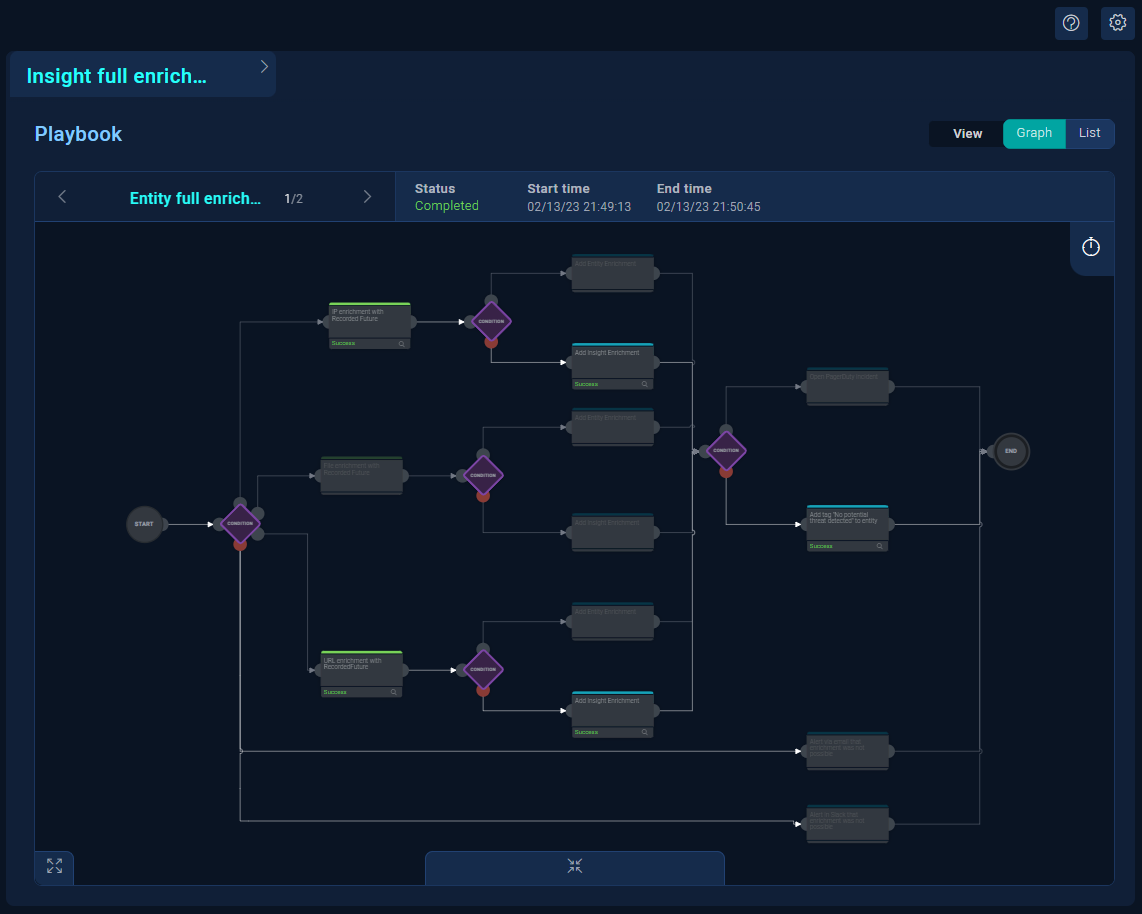
You can switch to the graphical view by clicking Graph View in the upper-right corner:
Migrate from legacy actions and enrichments to the Automation Service
Instead of using Cloud SIEM Actions and the Insight Enrichment Server, we recommend you use the Automation Service. The Automation Service is a newer way to perform actions and enrichments.
To continue using the same functionality found in the legacy actions and enrichments, use installed playbooks in the Automation Service, or replace the legacy actions and enrichments by adding the corresponding actions to playbooks you create in the Automation Service.
Migrating to the Automation Service has many benefits over using legacy actions and enrichments. With the Automation Service, you can:
- Run actions in playbooks rather than singly.
- Use a library of direct cloud integrations.
- Run on platforms other than Windows if you’re running custom actions.
- Customize output.
- Have support for threat indicators.
Use installed playbooks
Though you can create your own playbooks, the Automation Service provides the following playbooks with functionality that replaces legacy actions and enrichments:
- Insight Full Enrichment. Enriches the whole insight with Recorded Future. It enriches both the primary and all the involved entities by sorting them based on their entity type. The playbook alerts you if a risky entity is detected, and also adds tags to the insight for easier identification.
- Entity Full Enrichment. Determines the entity type and uses the appropriate Recorded Future technology to enrich.
- Enrich Entity with PowerShell Carbon Black. Executes the PowerShell script to enrich with Carbon Black, adds the enrichment to the entity, and sends an email if a risky score is detected.
- Enrich Entity with PowerShell CrowdStrike. Executes the PowerShell script to enrich with CrowdStrike, and adds the enrichment to the entity.
- Enrich Entity with PowerShell GreyNoise. Executes the PowerShell script to enrich with GreyNoise, and adds the enrichment to the entity.
- Enrich Entity with PowerShell SentinelOne: Executes the PowerShell script to enrich with SentinelOne, and adds the enrichment to the entity.
- Enrich Entity with PowerShell nslookup. Performs nslookup in the local host where PowerShell is running, and adds the enrichment to the entity.
- Enrich Entity with PowerShell Whois. Performs whois in the local host where PowerShell is running, and adds the enrichment to the entity.
- Enrich Entity with PowerShell User Query: Performs a query on user in the local host where PowerShell is running, and adds the enrichment to the entity.
Replace legacy actions and enrichments
To continue getting the same behavior found in the legacy actions and enrichments, in addition to using installed playbooks, you can add the corresponding new actions to playbooks you create.
For directions to add an action to a playbook, see Add an action node to a playbook. For examples, see Cloud SIEM Automation Examples.
Legacy actions
In place of the following legacy actions, use the corresponding actions from integrations in the Automation Service.
| Legacy action | Description | Corresponding action in the Automation Service | Additional instructions |
|---|---|---|---|
| AWS Simple Notification Service | Pushes insight JSON to the AWS Simple Notification Service. | The Send Message action in the AWS Simple Notification Service integration. | NA |
| Sends email with insight details to a list of recipients. The email includes the MITRE tactic and insight link. | The Send Email action in the Basic Tools integration). | NA | |
| HTTP POST v2 | Allows you to send a full insight in JSON format to any HTTP URL. | The HTTP POST action in the HTTP Tools integration. | NA |
| Microsoft Teams | Sends a message to a Teams channel using a webhook URL. | The Send Teams Message action in the Microsoft Teams integration. | Create a node with the Send Teams Message action and configure it with the message content and the channel name to which the message must be sent. |
| PagerDuty | Sends a notification to PagerDuty. | The Create New Incident action in the PagerDuty integration. | NA |
| Recorded Future | Performs IP, URL, and hash reputation, and pushes the enrichment in the insight. | The IP Reputation, URL Reputation, and File Reputation actions in the Recorded Future OIF integration. | 1. Create a node with the reputation action needed. You can add a condition node before the action to automatically determine the reputation action based on the entity type. 2. Create another node with the Add Insight Enrichment action from the CSE Tools integration, and configure it to use as enrichment the output.raw from the previous node. |
| Slack | Sends a message to a Slack channel. | The Send Message action in the Slack integration. | Create a node with the Send Message action and configure the node with the channel name to which the message must be sent. |
Legacy enrichments
In place of the following legacy enrichments, use the corresponding actions from integrations in the Automation Service.
| Legacy enrichment | PowerShell alternative in the Automation Service | Python alternative in the Automation Service |
|---|---|---|
| Carbon Black | Use the VMwareCarbon Black IP Enrichment action from the PowerShell Tools integration. | Use the Get Devices action from the VMware Carbon Black Cloud Platform integration. |
| CrowdStrike | Use the Crowd Strike Falcon Enrichment action from the PowerShell Tools integration. | Use the List Endpoints action from the CrowdStrike Falcon integration. |
| GreyNoise | Use the GreyNoise Enrichment action from the PowerShell Tools integration. | Use the Context IP Lookup action from the GreyNoise integration. |
| nslookup | Use the DNS Lookup action from the PowerShell Tools integration. | NA |
| Query user | Use the Query User action from the PowerShell Tools integration. | NA |
| SentinelOne | Use the SentinelOne Enrichment action from PowerShell Tools integration. | Use the List Agents action from the SentinelOne integration. |
| whois | Use the Whois action from the PowerShell Tools integration. | NA |
| Custom scripts | Use the Execute Commands action from the PowerShell Tools integration to execute any command inside your PowerShell Windows host, including custom scripts. | NA |