AWS Security Hub CSPM

In order to give our shared clients even more context-rich and prioritized security discoveries, Sumo Logic is expanding its integration as a launch partner for the new AWS Security Hub CSPM. This new feature will enable security teams to concentrate on the most important threats to their cloud environments by enabling Sumo Logic to immediately ingest prioritized security results from AWS Security Hub CSPM.
AWS Security Hub CSPM is an AWS security service that provides a comprehensive view of your security state within AWS and your compliance with the security industry standards and best practices.
The Sumo Logic app for AWS Security Hub CSPM leverages findings data from Security Hub and visually displays security state data in Dashboards. The dashboards provide a high-level view of findings, showing the type, when they occurred, the resources that were affected, their severity, and their distribution, showing the current security and compliance status of an AWS account from all sources.
Sumo Logic provides a seamless bi-directional integration with AWS Security Hub CSPM with the following:
- AWS Security Hub CSPM forwarder - This solution forwards (sends) scheduled search results and alerts (as findings) to AWS Security Hub CSPM.
- AWS Security Hub CSPM collector - This solution collects findings from AWS Security Hub CSPM to Sumo Logic where they are displayed in visual pre-defined dashboards.
The Sumo Logic integration with AWS Security Hub CSPM extends compliance checks to other key regulatory frameworks such as PCI, GDPR, HIPAA, and others.
For more information on AWS Security Hub CSPM, refer to the Amazon AWS Security Hub CSPM documentation.
Log types
The AWS Security Hub CSPM utilizes the Amazon findings log types.
Sample log messages
{
  "SchemaVersion": "2018-10-08",
  "ProductArn": "arn:aws:securityhub:us-west- 2:123456789012:provider:private/default",
  "AwsAccountId": "123456789012",
  "Id": "test_finding_123456",
  "GeneratorId": "TestDetector",
  "Types": [
    "Software and Configuration Checks/Vulnerabilities/CVE"
  ],
  "CreatedAt": "2018-11- 06T13:22:13.933Z",
  "UpdatedAt": "2018-11-07T14:22:13.933Z",
  "Severity": {
    "Product": 10,
    "Normalized": 30
  },
  "Title": "Unprotected port 22 found on instance i-01234567890abcefb",
  "Description": "Test finding was found on instance i- 01234567890afbcefa",
  "Resources": [
    {
      "Type": "AwsEc2::Instance",
      "Id": "arn:aws:ec2:us-west-2: 123456789012:instance:i- 01234567890abcefa"
    }
  ],
  "SourceUrl": "http://myfp.com/recommendations/dangerous_things_and_how_to_fix_them",
  "Process": {
    "Name": "My Process",
    "Path": "/Process/Path"
  },
  "RecordState": "ACTIVE",
  "Note": {
    "Text": "User1 will address this finding",
    "UpdatedBy": "User1",
    "UpdatedAt": "2018-11-03T13:22:13.933Z"
  }
}
Sample queries
(_sourceCategory="securityhub_findings" OR _sourceCategory="Labs/AWS/SecurityHub")
| json  "AwsAccountId", "Id", "GeneratorId", "ProductArn", "CreatedAt", "UpdatedAt", "Resources",
 "Severity.Normalized", "SourceUrl",
"Types", "Compliance.Status" as aws_account_id, finding_id, generator_id, product_arn, created_at,
 updated_at, resources, severity_normalized, sourceurl, finding_types, compliance_status nodrop
| parse regex field=finding_types "\"(?<finding_type>.*?)\"" multi
| parse regex field=resources "\"Type\":\"(?<resource_type>.*?)\"" multi
| parse regex field=resources "\"Id\":\"(?<resource_id>.*?)\"" multi
| parse regex field=product_arn "product/(?<finding_provider>.*?)$"
| min(severity_normalized), pct(severity_normalized,25), pct(severity_normalized,50), pct(severity_normalized,75),
  max(severity_normalized) by resource_type
Sending findings to the AWS Security Hub CSPM forwarder
This section shows you how to enable Sumo Logic as a Finding Provider, deploy the AWS Security Hub CSPM forwarder, create a Webhook connection, and create a scheduled search.
The AWS Security Hub CSPM forwarder sends scheduled search results and alerts as findings to AWS Security Hub CSPM.
To complete the following tasks, Security Hub must be enabled on your AWS account. For more information, see the AWS Security Hub CSPM documentation for Setting Up AWS Security Hub CSPM.
Overview
AWS Security Hub CSPM forwarder creates a Lambda function along with an Identity Access and Management (IAM) authentication secured API Gateway endpoint. A Sumo Logic scheduled search then sends the results to the endpoint using Webhook for Lambda The triggered Lambda function parses the search results, transforming them into Amazon Finding Format (AFF). Each of the rows of the AFF data is sent as a finding to AWS Security Hub CSPM.
The configuration is defined using SAM specification and published in AWS Serverless Application Repository.
Step 1: Enable Sumo Logic as a Finding Provider
AWS Security Hub CSPM detects and consolidates those security findings from the supported AWS services that are generated after Security Hub is enabled in your AWS accounts. This section demonstrates how to enable Sumo Logic as an AWS Finding Provider (FP) to communicate with AWS Security Hub CSPM.
To enable Sumo Logic for AWS Security Hub CSPM, do the following:
- Open the Security Hub console at https://console.aws.amazon.com/securityhub, and choose Settings > Providers.
- Search for “Sumo Logic” and click Subscribe for Sumo Logic Machine Data Analytics.
Step 2: Deploy the AWS Security Hub CSPM forwarder
This section demonstrates how to deploy the AWS Security Hub CSPM forwarder, a serverless application based on AWS SAM specification.
To deploy the AWS Security Hub CSPM forwarder, do the following:
- Open a browser window and go to the following URL: https://serverlessrepo.aws.amazon.com/applications.
- In the Serverless Application Repository, search for sumologic.
- Select the Show apps that create custom IAM roles or resource policies checkbox, click the sumo-logic-securityhub-forwarder app link, and then click Deploy.
- After the stack is deployed, go to CloudFormation > Stacks > Stack details > Outputs and copy the value of SecurityHubForwarderApiUrl. This is the API Gateway endpoint.
Step 3: Create a Webhook connection
This section demonstrates how to create a Webhook connection to trigger an AWS Lambda function.
To create a Webhook connection, do the following:
- Follow the instructions for creating a Webhook connection, and use the API Gateway endpoint value you created in Step 2, point 4 as the URL. AWS Security Hub CSPM Connector (SAM application) secures the endpoint with the AWS_IAM authorization type.
- Verify that it has the following payload:
{
  "Types": "<type> Ex: Software and Configuration Checks/Industry and Regulatory Standards/PCI-DSS Controls",
  "Description": "{{SearchDescription}}",
  "SourceUrl": "{{SearchQueryUrl}}",
  "GeneratorID": "{{SearchName}}",
  "Severity": 50,
  "Rows": "{{AggregateResultsJson}}",
  "ComplianceStatus": "(Optional)<status> - PASSED/WARNING/FAILED/NOT_AVAILABLE"
}- For the
"Severity"value, enter a number from0to100. - For
"Types","Description","SourceUrl","GeneratorID","Severity", and"ComplianceStatus", status are mapped to corresponding fields specified in Amazon Finding Format.
- For the
- Ensure that the IAM role or IAM user (whose credentials are used) has permissions to invoke the API in API Gateway, as described in Control Access for Invoking an API Amazon documentation. You can use the payload in troubleshooting tips section to test the connection.
Step 4: Create scheduled searches
When you save a search, you can add a schedule to run it at a regularly scheduled time, and add alerts. This section demonstrates how to write a query and then create a scheduled search for AWS Security Hub CSPM.
The purpose of search is to identify a security or compliance issue, when it was generated, and which resource was affected.
Each search result translates to one finding—only one resource per finding is supported.
In the following example, the query generates a finding that there is direct external traffic to a secured port which violates one of the PCI requirement checks.
_sourceCategory=Labs/AWS/VPC ACCEPT (3306 or 5439 or 5432 or 1433 or 2638 or 5984)
| json "message" as _rawvpc nodrop | if (_raw matches "{*", _rawvpc,_raw) as message
| parse field=message "* * * * * * * * * * * * * *" as version,aws_account_id,interfaceID,src_ip,dest_ip,src_port,dest_port,Protocol,Packets,bytes,StartSample,EndSample,Action,status
| where Action="ACCEPT" and dest_port in ("3306", "5439", "5432", "1433", "2638", "5984")
| where (compareCIDRPrefix("172.16.0.0", dest_ip, toInt(12)) or compareCIDRPrefix("192.168.0.0", dest_ip, toInt(16)) or compareCIDRPrefix("10.0.0.0", dest_ip, toInt(8)) and (dest_port in ("3306", "5439", "5432", "1433", "2638", "5984")))
| where (!compareCIDRPrefix("172.16.0.0", src_ip, toInt(12)) and !compareCIDRPrefix("192.168.0.0", src_ip, toInt(16)) and !compareCIDRPrefix("10.0.0.0", src_ip, toInt(8)))
| "Direct external traffic to secure port" as message | "Critical" as Severity
| concat("PCI Req 01: Traffic to Cardholder Environment: Direct external traffic to secure port on ", dest_ip) as title
| _messagetime as finding_time
| dest_ip as resource_id
| "AwsEc2Instance" as resource_type
| count by finding_time, resource_id, resource_type, title, aws_account_id
| fields -_count
To write a query and create a scheduled search, do the following:
- Write a search query that contains the following mandatory fields, as described in the AWS Security Hub CSPM documentation:
The
"finding_time", "resource_type", "resource_id", "title"finding_timefield can be either the_messageTimeor_timeslicefield in Sumo Logic. - Create a scheduled search, and configure the following settings:
-
Alert condition is set to
Greater than >andNumber of Resultsis set to0. -
Alert Type is set to
Webhook. -
Connection is set to the name configured in step 2 (of the link document instructions).
-
Toggle the customize payload button and fill the fields in the following dialog. The following table explains each field.
-
The
aws_account_idis an optional field in search results. The Lambda function picks up theaws_account_idin the following order of priority:Types Type of Finding in the format namespace/category/classifier. This field should match one of the finding types, as defined in Finding Type Taxonomy in AWS docs. Description Details specific to the instance of the finding. This should be non empty. SourceURL Search Query URL pointing to the exact query that generated the finding. GeneratorID Scheduled Search Name that generated this finding. Severity Impact of a finding has on a customer (data loss, malware activity, configuration weakness etc), displayed as an integer ranging from 0 to 100. ComplianceStatus Results of a compliance check. This is an optional field and its value should be one of the following: PASSED/WARNING/FAILED/NOT_AVAILABLE.
-
- The
aws_account_idfield in the search results. AWS_ACCOUNT_IDset as a Lambda environment variable.- The
account_idwhere the Lambda function is running.
The aws_account_id defaults to the account in which Lambda is running.
Troubleshooting tips
In the case of a problem, perform the following tasks to discover the cause.
- Test the API using mock data, such as the following JSON example.
{
  "Types": "Software and Configuration Checks/Industry and Regulatory Standards/HIPAA Controls",
  "Description": "This search gives top 10 resources which are accessed in last 15 minutes",
  "GeneratorID": "InsertFindingsScheduledSearch",
  "Severity": 30,
  "SourceUrl": "https://service.sumologic.com/ui/#/search/RmC8kAUGZbXrkj2rOFmUxmHtzINUgfJnFplh3QWY",
  "ComplianceStatus": "FAILED",
  "Rows": "[{\"Timeslice\":1542719060000,\"finding_time\":\"1542719060000\",\"item_name\":\"A nice dashboard.png\",\"title\":\"Vulnerability: Apple iTunes m3u Playlist File Title Parsing Buffer Overflow Vulnerability(34886) found on 207.235.176.3\",\"resource_id\":\"10.178.11.43\",\"resource_type\":\"Other\"},{\"Timeslice\":\"1542719060000\",\"finding_time\":\"1542719060000\",\"item_name\":\"Screen Shot 2014-07-30 at 11.39.29 PM.png\",\"title\":\"PCI Req 01: Traffic to Cardholder Environment: Direct external traffic to secure port on 10.178.11.43\",\"resource_id\":\"10.178.11.42\",\"resource_type\":\"AwsEc2Instance\"},{\"Timeslice\":\"1542719060000\",\"finding_time\":\"1542719060000\",\"item_name\":\"10388049_589057504526630_2031213996_n.jpg\",\"title\":\"Test Check Success for  207.235.176.5\",\"resource_id\":\"10.178.11.41\",\"resource_type\":\"Other\"}]"
}
- Check for
status code 200in the response body to verify whether the API Gateway and Lambda integration is working correctly. For more information on how to test API Gateway with console refer these docs. - Monitor scheduled search logs using the following query in Sumo Logic. This verifies whether the scheduled search was triggered or not.
_view=sumologic_audit "Scheduled search alert triggered" <webhook_name>
- Check the CloudWatch logs for the Lambda function. Sumo Logic saves Lambda function logs to CloudWatch in a log group:
/aws/lambda/<function_name>. Check this log for any errors during lambda execution.
Collecting logs for the AWS Security Hub CSPM app
You can collect the AWS Security Hub CSPM logs using the following methods:
- Method 1: AWS Security Hub CSPM > EventBridge > Sumo Logic via HTTP
- Method 2: AWS Security Hub CSPM > Lambda Function > Amazon S3 > Sumo Logic via S3 Source
For efficiency and seamless integration, Method 1 using AWS EventBridge is preferred, as it leverages native AWS services to reduce resource overhead and simplify the process.
Before collecting logs, ensure that Security Hub is enabled on your AWS account. For more information, see the AWS Security Hub CSPM documentation for Setting Up AWS Security Hub CSPM.
Method 1: Security Hub CSPM > EventBridge > Sumo Logic via HTTP (Preferred)
This method leverages AWS EventBridge to streamline the logging process by sending data directly to Sumo Logic via an HTTP endpoint. By eliminating intermediary services such as Lambda, it offers a more straightforward and cost-effective solution.
Step 1: Create an HTTP source in Sumo Logic
To create an HTTP source in Sumo Logic, see HTTP Logs and Metrics Source.
Step 2: Configure EventBridge API destination
Follow the steps below to configure the EventBridge API destination:
- Sign in to your Amazon EventBridge Console.
- In the navigation bar, click API destinations.
- Click Create destination.
- Enter a name for the API Destination.
- Provide the HTTP Source URL from Sumo Logic.
- Click Create a new connection to create a connection for the API destination.
- Provide a connection name.
- Keep the API Type as Public.
- Select Basic (Username/Password) in the Authorization type.
- Add any value of your choice for Username and Password.
Step 3: Create the EventBridge rule
Follow the steps below to configure the EventBridge rule:
- Sign in to your Amazon EventBridge Console.
- In the navigation bar, click Rules.
- Set the event source to AWS services and then select Security Hub as the AWS service.
- Select All Events in Event Type.
- Under Select targets, choose EventBridge API destination.
- Select the API Destination created in Step 2.
- Select Create a new role for this specific resource in the Execution role.
- Click Create to activate the rule.
Method 2: AWS Security Hub CSPM > Lambda Function > Amazon S3 > Sumo Logic via S3 Source (Alternative)
This method uses an AWS Lambda function to process, store, and forward logs to Sumo Logic. While it offers a robust solution, it introduces additional AWS resources, such as Lambda, which can increase both cost and complexity.
Sumo Logic provides a serverless solution for creating a CloudWatch events rule and a Lambda function (SecurityHubCollector) to extract findings from AWS Security Hub CSPM.
Findings from AWS services (AWS Security Hub CSPM) are delivered to CloudWatch Events as events in near real time. The Lambda function parses those events and sends them to an S3 bucket. Sumo Logic then collects the findings data using an S3 bucket source on a Sumo Logic hosted collector. The Lambda function setup is defined using Serverless Application Model (SAM) specifications and is published in AWS Serverless Application Repository.
You do not have to manually create the AWS resources. Simply deploy the solution, as described in the Step 2: Deploy an AWS Security Hub CSPM App collector.
Step 1: Add a hosted collector and Amazon S3 source
This section demonstrates how to add a hosted Sumo Logic collector and AWS source, to collect events for the AWS Security Hub CSPM App.
Prerequisites
An AWS Source must be associated with a Sumo Logic Hosted Collector. Before creating the S3 source, identify the Sumo Logic Hosted Collector you want to use, or create a new Hosted Collector as described in the following task.
To add a hosted collector and Amazon S3 source:
- Grant Access to an Amazon S3 Bucket.
- Create a new Sumo Logic Hosted Collector by performing the steps in Configure a Hosted Collector
- Add an AWS Source for the S3 Source to Sumo Logic, and in Advanced Options for Logs, under Timestamp Format, click Specify a format and enter the following:
- Specify Format as
yyyy-MM-dd'T'HH:mm:ss.SSS'Z' - Specify Timestamp locator as
.*"UpdatedAt":"(.*)".* - Click Add.
- Specify Format as
Step 2: Deploy an AWS Security Hub CSPM App collector
The AWS Security Hub CSPM App collector transforms the received events and sends them to Sumo Logic. The AWS Security Hub CSPM App displays the results in pre-defined visual dashboards for you to analyze.
To deploy an AWS Security Hub CSPM App collector:
- Open a browser window and enter the following URL: https://serverlessrepo.aws.amazon.com/applications
- In the Serverless Application Repository, search for sumologic.
- Select Show apps that create custom IAM roles or resource policies check box.
- Click the sumologic-securityhub-collector link, and then click Deploy.
- In the AWS Lambda > Functions > Application Settings panel, enter the name of the S3SourceBucketName for the bucket you configured (when you defined the S3 source).
- Scroll to the bottom of the window and click Deploy.
Installing the AWS Security Hub CSPM app
Now that you have set up ingestion and collected findings for AWS Security Hub CSPM, you can install the Sumo Logic app for AWS Security Hub CSPM and use the preconfigured searches and dashboards that provide insight into your data.
To install the app, do the following:
Next-Gen App: To install or update the app, you must be an account administrator or a user with Manage Apps, Manage Monitors, Manage Fields, Manage Metric Rules, and Manage Collectors capabilities depending upon the different content types part of the app.
- Select App Catalog.
- In the 🔎 Search Apps field, run a search for your desired app, then select it.
- Click Install App.
note
Sometimes this button says Add Integration.
- Click Next in the Setup Data section.
- In the Configure section of your respective app, complete the following fields.
- Field Name. If you already have collectors and sources set up, select the configured metadata field name (eg _sourcecategory) or specify other custom metadata (eg: _collector) along with its metadata Field Value.
- Click Next. You will be redirected to the Preview & Done section.
Post-installation
Once your app is installed, it will appear in your Installed Apps folder, and dashboard panels will start to fill automatically.
Each panel slowly fills with data matching the time range query received since the panel was created. Results will not immediately be available but will be updated with full graphs and charts over time.
Viewing AWS Security Hub CSPM dashboards
All dashboards have a set of filters that you can apply to the entire dashboard. Use these filters to drill down and examine the data to a granular level.
- You can change the time range for a dashboard or panel by selecting a predefined interval from a drop-down list, choosing a recently used time range, or specifying custom dates and times. Learn more.
- You can use template variables to drill down and examine the data on a granular level. For more information, see Filtering Dashboards with Template Variables.
- Most Next-Gen apps allow you to provide the scope at the installation time and are comprised of a key (
_sourceCategoryby default) and a default value for this key. Based on your input, the app dashboards will be parameterized with a dashboard variable, allowing you to change the dataset queried by all panels. This eliminates the need to create multiple copies of the same dashboard with different queries.
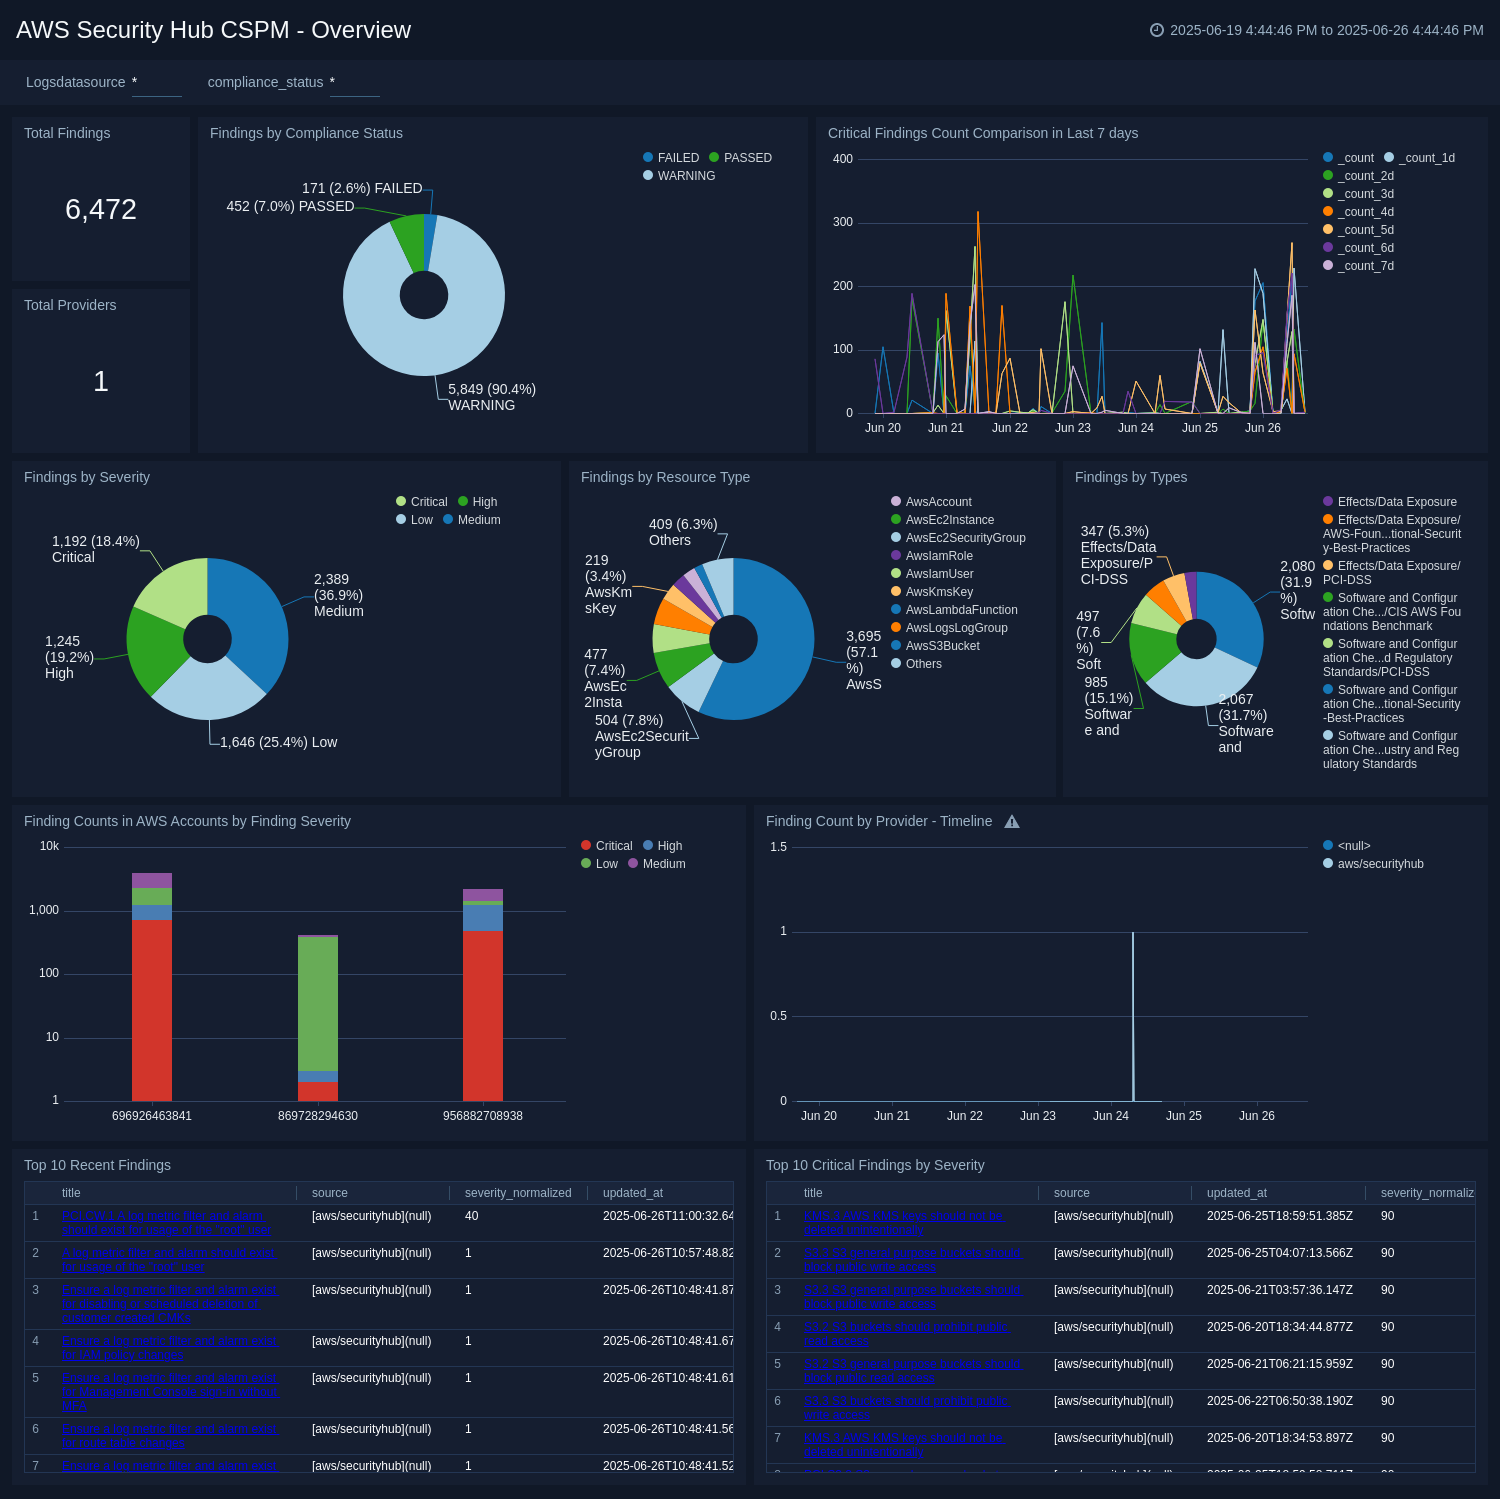
Overview
The AWS Security Hub CSPM - Overview dashboard provides a high-level view of findings results. Panels display data aggregated by the number of providers, findings by provider, total findings, findings in AWS accounts by severity, top recent findings, findings by resource type and severity, most severe findings, and critical findings comparison. Each panel provides the ability to drill down for a more granular view of the data.
Use this dashboard to:
- Track findings from different finding providers.
- Get a high-level overview of actionable items from a security perspective.
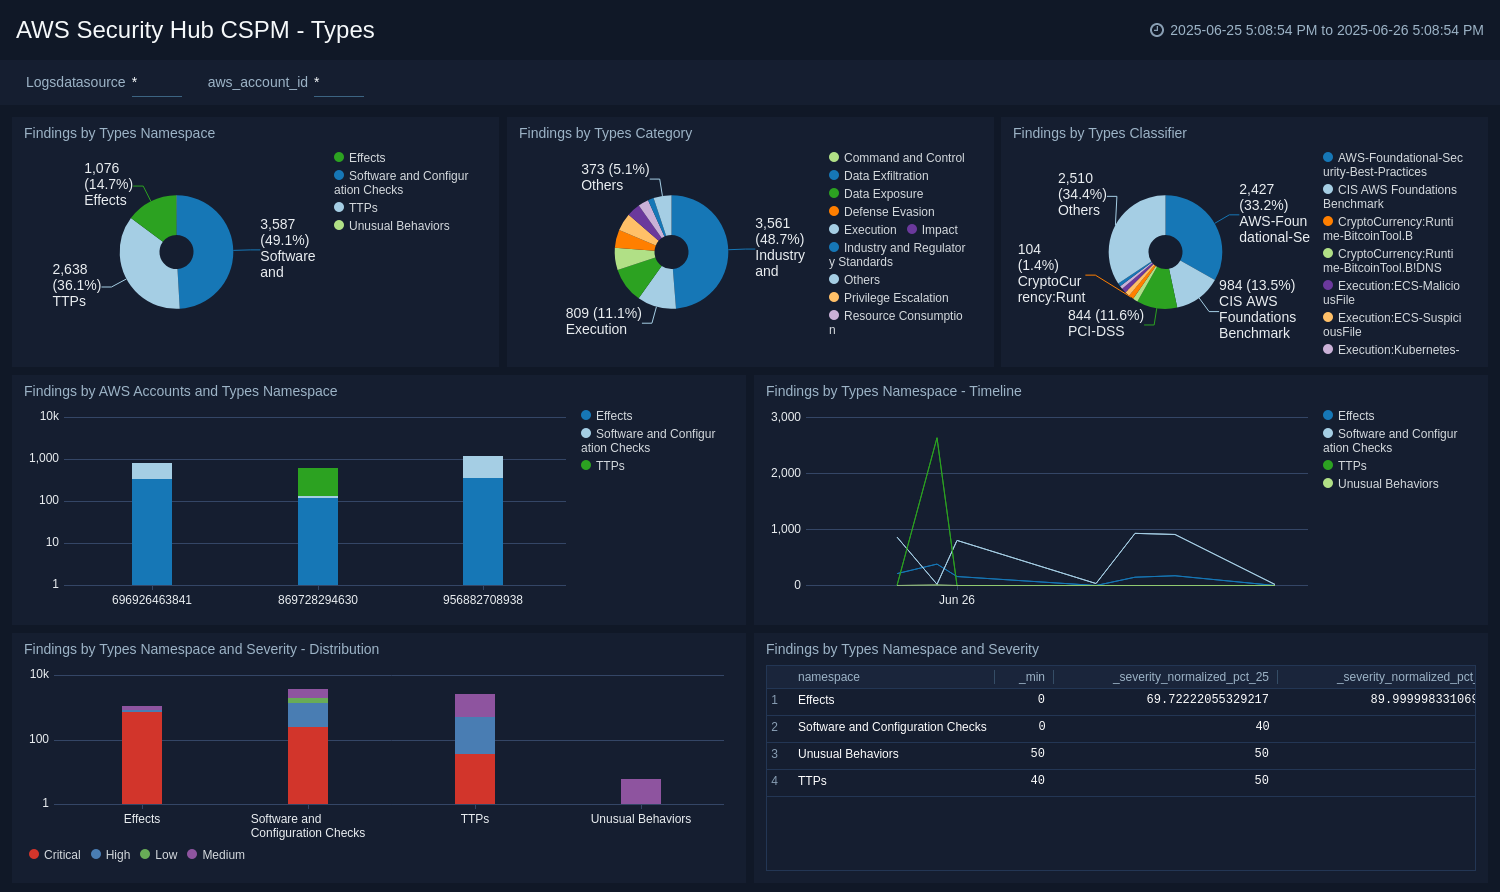
Types
The AWS Security Hub CSPM - Types dashboard provides a visual analysis of findings by AWS accounts and types namespace for: category, classifier, timeline, severity distribution, and severity Box Plot. Each panel provides the ability to drill down for a more granular view of the data.
Use this dashboard to:
- Isolate important security findings based on finding types.
- Analyze the findings distribution across AWS accounts and their severity.
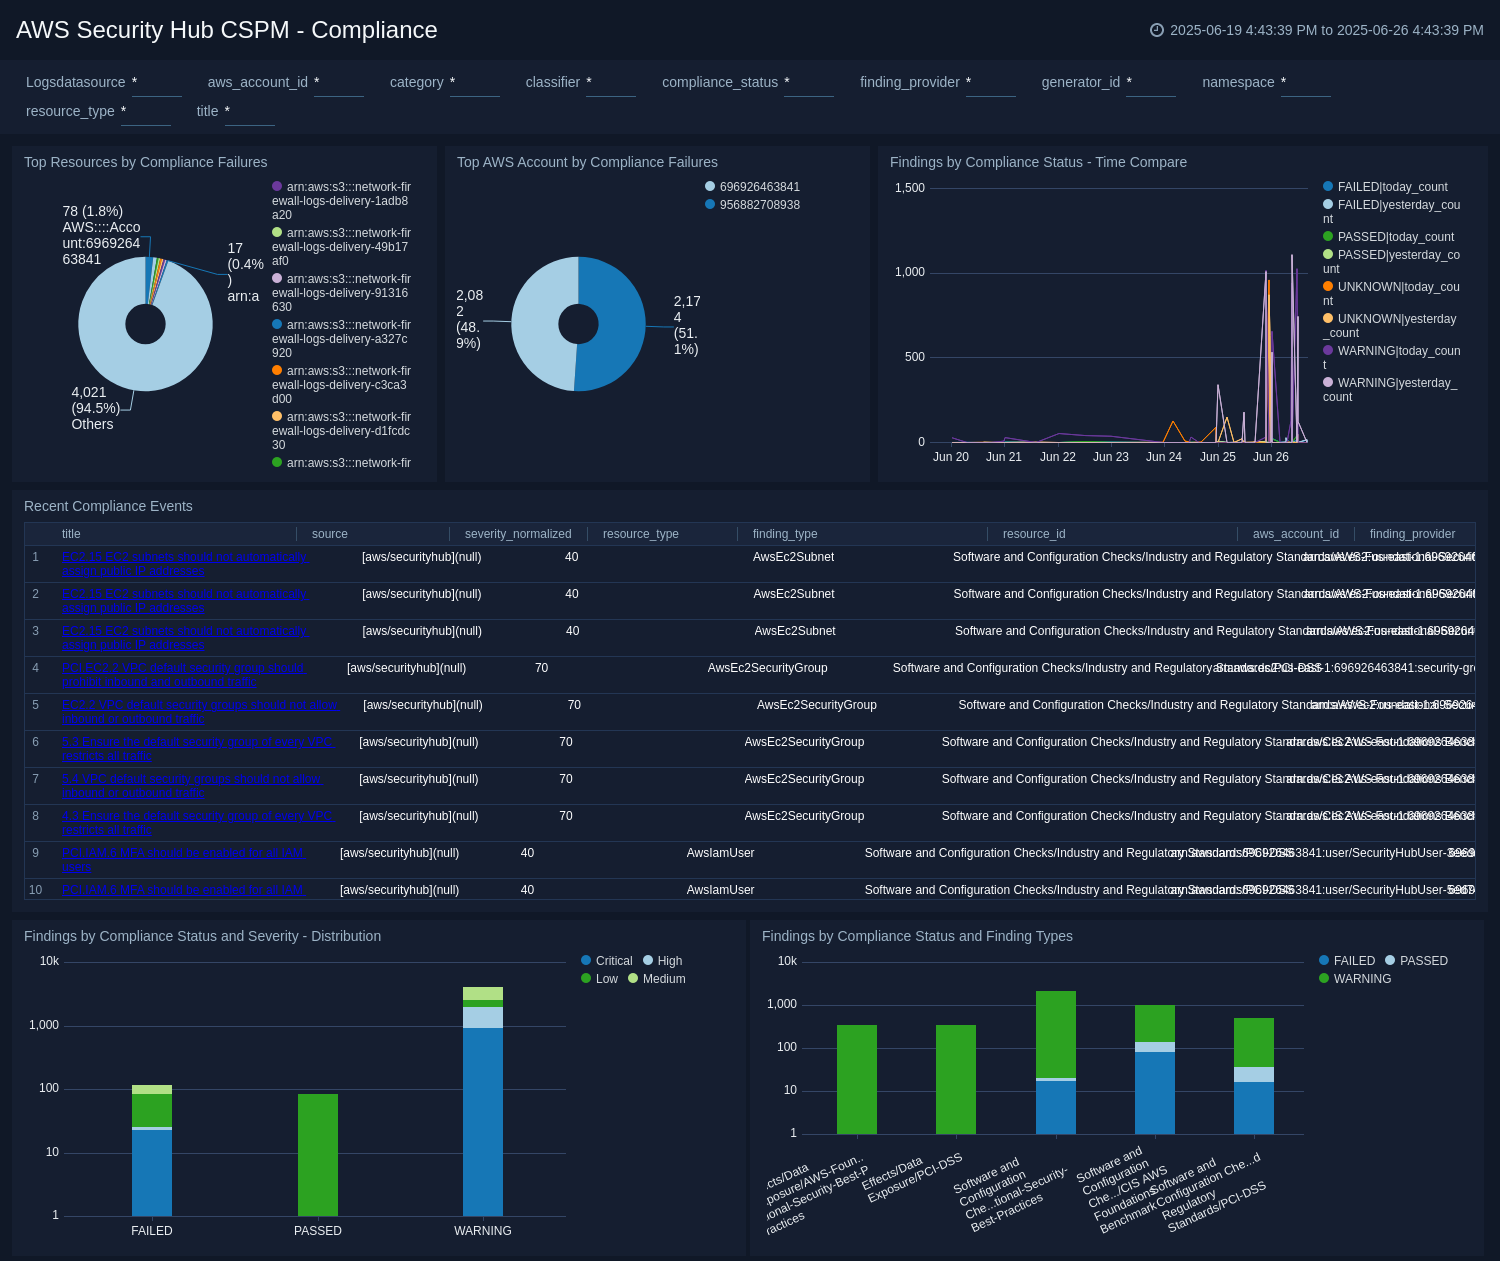
Compliance
The AWS Security Hub CSPM - Compliance dashboard provides a high-level visual analysis of compliance status, resource failures, AWS account failures, failed events, status timelines, status and severity distribution and finding types. Each panel provides the ability to drill down for a more granular view of the data.
Use this dashboard to:
- Monitor failing compliance checks.
- Analyze the distribution of failed compliance checks across AWS accounts, their severity and finding types.
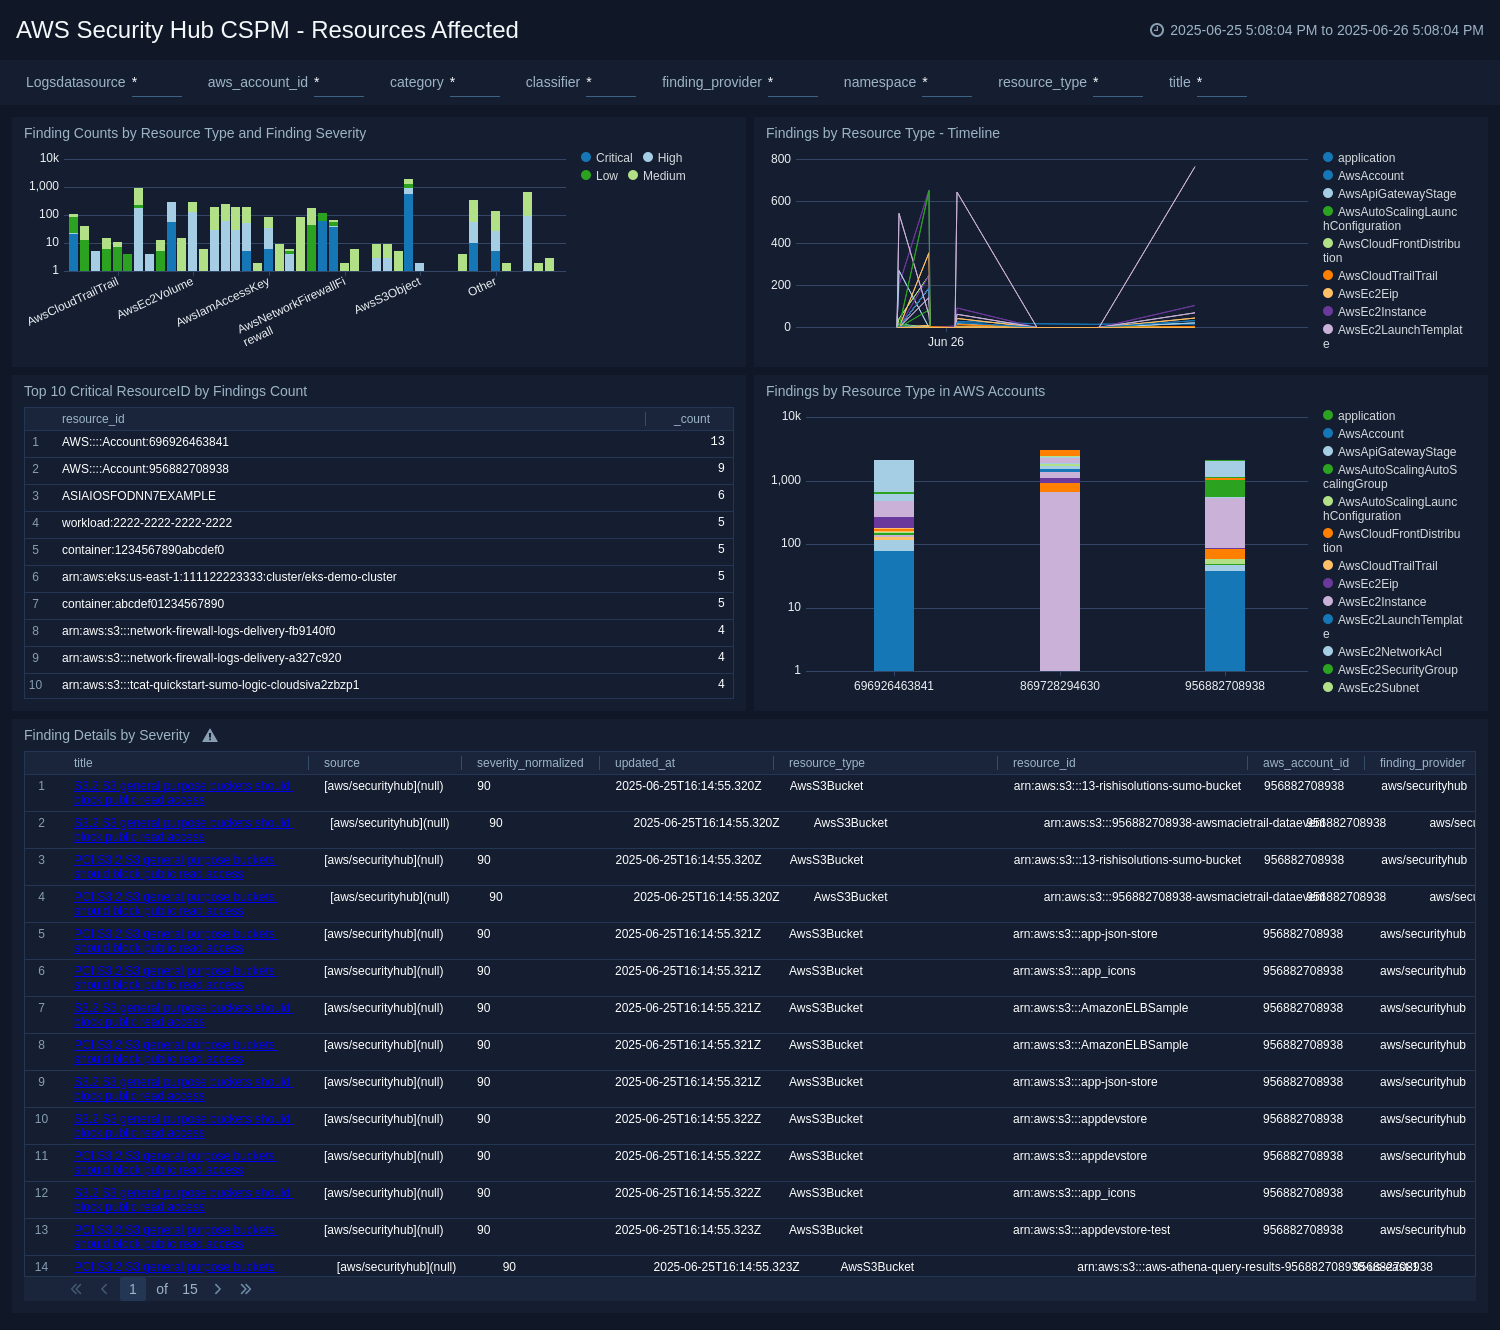
Resources Affected
The AWS Security Hub CSPM - Resources Affected dashboard provides a high-level visual analysis of findings by resource type by time interval, top critical resource IDs, AWS account, and the findings details. Each panel provides the ability to drill down for a more granular view of the data.
Use this dashboard to:
- Discover which critical resources are affected.
- Analyze how they are distributed across AWS accounts.
- Filter on Finding Type, Resource Type, Provider, AWS Account, Title, Category, Resource Type with the Finding details panel.
