Puppet - Classic Collector

Puppet is a software configuration management tool. Puppet can provision infrastructure and enforce desired configurations across new and existing servers. The Sumo Logic app for Puppet helps you monitor Puppet metrics and events, which means that you can easily:
- Determine when Puppet runs occurred.
- Track service and applying times for each run.
- Find out how often resources have changed, skipped, failed to update, or are out-of-sync.
- Find out the root cause of issues by correlating puppet runs with metrics from other components in your infrastructure.
Log types
Sumo Logic’s Puppet Logs source and Puppet Reports source use an installed collector to gather the following data from Puppet:
- Puppet Server logs. For more information about the logs location, see Puppet Server Logs.
- Puppet Server Access logs. For more information about the logs location, see Puppet Server Logs.
- Puppet Reports. Puppet generates reports in YAML format. SumoLogic supports report format 10. This is the format of reports output by Puppet versions 5.5.3 and newer. It is backward compatible with report format 9 (in Puppet versions 5.5.0 to 5.5.2). For more information about the puppet reports, see Puppet Reports.
Puppet reports
Puppet reports are in YAML format. They must be converted to JSON prior to ingestion to Sumo.
- YAML
- JSON
-- !ruby/object:Puppet::Transaction::Report
host: puppet-node-1
time: '2018-08-28T03:25:05.628370065Z'
configuration_version: 1535426713
transaction_uuid: 8a3bb8e5-c5ec-44a2-a3a4-45aed3ae13e9
report_format: 6
puppet_version: 4.10.12
status: unchanged
transaction_completed:
noop: false
noop_pending: false
environment: production
logs:
- level: notice
  message: Applied catalog in 2.03 seconds
  source: Puppet
  tags:
  - notice
  time: '2018-08-28T03:25:17.345922191Z'
  file:
  line:
metrics:
  resources:
    name: resources
    label: Resources
    values:
    - - total
      - Total
{
	"host":"puppet-node-1",
	"time":"2018-08-14T22:22:50.931239059Z",
	"configuration_version":1534247572,
	"transaction_uuid":"43b51400-e009-4e5e-b856-1dff5dae9c64",
	"report_format":10,
	"puppet_version":"5.5.3",
	"status":"unchanged",
	"transaction_completed":true,
	"noop":false,
	"noop_pending":false,
	"environment":"production",
	"logs":[
		{
			"level":"err",
			"message":"Could not retrieve catalog from remote server: Error 500 on SERVER: Server Error: Syntax error at '}' (file: /etc/puppetlabs/code/environments/production/modules/sumo/manifests/nix_config.pp, line: 185, column: 1) on node puppet-node-1",
			"source":"Puppet",
			"tags":[
				"err"
			],
			"time":"2018-08-14T22:22:52.910348336Z",
			"file":null,
			"line":null
		},
		{
			"level":"notice",
			"message":"Applied catalog in 0.05 seconds",
			"source":"Puppet",
			"tags":[
				"notice"
			],
			"time":"2018-08-14T22:22:53.024015171Z",
			"file":null,
			"line":null
		}
	],
	"metrics":{
		"resources":{
			"name":"resources",
			"label":"Resources",
			"values":[
				[
					"total",
					"Total",
					10
				],
				[
					"skipped",
					"Skipped",
					0
				],
				[
					"failed",
					"\"Fail",
				]
			]
		}
	}
}
Sample log messages
2018-08-22 00:03:14,141 INFO  [qtp839286351-63] [puppetserver] Puppet Compiled catalog for puppet-node-1 in environment production in 0.18 seconds
2018-08-22 00:19:33,594 ERROR [qtp839286351-62] [puppetserver] Puppet Could not find node statement with name 'default' or 'puppet-node-2' on node puppet-node-2
54.90.112.107 - - [28/Aug/2018:06:42:49 +0000] "PUT /puppet/v3/report/puppet-node-1?environment=production& HTTP/1.1" 200 9 "-" "Puppet/5.5.3 Ruby/2.4.4-p296 (x64-mingw32)" 134
10.1.3.83 - - [28/Aug/2018:06:44:18 +0000] "GET /puppet/v3/node/puppet-node-3?environment=production&configured_environment=production&transaction_uuid=f95ce8bd-f97e-4d99-9a72-3b010a50ceb1&fail_on_404=true HTTP/1.1" 200 11394 "-" "Puppet/5.5.3 Ruby/2.4.4-p296 (x86_64-linux)" 77
Sample queries
_sourceCategory=prod/web/puppet/reports
| parse "\"resources\":{\"name\":\"resources\",\"label\":\"Resources\",\"values\":[[\"total\",\"Total\",*],[\"skipped\",\"Skipped\",*],[\"failed\",\"Failed\",*],[\"failed_to_restart\",\"Failed to restart\",*],[\"restarted\",\"Restarted\",*],[\"changed\",\"Changed\",*],[\"out_of_sync\",\"Out of sync\",*],[\"scheduled\",\"Scheduled\",*],[\"corrective_change\",\"Corrective change\",*]]" as total_res,skipped,failed,failed_to_restart,restarted,changed,out_of_sync,scheduled,corrective_change
| sum(total_res) as total_resources, sum(failed) as failed_resources
| failed_resources/total_resources*100 as failed_res_pct
| fields failed_res_pct
Collecting logs for Puppet
Learn how to collect Puppet logs, reports, and events for the Sumo app for Puppet.
The sections below provide instructions for installing a collector on a Puppet Master host, setting up Sumo Puppet sources (server, access and reports logs), and installing the Sumo app for Puppet. With this configuration you can collect Puppet logs, events, and reports, and visualize resource performance and puppet runs data in the dashboards provided by the app.
Step 1: Create access keys
Follow the instructions in Access Keys to create a Sumo Logic access ID and key. You’ll need to supply them when you set up a collector on the Puppet Master host in the following step.
Step 2: Install collector on Puppet Master
In this step you install a collector on the Puppet Master host. Follow the instructions on Install a Collector on Linux.
Puppet Master only runs on Linux.
Step 3: Configure local file source for Puppet Server logs
In this step, you add a local file source to the installed collector you created in Step 2. The local file source will receive Puppet Server logs.
Follow the steps on Local File Source, with these additional instructions:
- For File Path, Enter the puppet server log file path. The default Puppet Server log file is:
/var/log/puppetlabs/puppetserver/puppetserver.log. If your Puppet Server logs are located elsewhere, enter the correct path. - For Source Category, enter a value like:
prod/web/puppet/server. - For Advanced Options, accept the default values.
Step 4: Configure local file source for Puppet Server Access logs
In this step, you add another local file source to the installed collector you created in Step 2. The local file source will receive Puppet Server Access logs.
Follow the steps on Local File Source, with these additional instructions:
- For File Path, Enter the puppet server log file path. The default Puppet Server Access log file is:
/var/log/puppetlabs/puppetserver/puppetserver-access.log. If your Puppet Server Access logs are located elsewhere, enter the correct path. - For Source Category, enter a value like:
prod/web/puppet/access - For Advanced Options, accept the default values.
Step 5: Configure Puppet Reports script source
Puppet reports are in YAML format. They must be converted into JSON format before Sumo ingests them.
This section has instructions for setting up a Script source that runs a shell script to convert the YAML files to JSON for ingestion by the Sumo collector. Alternatively, you can convert the YAML files with a third party tool and provide the configure a local file source on installed collection to obtain the JSON from the directory you specify.
Script source prerequisites
The following requirements apply to the script source:
- The user running the collector process must have read and write access to the Puppet Reports directory.
- The collector executes the script as the user running the collector process. The script outputs data to your machine's stdout or stderror output streams to be collected. For more information, see Script Source.
- The machine where you run the script must have Ruby installed.
- The script generates a log in the configured working directory that you can review in case of issues.
For more information, see Script Source.
To set up a script source
The script requires Ruby on the host machine.
- Classic UI. In the main Sumo Logic menu, select Manage Data > Collection > Collection.
New UI. In the Sumo Logic top menu select Configuration, and then under Data Collection select Collection. You can also click the Go To... menu at the top of the screen and select Collection. - Navigate to the collector you installed on the Puppet Master host, and select Add > Add Source.
- Select Script. New Collectors using version 19.245-4 and later do not allow Script Sources to run by default. To allow Script Sources you need to set the Collector parameter
enableScriptSourcein user.properties to true and restart the Collector. - Name. (Required).
- Description. (Optional).
- Source Host. Enter the hostname or IP address of the source host. The hostname can be a maximum of 128 characters.
- Source Category. (Required) Enter a value like:
prod/web/puppet/reports - Frequency. Default is 15 mins.
- Command. Leave the default value,
/bin/sh, selected. - Script. Choose Type the script to execute and copy/paste the below script in the text box:
Click to expand
MaxFileSize=20
log_file_name=puppet_rpt_conversion.log
#Get size in bytes**
    file_size=`du -b puppet_rpt_conversion.log | tr -s '\t' ' ' | cut -d' ' -f1`
    file_size=$(($file_size/1048576))
    if [ $file_size -gt "$MaxFileSize" ];then
        timestamp=`date +%s`
        mv puppet_rpt_conversion.log puppet_rpt_conversion.log.$timestamp
    fi
echo "YAML to JSON conversion started!!" >> "$log_file_name"
echo "Start Time: $(date)" >> "$log_file_name"
if [ ! -e last_run_date.tmp ]
then
date "+%Y-%m-%d" --date=1970-01-01 > last_run_date.tmp;
fi
find . -maxdepth 2 -type f -name "*.yaml" -newermt "$(cat last_run_date.tmp)" |
while read f;
do
if [ -s "$f" ]
then
sed 1d "$f" > tmpfile;
ruby -rjson -ryaml -e "resource_list = ''
json = JSON.generate({});data = JSON.parse(json);
obj = JSON.parse(YAML.load_file('tmpfile').to_json);
data['host'] = obj['host'];
data['time'] = obj['time'];
data['configuration_version'] = obj['configuration_version'];
data['transaction_uuid'] = obj['transaction_uuid'];
data['report_format'] = obj['report_format'];
data['puppet_version'] = obj['puppet_version'];
data['status'] = obj['status'];
data['transaction_completed'] = obj['transaction_completed'];
data['noop'] = obj['noop'];
data['noop_pending'] = obj['noop_pending'];
data['environment'] = obj['environment'];
data['metrics'] = obj['metrics'];
data['resource_list'] = resource_list;
i = 0;
obj['resource_statuses'].each{
  |j|
if i == 0 then
  tempdata = j[0];
else
  tempdata = ',' + j[0];
end
data['resource_list'] << tempdata;
i = i + 1;
};

puts data.to_json;
obj['resource_statuses'].each{
  |y|  logsres = y[1];
  logsres['transaction_uuid'] = obj['transaction_uuid'];
  logsres['environment'] = obj['environment'];
  logsres['host'] = obj['host'];
  puts logsres.to_json;
  };
obj['logs'].each {
  |x|logsjson = x;
  logsjson['host'] = obj['host'];
  logsjson['transaction_uuid'] = obj['transaction_uuid'];
  logsjson['environment'] = obj['environment'];
  puts logsjson.to_json
  };"
echo "$f conversion status:" $? >> "$log_file_name"
date "+%d-%b-%Y %H:%M:%S" > last_run_date.tmp
fi
done
echo "Conversion Completed. End Time: $(date)" >> "$log_file_name"
- Working Directory. Default Puppet reports directory:
/opt/puppetlabs/server/data/puppetserver/reports.If Puppet is installed in a different location, enter the correct path. - Configure Advanced options.
- Enable Timestamp Parsing. This option is checked by default.
- Time Zone. Default is “Use time zone from log file”.
- Timestamp Format. Click Specify a format.
- Format. Enter:
yyyy-MM-dd'T'HH:mm:ss.SSS'Z' - Timestamp locator. Enter:
"time":"(.*?)"
- Format. Enter:
- Enable Multiline Processing.
- Detect messages spanning multiple lines. This option is checked by default.
- Infer Boundaries. This option is checked by default.
- Boundary Regex. If multiple processing is enabled, and Infer Boundaries is disabled, enter a regular expression for message boundaries.
- Processing Rules. Configure processing rules, as desired. For more information, see Processing Rules.
Puppet logs and reports should start flowing into Sumo Logic.
Troubleshooting the script source
If you encounter problems:
- Review Script source prerequisites.
- Review the contents of the log file that the script creates in the configured working directory.
Installing the Puppet app
To install the app, do the following:
Next-Gen App: To install or update the app, you must be an account administrator or a user with Manage Apps, Manage Monitors, Manage Fields, Manage Metric Rules, and Manage Collectors capabilities depending upon the different content types part of the app.
- Select App Catalog.
- In the 🔎 Search Apps field, run a search for your desired app, then select it.
- Click Install App.
note
Sometimes this button says Add Integration.
- Click Next in the Setup Data section.
- In the Configure section of your respective app, complete the following fields.
- Field Name. If you already have collectors and sources set up, select the configured metadata field name (eg _sourcecategory) or specify other custom metadata (eg: _collector) along with its metadata Field Value.
- Click Next. You will be redirected to the Preview & Done section.
Post-installation
Once your app is installed, it will appear in your Installed Apps folder, and dashboard panels will start to fill automatically.
Each panel slowly fills with data matching the time range query received since the panel was created. Results will not immediately be available but will be updated with full graphs and charts over time.
Viewing Puppet dashboards
All dashboards have a set of filters that you can apply to the entire dashboard. Use these filters to drill down and examine the data to a granular level.
- You can change the time range for a dashboard or panel by selecting a predefined interval from a drop-down list, choosing a recently used time range, or specifying custom dates and times. Learn more.
- You can use template variables to drill down and examine the data on a granular level. For more information, see Filtering Dashboards with Template Variables.
- Most Next-Gen apps allow you to provide the scope at the installation time and are comprised of a key (
_sourceCategoryby default) and a default value for this key. Based on your input, the app dashboards will be parameterized with a dashboard variable, allowing you to change the dataset queried by all panels. This eliminates the need to create multiple copies of the same dashboard with different queries.
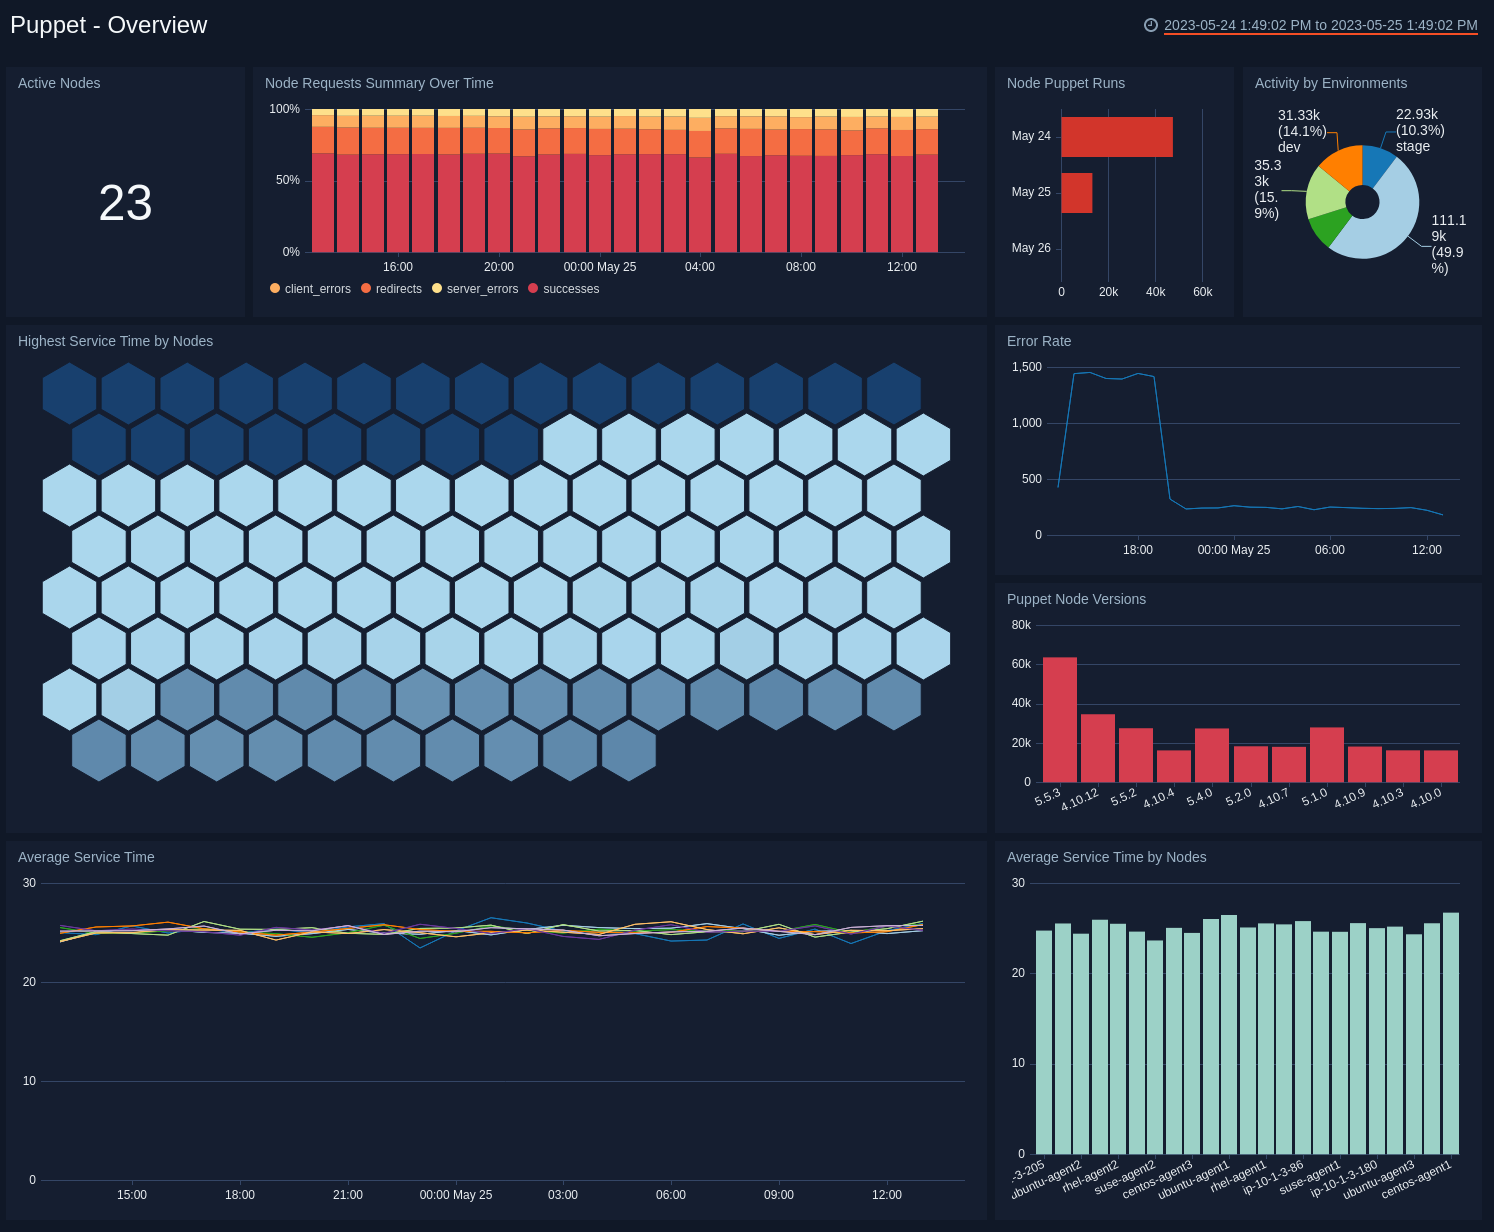
Overview
See an overview of Puppet activity, including puppet versions, environments, service times, unique nodes, nodes puppet runs, node requests and nodes responding.
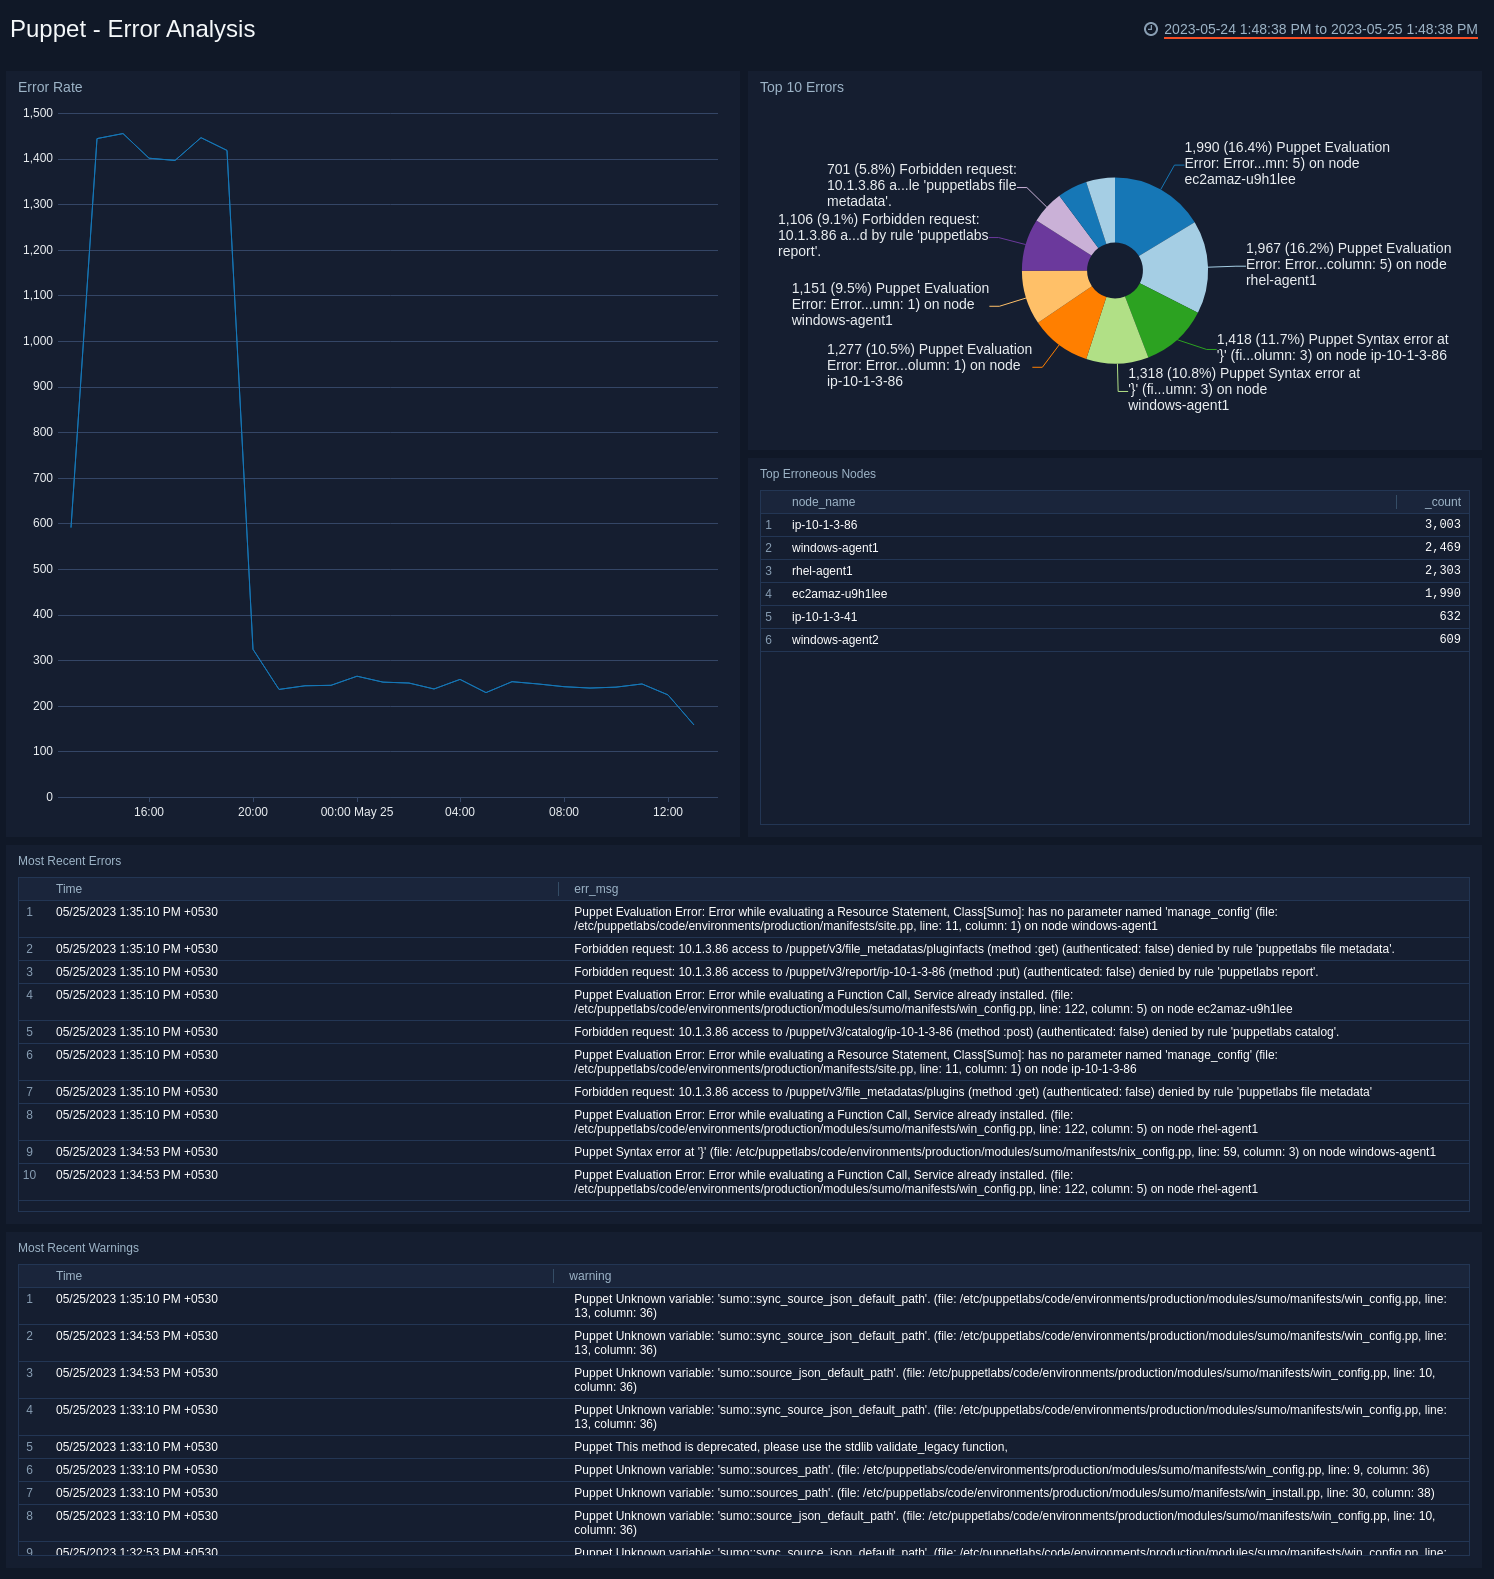
Error Analysis
See an analysis of errors in Puppet Master and nodes.
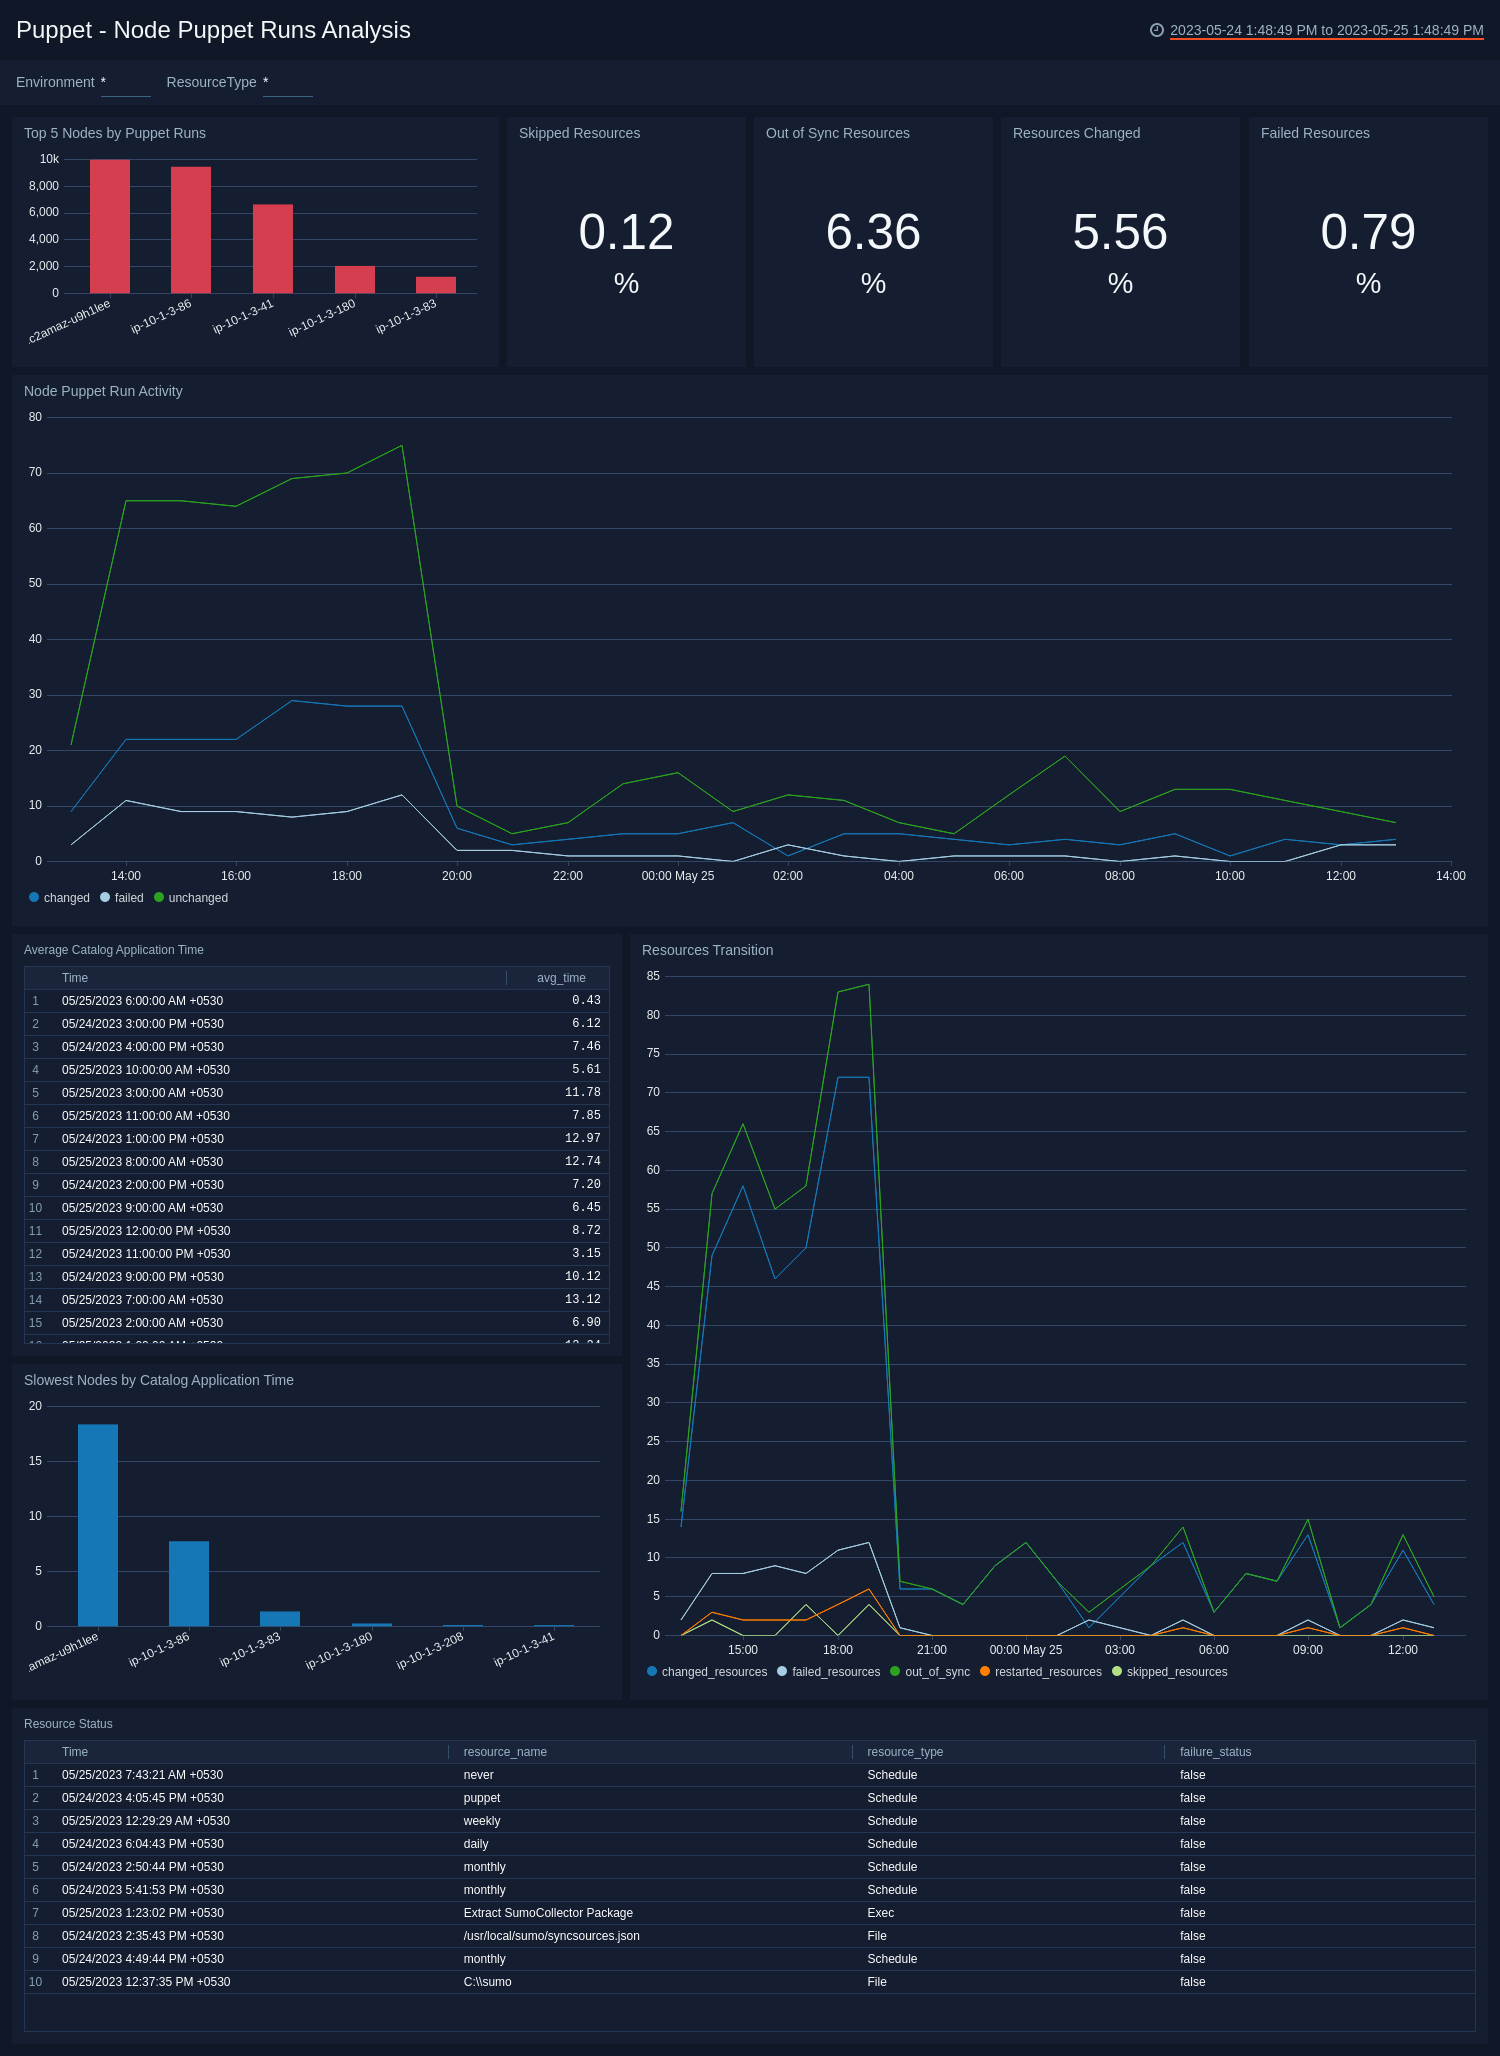
Node Puppet Runs Analysis
See an analysis of puppet runs on nodes, including resources analysis, average time to apply, node puppet activity.
Upgrade/Downgrade the Puppet app (Optional)
To update the app, do the following:
Next-Gen App: To install or update the app, you must be an account administrator or a user with Manage Apps, Manage Monitors, Manage Fields, Manage Metric Rules, and Manage Collectors capabilities depending upon the different content types part of the app.
- Select App Catalog.
- In the Search Apps field, search for and then select your app.
Optionally, you can identify apps that can be upgraded in the Upgrade available section. - To upgrade the app, select Upgrade from the Manage dropdown.
- If the upgrade does not have any configuration or property changes, you will be redirected to the Preview & Done section.
- If the upgrade has any configuration or property changes, you will be redirected to the Setup Data page.
- In the Configure section of your respective app, complete the following fields.
- Field Name. If you already have collectors and sources set up, select the configured metadata field name (eg _sourcecategory) or specify other custom metadata (eg: _collector) along with its metadata Field Value.
- Click Next. You will be redirected to the Preview & Done section.
Post-update
Your upgraded app will be installed in the Installed Apps folder and dashboard panels will start to fill automatically.
See our Release Notes changelog for new updates in the app.
To revert the app to a previous version, do the following:
- Select App Catalog.
- In the Search Apps field, search for and then select your app.
- To version down the app, select Revert to < previous version of your app > from the Manage dropdown.
Uninstalling the Puppet app (Optional)
To uninstall the app, do the following:
- Select App Catalog.
- In the 🔎 Search Apps field, run a search for your desired app, then select it.
- Click Uninstall.