Cisco ISE

Version: 1.6
Updated: Sep 19, 2023
Utilize Cisco ISE session, policy, and security group information during an investigation.
Actions
- Get Sessions (Enrichment) - Gather session information from Cisco ISE.
- List Policies (Enrichment) - List all available ISE policies.
- List Security Groups (Enrichment) - List all available security groups.
- Get Policies Endpoints (Enrichment) - Gather endpoint policies.
- Apply Policy (Containment) - Create a new policy.
- Clear Policy (Containment) - Remove an existing policy.
- Get Endpoints (Enrichment ) - List all available endpoints.
- Get Endpoint Identity Groups (Enrichment ) - List all available endpoint identity groups.
- Get Internal Users (Enrichment ) - List all available internal user.
- Deployment Info (Enrichment ) - To check if ISE primary node is up or not.
Cisco ISE Configuration
Cisco ISE is configured in a way that you'll need to specify the resource together with the URL and port in the following manner:
- URL:port The default port used is port 9060 that will need to be enabled.
- ERS uses HTTPS port 9060 which is by default closed. Clients trying to access this port without enabling ERS first, will face a timeout from the server.
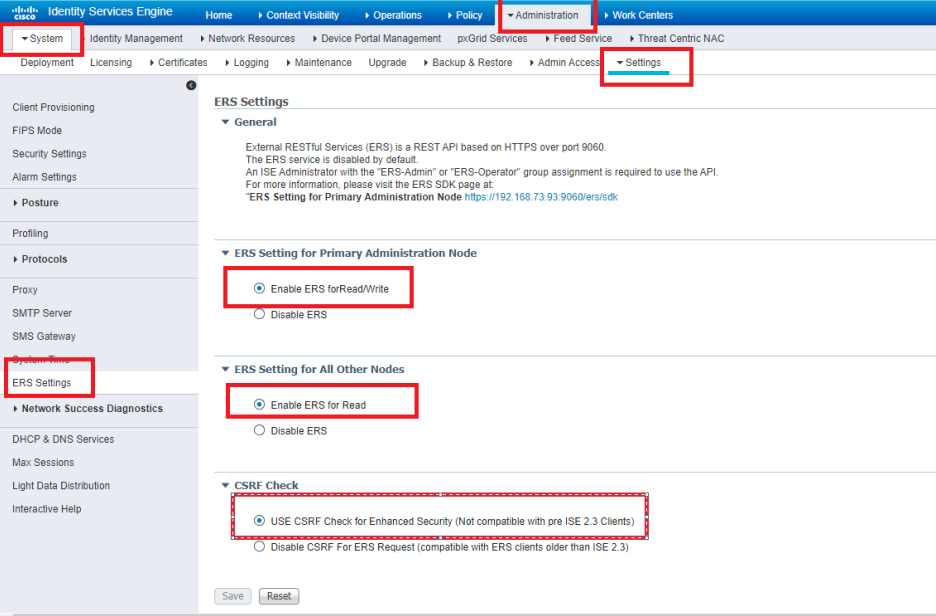
Therefore, the first requirement is to enable ERS from the ISE admin UI.
- Go to Administration > Settings > ERS Settings.
- Check the Enable ERS for Read/Write radio button as shown in the screenshot below.
- The following ISE Administrator Groups allow REST API access:
- SuperAdmin Read/Write
- ERSAdmin Read/Write
- ERSOperator Read Only
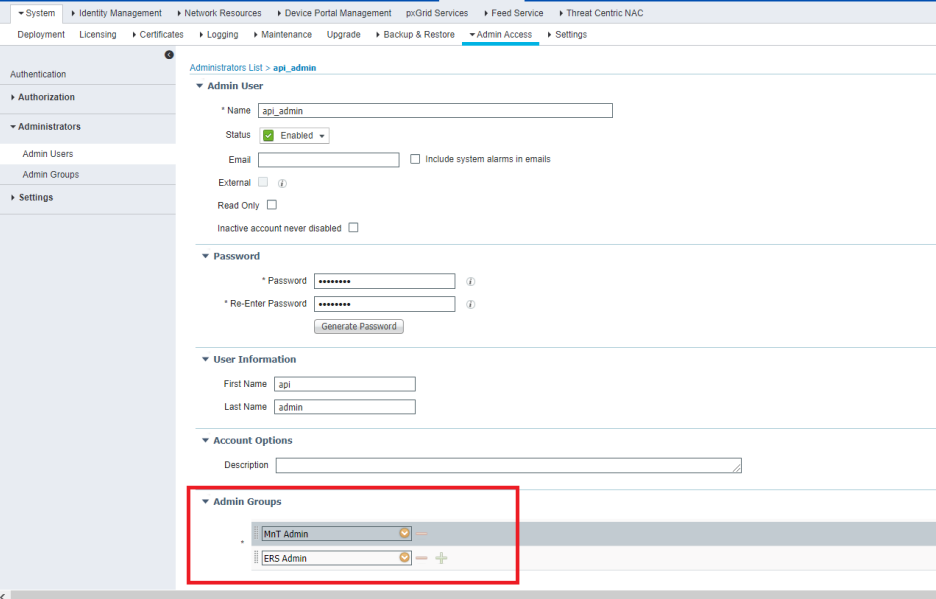
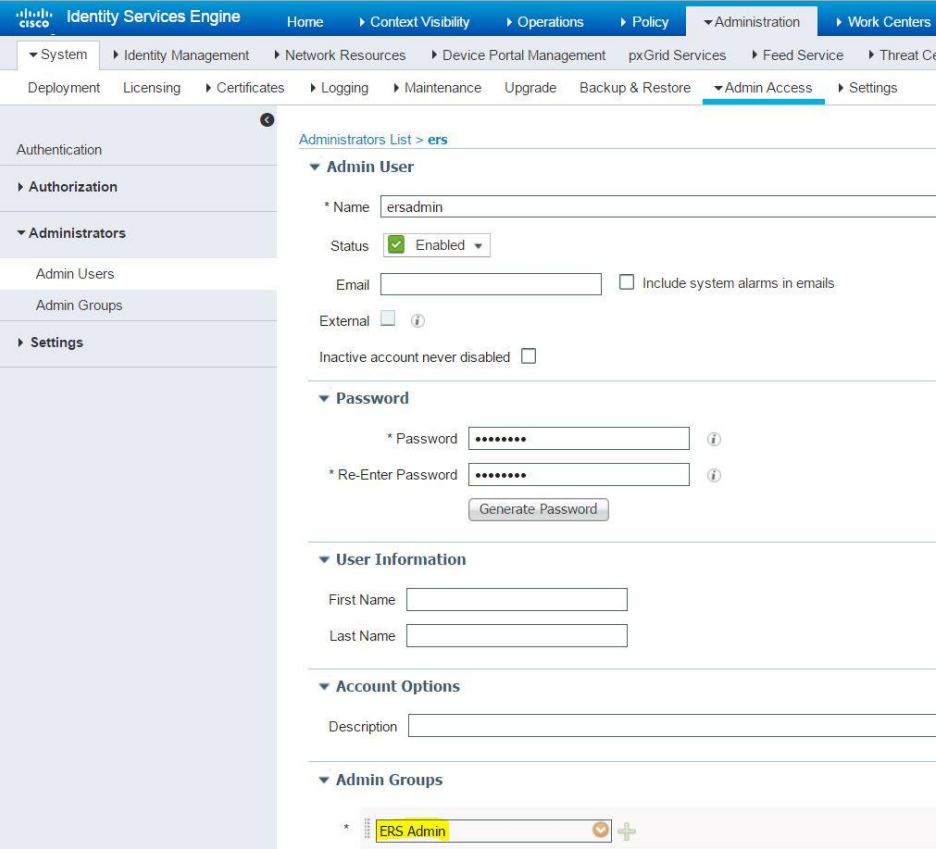 To perform Get Sessions action, the users must be assigned to one of the following Admin Groups:
- Super Admin
- System Admin
- MnT Admin
So you have to use both Admins Groups together to use all the actions inside CSOAR.
Configure Cisco ISE in Automation Service and Cloud SOAR
Before you can use this automation integration, you must configure its authentication settings so that the product you're integrating with can communicate with Sumo Logic. For general guidance, see Configure Authentication for Automation Integrations.
How to open the integration's configuration dialog
- Access App Central and install the integration. (You can configure at installation, or after installation with the following steps.)
- Go to the Integrations page.
Classic UI. In the main Sumo Logic menu, select Automation and then select Integrations in the left nav bar.
New UI. In the main Sumo Logic menu, select Automation > Integrations. You can also click the Go To... menu at the top of the screen and select Integrations. - Select the installed integration.
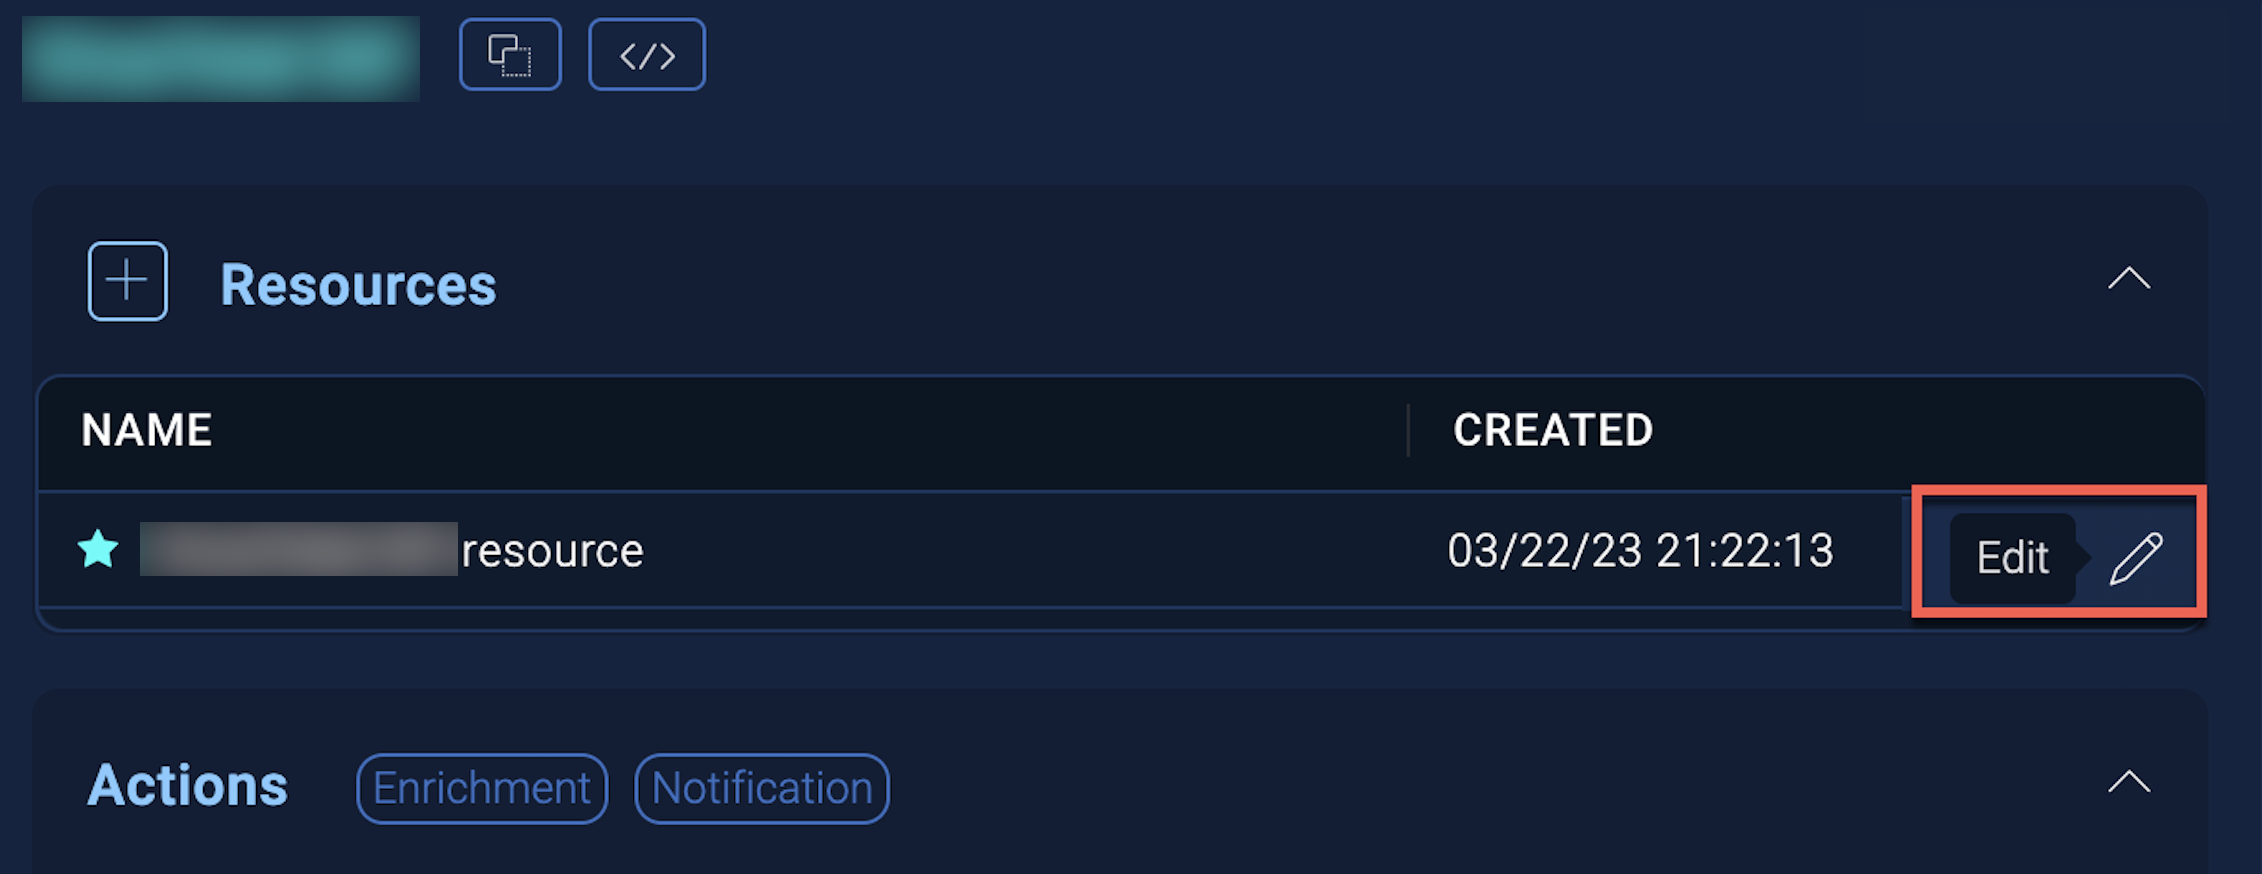
- Hover over the resource name and click the Edit button that appears.
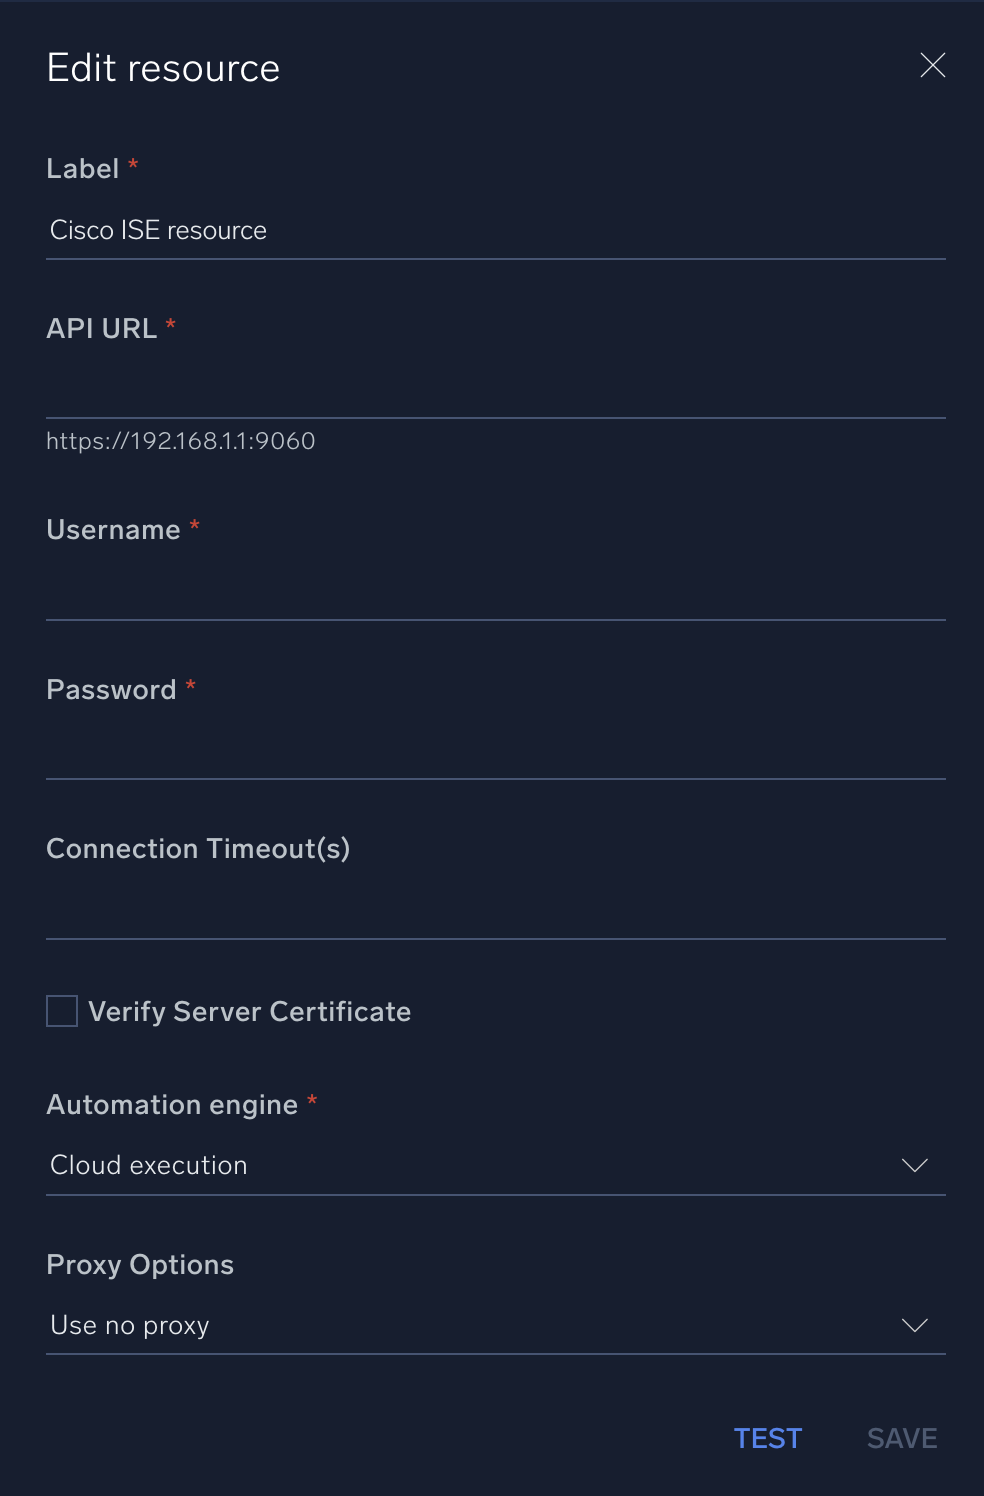
In the configuration dialog, enter information from the product you're integrating with. When done, click TEST to test the configuration, and click SAVE to save the configuration:
-
Label. Enter the name you want to use for the resource.
-
API URL. Enter your Cisco ISE API URL.
-
Username. Enter the username of a Cisco ISE admin authorized to provide authentication for the integration.
-
Password. Enter the password for the Cisco ISE admin user.
-
Connection Timeout (s). Set the maximum amount of time the integration will wait for a server's response before terminating the connection. Enter the connection timeout time in seconds (for example,
180). -
Verify Server Certificate. Select to validate the server’s SSL certificate.
-
Automation Engine. Select Cloud execution for this certified integration. Select a bridge option only for a custom integration. See Cloud or Bridge execution.
-
Proxy Options. Select whether to use a proxy. (Applies only if the automation engine uses a bridge instead of cloud execution.)
- Use no proxy. Communication runs on the bridge and does not use a proxy.
- Use default proxy. Use the default proxy for the bridge set up as described in Using a proxy.
- Use different proxy. Use your own proxy service. Provide the proxy URL and port number.
For information about Cisco ISE, see Cisco ISE documentation.
Change Log
- September 3, 2019 - First upload
- January 5, 2021 - Updated actions
- July 3, 2023 (v1.1) - Updated the integration with Environmental Variables
- July 14, 2023 (v1.3) - Removed leading/trailing spaces
- August 17, 2023 (v1.4) - Updated the integration with Environmental Variables
- September 4, 2023 (v1.5) - Fixed a bug where if the timeout was not specified, an error would occur
- September 19, 2023 (v1.6) - Versioning