Microsoft EWS Daemon

Version: 2.6
Updated: May 16, 2025
This integration is only for Cloud SOAR.
Process emails with EWS Daemon.
Overview
Purpose
The Microsoft EWS Incoming Mail Daemon automatically retrieves emails. It enables seamless integration with security automation platforms by pulling in messages for further analysis and action.
Use cases
- Automatically ingest emails from monitored mailboxes for phishing analysis or ticketing systems.
- Feed email content into security orchestration workflows.
- Process and analyze attachments (for example, .eml, .msg, documents) in near real-time.
- Extract and enrich sender/recipient metadata for further investigation.
Supported versions
- Microsoft Exchange Online (Office 365)
Prerequisites
- Active Azure subscription
- Application registration with:
- Client ID
- Client Secret
- Tenant ID
- EWS API permissions
- Basic authentication (legacy) or OAuth 2.0 with modern authentication
- Correctly configured EWS endpoint
- Valid credentials or token
Limitations
- Certain attachments may be represented differently, which can result in missing or inconsistent file metadata (for example, name or type).
- Mailbox rate limits may apply depending on Microsoft tenant configuration
Usage
Basic usage
- Configure credentials (Tenant ID, Client ID, Client Secret).
- Set retrieval parameters like polling frequency, folders to include/exclude.
- Enable the Daemon action in a rule or playbook.
- Emails are pulled automatically.
Advanced usage
- Use filtering parameters to narrow email scope:
- Subject keywords
- Sender domain
- Date ranges
- Enable the Daemon action in a rule or playbook.
Actions
- Microsoft EWS Incoming Mail Daemon (Daemon) - Automatically retrieve emails from EWS.
Microsoft EWS configuration
Each application you want the Microsoft identity platform to perform identity and access management (IAM) needs to be registered. Registering it establishes a trust relationship between your application and the identity provider, the Microsoft identity platform.
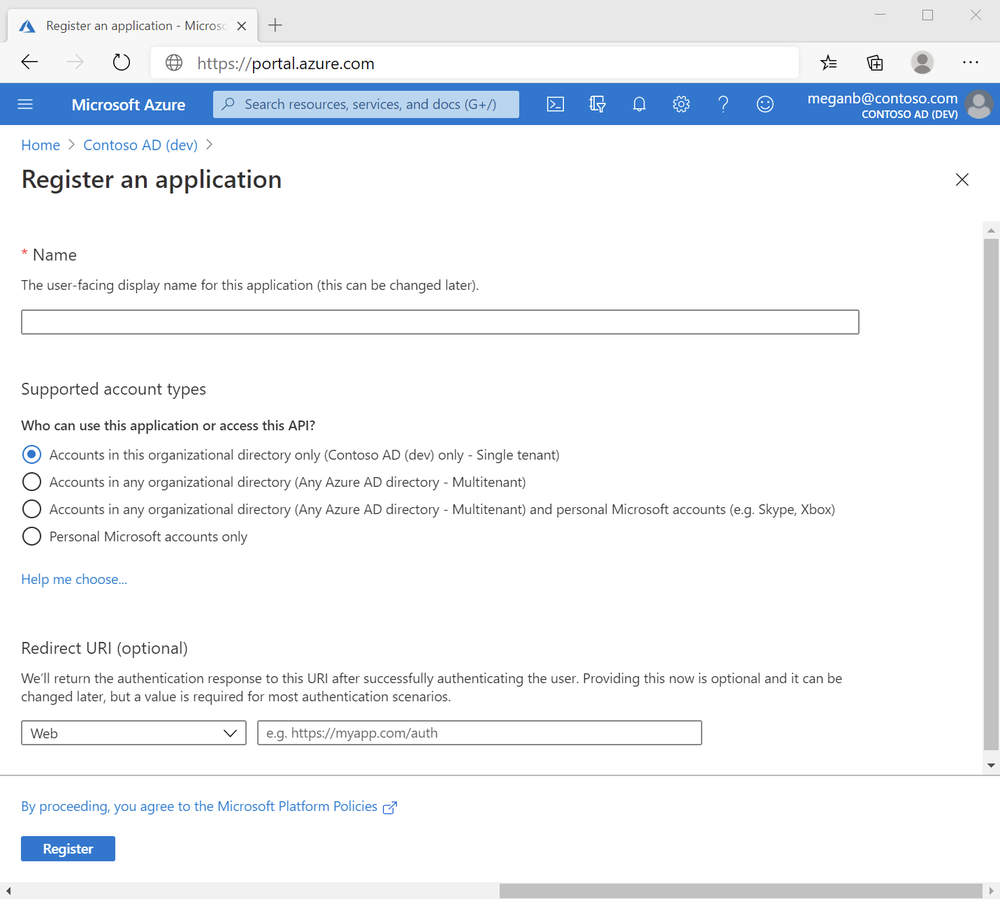
Register an application
Registering your application establishes a trust relationship between your app and the Microsoft identity platform. The trust is unidirectional: your app trusts the Microsoft identity platform, and not the other way around.
Follow these steps to create the app registration:
- Sign in to the Azure portal.
- If you have access to multiple tenants, use the Directory + subscription filter
 in the top menu to select the tenant in which you want to register an application.
 - Search for and select the Azure Active Directory.
- Under Manage, select App registrations > New registration.
- Enter a Name for your application. Users of your app might see this name, and you can change it later.
- Select Register to complete the initial app registration.
- Don't enter anything for Redirect URI (optional).
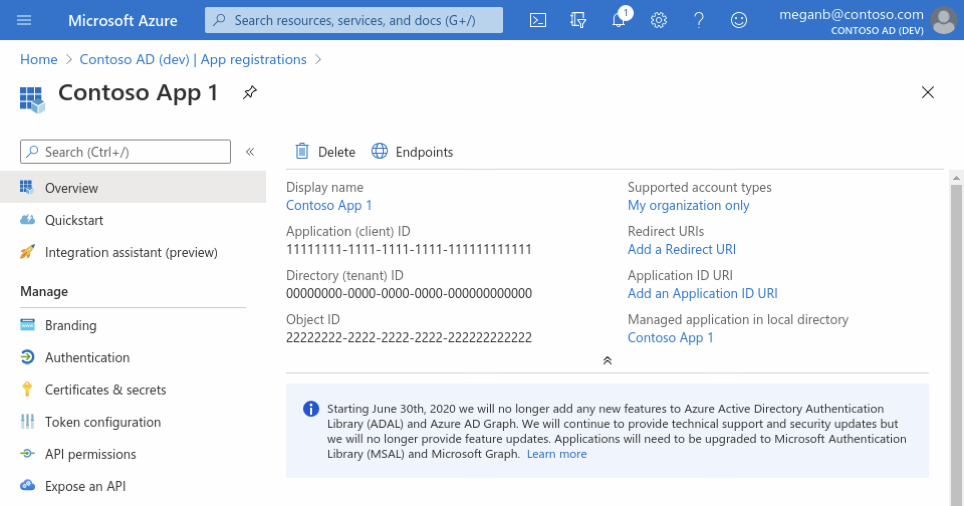
When registration completes, the Azure portal displays the app registration's Overview pane, which includes its Application (client) ID. Also referred to as just client ID, this value uniquely identifies your application in the Microsoft identity platform.
The client ID as one aspect in validating the security tokens it receives from the identity platform.
Add credentials
Credentials are used by confidential client applications that access an API. Examples of confidential clients are web apps, or service- and daemon-type applications. Credentials allow your application to authenticate as itself, requiring no interaction from a user at runtime.
You can add client secrets (a string) as credentials to your confidential client app registration.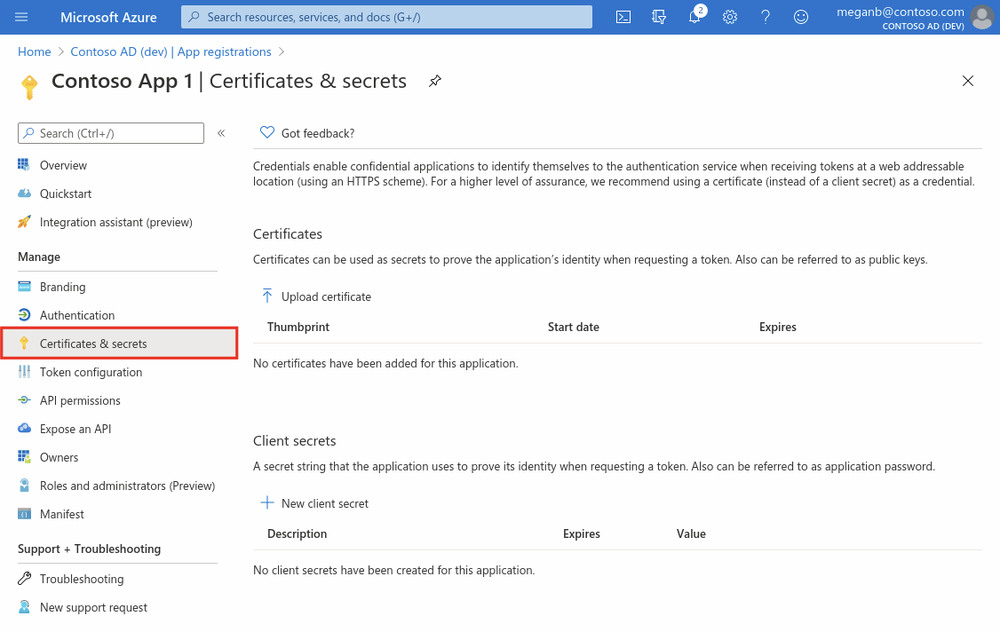
Add a client secret
The client secret, known also as an application password, is a string value of your app.
- Select your application in App registrations in the Azure portal.
- Select Certificates & secrets > New client secret.
- Add a description for your client secret.
- Select a duration.
- Select Add.
- Record the secret's value for use in your client application code - it's never displayed again after you leave this page.
Add permissions to API
- Select your application in App registrations in the Azure portal.
- Select API permissions > Add a permission.
- Delegated permissions are selected by default. Delegated permissions are appropriate for client apps that access an API as the signed-in user, and whose access should be restricted to the permissions you select in the next step.
- Application permissions are for service- or daemon-type applications that need to access API as themselves, without user interaction for sign-in or consent. Unless you've defined application roles for your API.
- Select Add a permission, and add the following permissions (as we can see from the picture).
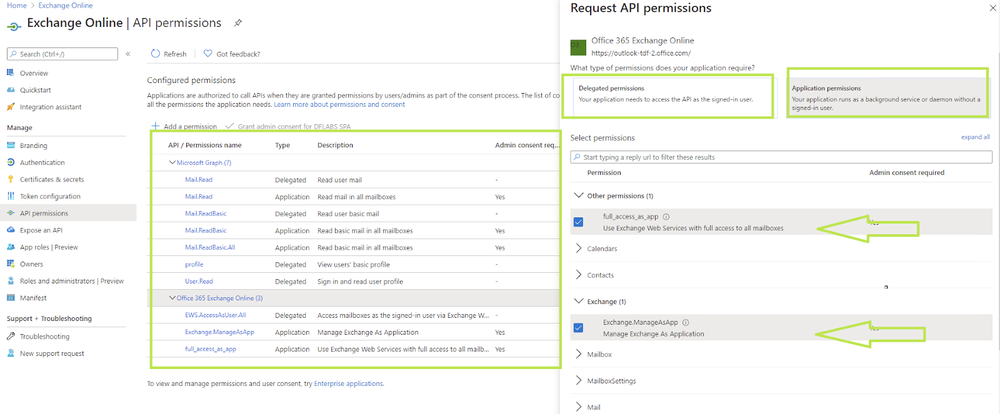
EWS API need to be configure these permissions
Applications are authorized to call APIs when they are granted permissions by users/admins as part of the consent process. The list of configured permissions should include all the permissions the application needs.
API / Permissions
Microsoft Graph (7)
- Mail.Read
- Type: Delegated
- Description: Read user mail
- Admin: -
- Mail.Read
- Type: Application
- Description: Read mail in all mailboxes
- Admin: Yes
- Mail.ReadBasic
- Type: Delegated
- Description: Read user basic mail
- Admin: -
- Mail.ReadBasic
- Type: Application
- Description: Read basic mail in all mailboxes
- Admin: Yes
- Mail.ReadBasic.All
- Type: Application
- Description: Read basic mail in all mailboxes
- Admin: Yes
- profile
- Type: Delegated
- Description: View users' basic profile
- Admin: -
- User.Read
- Type: Delegated
- Description: Sign in and read user profile
- Admin: Yes
Office 365 Exchange Online (3)
- EWS.AccessAsUser.All
- Type: Delegated
- Description: Access mailboxes as the signed-in user via Exchange Web Services
- Admin: -
- Exchange.ManageAsApp
- Type: Application
- Description: Manage Exchange As Application
- Admin: Yes
- full_access_as_app
- Type: Application
- Description: Use Exchange Web Services with full access to all mailboxes
- Admin: Yes
full_access_as_app Use Exchange Web Services with full access to all mailboxes
Once API permission are added then Admin must consent to a grant these permissions, Learn more about permissions and consent.
When using the Microsoft EWS Daemon action within an automation rule, note that it will only pull in emails that are marked "Unread" within the respective mailbox scope. To ensure all relevant alerts are processed correctly, keep this mailbox a dedicated entity and avoid any manual reviews by other stakeholders.
Configure Microsoft EWS Daemon in Cloud SOAR
Before you can use this automation integration, you must configure its authentication settings so that the product you're integrating with can communicate with Sumo Logic. For general guidance, see Configure Authentication for Automation Integrations.
How to open the integration's configuration dialog
- Access App Central and install the integration. (You can configure at installation, or after installation with the following steps.)
- Go to the Integrations page.
Classic UI. In the main Sumo Logic menu, select Automation and then select Integrations in the left nav bar.
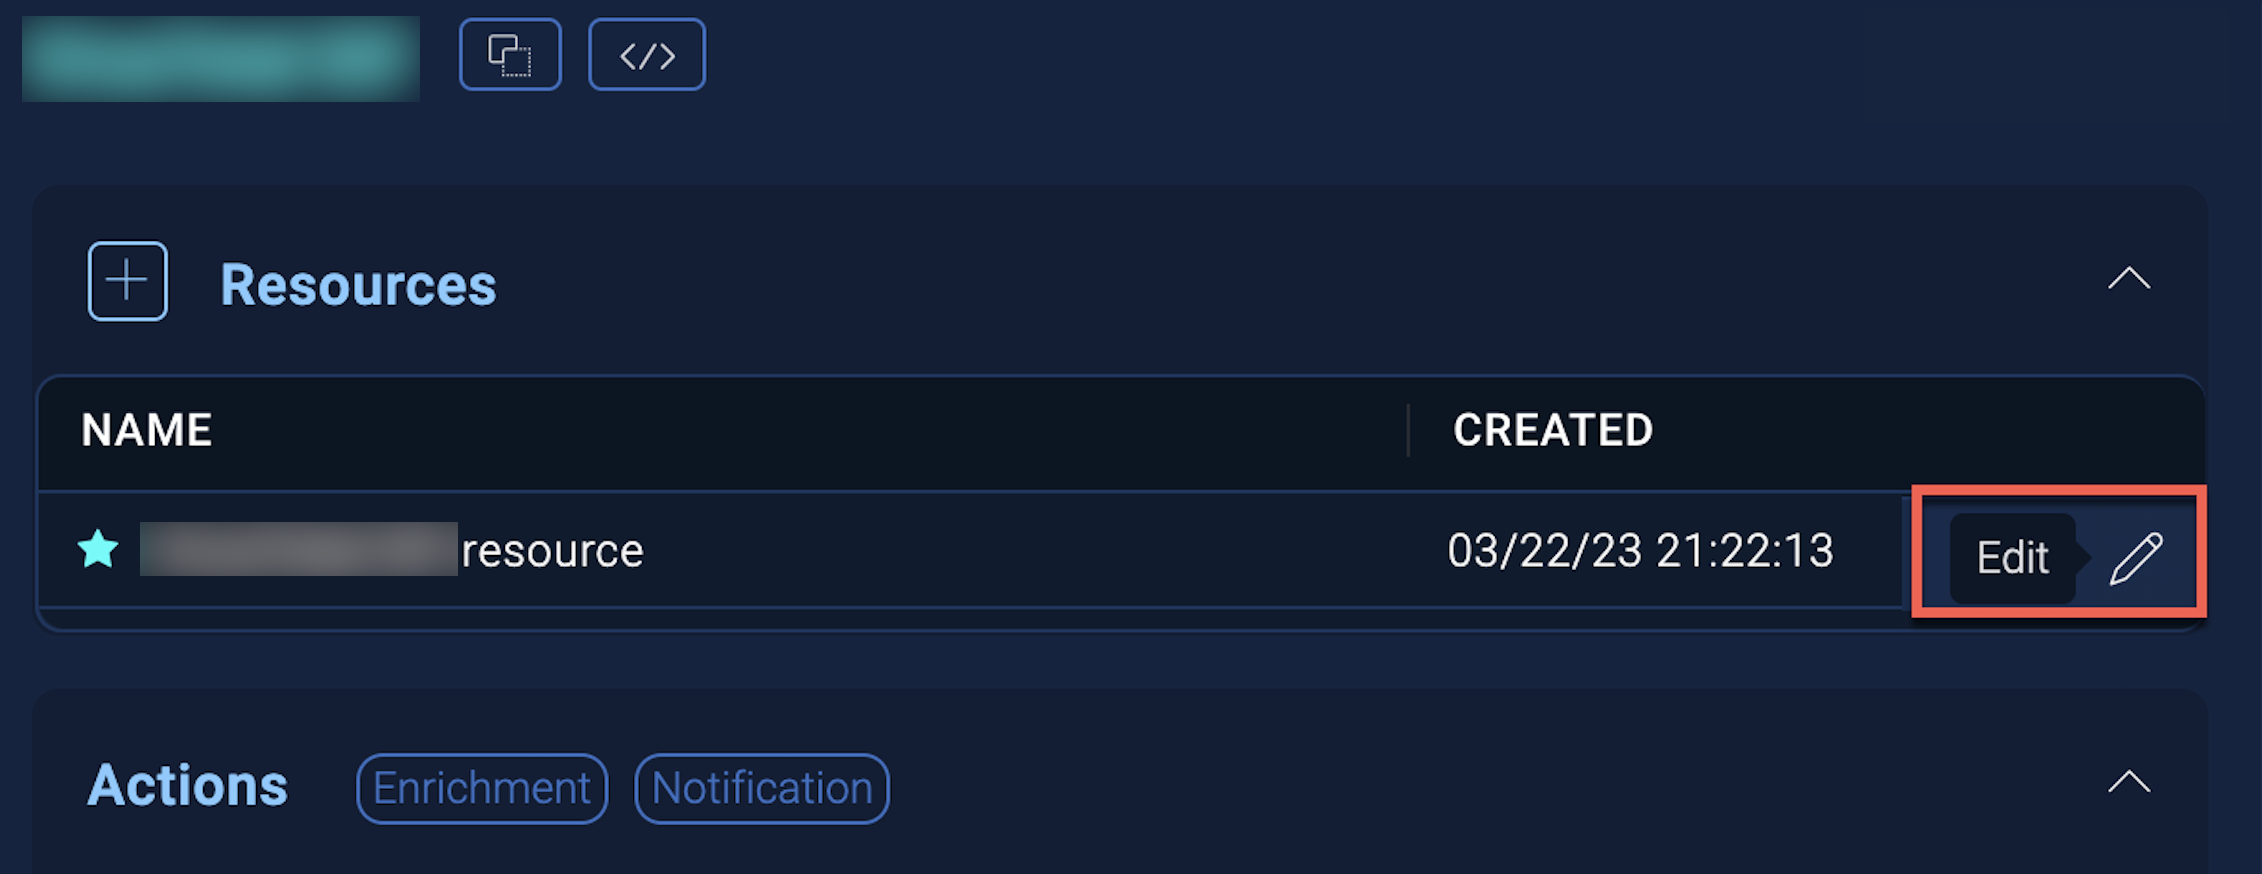
New UI. In the main Sumo Logic menu, select Automation > Integrations. You can also click the Go To... menu at the top of the screen and select Integrations. - Select the installed integration.
- Hover over the resource name and click the Edit button that appears.
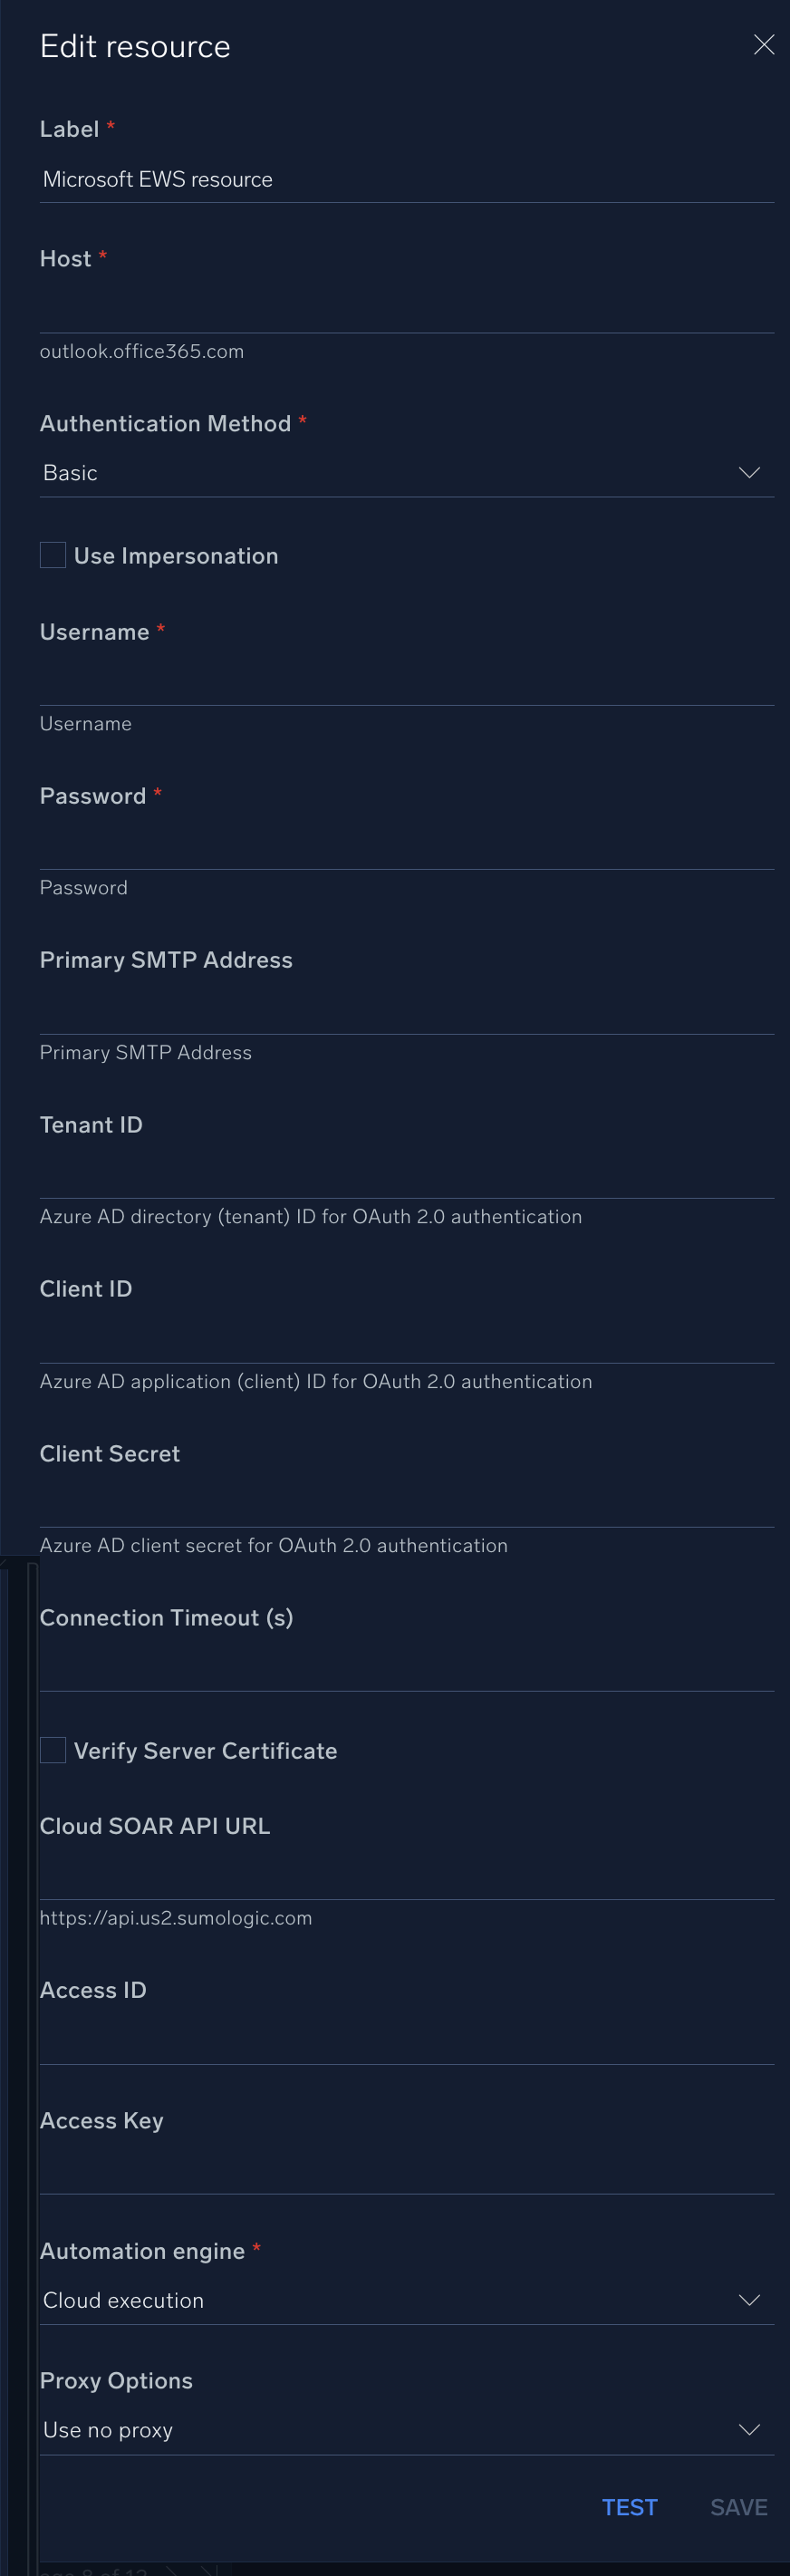
In the configuration dialog, enter information from the product you're integrating with. When done, click TEST to test the configuration, and click SAVE to save the configuration:
Use the information you set up in Microsoft EWS configuration above.
-
Label. Enter the name you want to use for the resource.
-
Host. Enter the host name of the EWS instance, for example,
outlook.office365.com. -
Authentication Method. Select the EWS authentication method:
- Basic
- NTLM
- OAuth 2.0
-
Username. Enter the Microsoft EWS username.
-
Password. Enter the Microsoft EWS password.
-
Primary SMTP Address. Enter the primary SMTP address for the user.
-
Tenant ID. Enter the tenant ID for authentication.
-
Client ID. Enter the client ID for authentication.
-
Client Secret. Enter the client secret for authentication.
-
Connection Timeout (s). Set the maximum amount of time the integration will wait for a server's response before terminating the connection. Enter the connection timeout time in seconds (for example,
180). -
Verify Server Certificate. Select to validate the server’s SSL certificate.
-
Cloud SOAR API URL. Enter your Sumo Logic API URL (for example,
https://api.us2.sumologic.com). Enter the API endpoint URL for your region. -
Access ID. Enter the access ID for your Sumo Logic access key. Select Default as the scope when generating access keys.
-
Access Key. Enter the access key corresponding to your Sumo Logic access ID.
-
Automation Engine. Select Cloud execution for this certified integration. Select a bridge option only for a custom integration. See Cloud or Bridge execution.
-
Proxy Options. Select whether to use a proxy. (Applies only if the automation engine uses a bridge instead of cloud execution.)
- Use no proxy. Communication runs on the bridge and does not use a proxy.
- Use default proxy. Use the default proxy for the bridge set up as described in Using a proxy.
- Use different proxy. Use your own proxy service. Provide the proxy URL and port number.
For information about Microsoft EWS, see Microsoft Exchange Web Services documentation.
API reference
Configuration
Environment variables or parameters:
- Tenant
- Client ID
- Client secret
- Email: The service account email address
- Password or OAuth token: Authentication credentials
- Automation bridge
- And other fields info based on the requirement
Containment APIs
Rate Limits and Quotas
- Microsoft may enforce throttling based on:
- Number of concurrent EWS requests
- Number of items retrieved per call
- Number of mailbox accesses per day/hour
Troubleshooting
| Issue | Resolution | Resolution |
|---|---|---|
| No emails retrieved | Incorrect folder, filters too strict | Check filters, verify folder ID |
| Authentication failed | Invalid credentials or token | Update credentials and reauthorize |
FAQ
Can I filter which emails are fetched?
Yes. Filtering can be applied based on folders, received time. Custom filters may be implemented depending on integration configuration.
How frequently does the Daemon poll for new messages?
The polling interval is determined by the configuration within the integration setup or automation rule.
Support
- For issues, questions, or improvements:
- Microsoft Q&A
- Review logs on the portal using log search.
Category
Email Gateway
Change Log
- October 27, 2021 - First upload
- March 10, 2022 - Logo
- October 6, 2023 (v2.2) - Integration Updated
- March 4, 2024 (v2.3) - Updated code for compatibility with Python 3.12
- March 21, 2024 (v2.4) - Resolved an issue related to the Email Body
- May 9, 2024 (v2.5) - A new field has been added to the integration resource for specifying the folder or path to search within
- May 16, 2025 (v2.6) - Enhanced attachment handling to ensure accurate detection and processing.