Create a Match List
This topic has information about Match Lists, their purpose and usage, and how to create them.
About Match Lists
Match Lists are lists of important indicators and identifiers configured by a Cloud SIEM analyst. Match Lists are typically used to define “allow lists” of items, like IP addresses, URLs, and hostnames, and so on, that you want to exempt from ordinary rule processing. For example, you might want to prevent a rule from firing for Records that contain one of a certain set of IP addresses.
Here’s a use case for using a Match List to define an allow list: Vulnerability scanners often set off false alarms in security data, as they intentionally mimic the behavior of an attacker. Given that this behavior is safe and expected, you don’t want scanner activities to fire a rule. That’s what a match list is for. You can create a Match List called “vuln_scanners” that contains the IP addresses of your scanners.
There’s no reason you can’t use a Match List to define “deny lists” of items. However, Cloud SIEM’s Threat Intel feature is designed for exactly that purpose. Most of the time, but not always, you should use Threat Intel lists for negative indicators. For more information, see Match Lists or Threat Intel: which to use?.
Here’s an example of a Match List in the Cloud SIEM UI. It is a list of trusted domains.
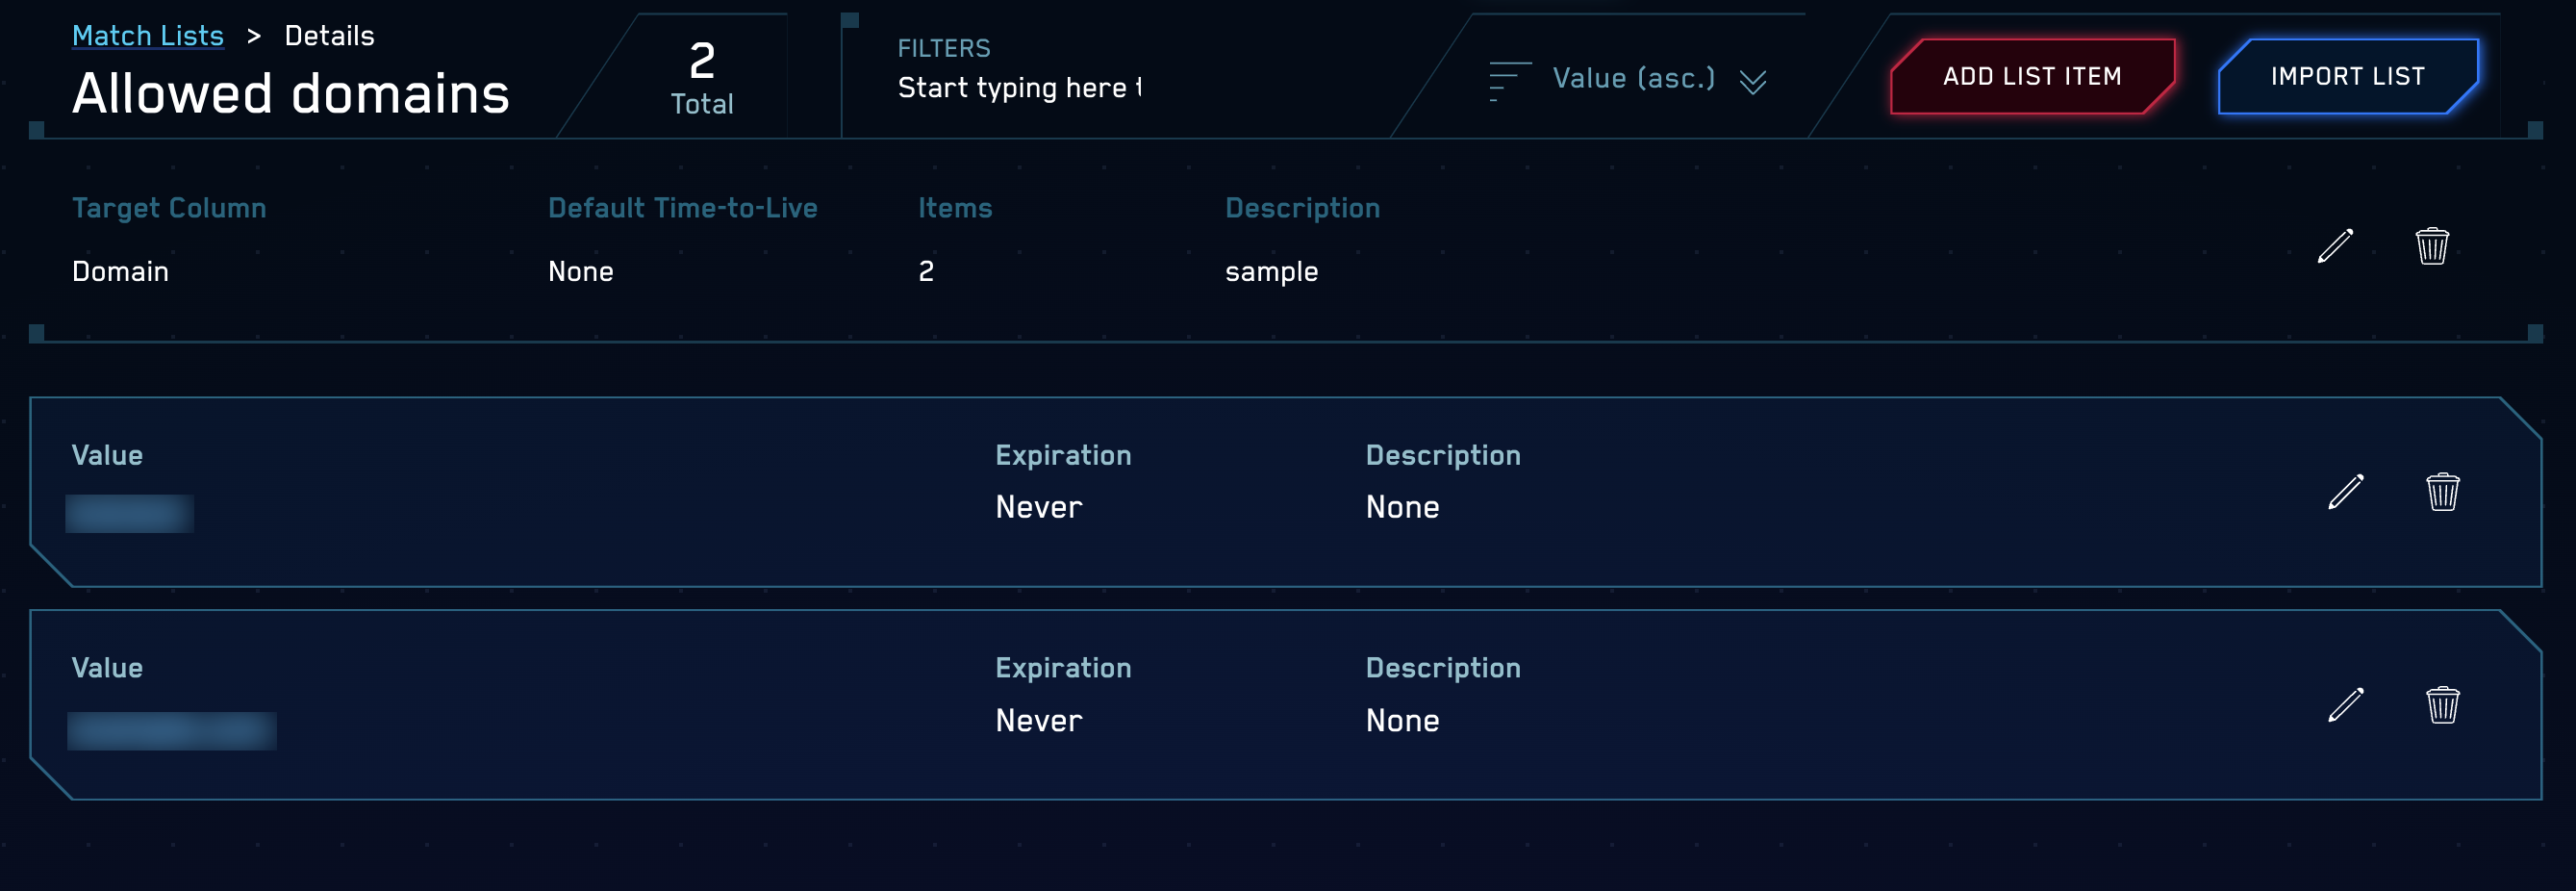
Note that the Match List has a Target Column, which you define when you create the list. The Target Column indicates what type of Record fields should be compared to the Match List, for example, hostnames, URLs, domains, IP addresses, usernames, and so on. For more information, see How are Match Lists Used?
Built-in rules refer to standard Match List names
Many of Cloud SIEM’s built-in rules assume the existence of one or more standard Match Lists. A standard Match List is a list that you need to create and populate so that Cloud SIEM can leverage it. Cloud SIEM rules take advantage of about 20 standard Match Lists. One example of a standard Match list is the “vuln_scanners” list mentioned in the previous section. There are analogous Match Lists for other entity types, such as “business_ips”, “verified_domains”, and so on.
When you create the standard Match Lists, it’s important to create them correctly: you need to use the exact name Cloud SIEM has defined for the list, and you must specify the correct Target Column. You can find that information in the Standard Match Lists topic, which also lists the built-in rules that refer to Match List data.
If you don’t define one or more standard Match Lists, the rules that refer to the match list data will still function, but you’ll miss out on the benefit that Match Lists provide—a rule will have no way of knowing that a particular IP address, domain, or other entity in a message should not cause it to fire.
As necessary, you can also create custom Match Lists.
How are Match Lists used?
When Cloud SIEM processes an incoming message, it compares the entries in each Match List that you’ve created to message fields that are of the same type as the Target Column of the Match List. For example, given a Match List whose Target Column is Domain, Cloud SIEM will compare items on that list only to message fields that contain domains.
When a Record contains a value that exactly matches one or more Match Lists (partial matches are not supported), two fields in the Record get populated:
-
listMatches. Cloud SIEM adds the names of the Match Lists that the Record matched, and the column values of those lists. For example, if an IP address in a Record matches theSourceIPaddress in the “vuln_scanners” Match List, thelistMatchesfield would look like this:listMatches: ['vuln_scanners', 'column:SourceIp'] -
matchedItems. Cloud SIEM adds the actual key-value pairs that were matched. For example, continuing the example above, if “vuln_scanners” Match List contained an entry “5.6.7.8”, and the Record’sSourceIpis also “5.6.7.8”, and assuming the SourceIP address in the “vuln_scanners” Match List, thematchedItemsfield would like like this:matchedItems: [ { value: '5.6.7.8', …other metadata about list item } ]
Because the information about list matches gets persisted within Records, you can reference it downstream in both rules and search.
In a rule, you look for matches by extending a rule expression with an array_contains function, for example:
... AND NOT array_contains(listMatches, "vuln_scanners")
If any of the IP addresses within the Record match one of the “vuln_scanner” IPs, the listMatches field will have a value of ['vuln_scanners']. Thus, the check above will effectively prevent Signals from firing for those rules on the scanner IP addresses.
For more information about referring to Match List data in rules, see Match Lists in the About Cloud SIEM Rules topic.
Match List or Threat Intel: which to use?
Cloud SIEM has another feature that is similar to Match Lists: Threat Intel. Like Match Lists, Threat Intel lists are lists of indicators and identifiers configured by a Cloud SIEM analyst. When deciding whether to put an indicator on a Match List or a Threat Intel list, consider the following.
Threat Intel lists are intended specifically for negative identifiers that should definitely fire a Signal. So, whenever a rule detects a Record field that matches an item on a Threat Intel list, it always results in a Signal. If that’s what you want to occur when a particular identifier is encountered in a Record, you should put that identifier on an Threat Intel list. But, if you don’t want a match to invariably result in a Signal, the item should be on a Match List. For example, you might use a Match List for negative indicators that should fire a Signal only if a secondary condition is also met.
Another difference between Match Lists and Threat Intel lists is the Target Column types they support. For instance, you can’t create a Threat Intel list that contains email addresses. So, although typically a Threat Intel list is what you’d use for suspicious indicators, in some cases, a Match List is the answer.
Match List limitations
A Match List can contain up to 100,000 items.
Matching behavior
When comparing a field value to items on a Match List, Cloud SIEM generally requires an exact match (case insensitive). There are two exceptions to that rule.
- Match Lists that contain IP addresses can list either explicit IP addresses, CIDR blocks of IP addresses, (for example
1.2.3.4/24), or both. - Match Lists that contain domains can list, either complete internet domains or partial domain. Partial domains will match all the matching subdomains. For example,
google.comin a list will matchmail.google.comin a Record. Note that the converse is not the case:mail.google.comin a list won’t matchgoogle.com.
Create a Match List
Perform the steps below to create a Match List in Cloud SIEM.
You can also create and manage Match Lists with Cloud SIEM's REST API.
- Classic UI. In the top menu select Content > Match Lists.
New UI. In the main Sumo Logic menu, select Cloud SIEM > Match List. You can also click the Go To... menu at the top of the screen and select Match List. - Click Create.

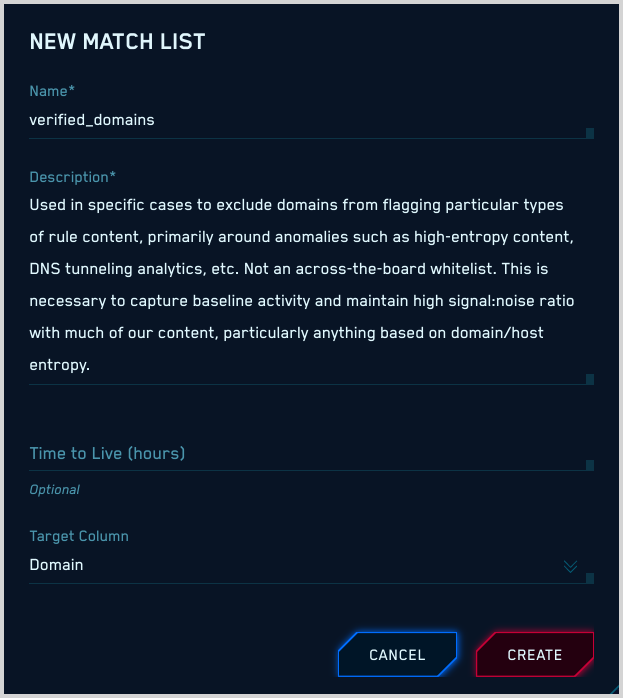
- On the New Match List popup, enter the following:
- Name. Name of the Match list. If you are creating a standard Match List, make sure the name matches the standard Match List name. For more information, see Standard Match Lists. We recommend no embedded spaces in list names. For example, instead of my list, use my_list.
- Description. Enter a description for the list. Descriptions for standard Match Lists can be found in Standard Match Lists.
- Time to Live (hours). (Optional) Enter the number of hours after which the entries on the list should expire.
- Target Column. The type of message field to which items on the list should be compared. The Target Column for standard Match Lists can be found in Standard Match Lists.
noteOnce you create a Match List, it's not possible to change its Target Column.
- Click Create.
- The Match List now appears on the Match Lists page.

- Click the name of the Match List to open it.
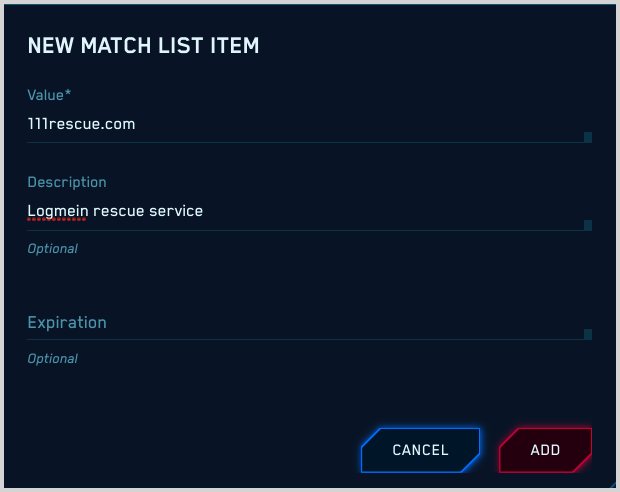
- On the Match List > Details page, click ADD LIST ITEM.

- On the New Match List Item popup, enter:
- Value. The value of the entity. Make sure the value you enter is of the same type as the type you selected as the Target Column for the list. For example, if the Target Column is
Domain, enter a domain. - Description. (Optional) Enter a description of the entity instance you entered.
- Expiration. (Optional) The date and time at which the list item should be removed from the list.
- Click Add to add the item to the list.
- Value. The value of the entity. Make sure the value you enter is of the same type as the type you selected as the Target Column for the list. For example, if the Target Column is
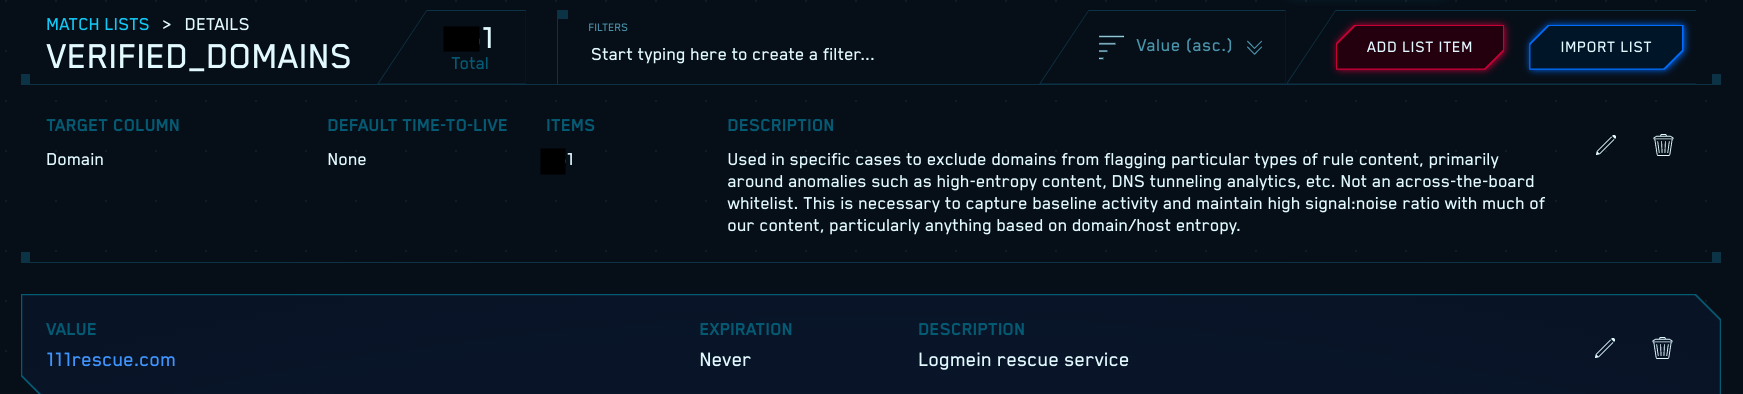
- The item now appears in the Match List.
Import a Match List
You can import list items by uploading a .csv file. This is convenient when you want to add many items to a list.
Create a .csv file
Create a .csv file. You can import up to three fields for an item.
- value (Required). The value of the list item. The item you supply should be of the same type as the Target Column defined for the Match List. For example, if the Target Column is
IP Address, supply an IP address. The maximum length for the value field is 2000 characters. - description (Optional). A description of the list item.
- expires (Optional). Expiration date and time for the list item, in ISO 8601 format, for example: 2020-08-17 01:18:00
Follow these guidelines when you create the .csv file:
- Use the first line of the file to identify the fields, and then add a line for each list item with the fields in the same order as the field names in the header. (Fields can be in any order, but the fields for each item must be in the same order as the field in the header.)
- If a field contains a comma, enclose it in double quotes (“).
- Save the file with a .csv extension.
Here is an example of a file in which all fields are supplied:
value,description,expires
10.99.19.9,test-desc,2020-08-17 01:18:00
Here is an example of a file in which only the required field, value, is specified:
value
10.99.19.9
Best practices for using Match Lists
Sumo Logic recommends the following conventions and best practices for using Match Lists.
Use Match Lists
Use the Match List feature early on to get the most value from Cloud SIEM. This feature allows you to prevent rules from firing as a result of devices and activity in your environment that you know are benign. This optimizes the detection process by reducing noise in results, and helps reduce alert overload and analysis fatigue.
Match Lists are not your only option for creating allowlists or denylists. For Entities, use schema key tags rather than Match Lists. And to suppress Signals altogether, use Suppressed Lists.
Choose appropriate Target Column
When creating a custom Match List, consider directionality when you select the Target Column. In most cases, Match Lists work fine with a directionless column type, like IP Address. However, in some cases, a Match List is best configured with a directional column type, such as Source IP Address or Destination IP Address. In some cases it works best to create multiple Match Lists with the same items in each, but different Target Columns. For example, you can have the same IP addresses in three Match List: one whose target column is IP Address, one with Source IP Address, and one with Destination IP Address.
Get the TTL right
Select a default TTL for Match Lists that make sense. For example, a Match List of resources like authentication servers or vulnerability scanners should be fairly static and typically never have items expire. On the other hand, Match List of Tor node addresses is dynamic—a TTL is definitely appropriate.
General purpose Match Lists are good
When creating custom Match Lists, we recommend a general purpose approach to naming and populating them so that they�’re broadly applicable across your infrastructure.
It’s better to have one generic Match List for similar resource types than multiple vendor-specific lists. For example, creating the “vuln_scanners” list is better than having one for each type you have, like “Qualys Scanners”, “Tenable Vulnerability Scanners”, and so on.