Netlify

The Sumo Logic app for Netlify offers a comprehensive solution for managing and optimizing web development and deployment processes. It provides insights into high-level web deployment metrics and essential data such as sites, branches, and repositories. Additionally, the app offers deeper insights into deployment operations, helping identify bottlenecks, resolve issues, and analyze performance metrics. It also focuses on version control and development productivity, offering key metrics to assess development activities, deployment status, and environmental transitions. This integration enables users to make data-driven decisions, optimize web development strategies, and maintain efficient and productive web projects.
Netlify is a web development platform for building fast and dynamic websites, e-commerce stores, and web applications. You can use a webhook in the Netlify platform to forward site deployment events from the Netlify platform to the Sumo Logic HTTP endpoint. Using these logs, you can monitor deploy processes including events such as deploy started, succeeded, failed, deleted, locked, unlocked, request status changes, and transitions between previously successful and failed deploys in Sumo Logic. For more details, refer to the Netlify Documentation.
Event types
The Sumo Logic app for Netlify ingests site deployment events into Sumo Logic through an outgoing webhook available in Netlify. For more information on supported events that are ingested through the Netlify webhook, see the Netlify Documentation
Sample log messages
View sample log message
{
  "id": "65268a46257790246",
  "site_id": "b46da3f-0ca764f81365",
  "build_id": "65268a461697790246",
  "state": "ready",
  "name": "eclectic-cucurucho",
  "url": "http://eclectetlify.app",
  "ssl_url": "https://eclectilify.app",
  "admin_url": "https://app.netic-cucurucho",
  "deploy_url": "http://main--eclecty.app",
  "deploy_ssl_url": "https://main-tlify.app",
  "created_at": "2023-10-20T08:24:06.058Z",
  "updated_at": "2023-10-20T08:24:06.058Z",
  "user_id": "6523cd133",
  "error_message": null,
  "required": [

  ],
  "required_functions": [

  ],
  "commit_ref": "21cad587a3c5dbef9e0f548d",
  "review_id": null,
  "branch": "main",
  "commit_url": "https://github.com/dshjgfkah/n1f00c5dbef9e0f548d",
  "skipped": null,
  "locked": null,
  "log_access_attributes": {
    "type": "firebase",
    "url": "https://netlify-builds7.firebaseio.com/bu0008aeba9c/log",
    "database": "netlify-builds7",
    "endpoint": "https://netlify-burebaseio.com",
    "path": "/builds/65268a4625aeba9c/log",
    "token": "eyJ0eXAiOiJKVP683hKKDr1xLnW10qWNyxvgZ4"
  },
  "title": "Update Layout.js",
  "commit_message": null,
  "review_url": null,
  "published_at": "2023-10-11T11:43:10.187Z",
  "context": "production",
  "deploy_time": 5,
  "available_functions": [

  ],
  "screenshot_url": null,
  "site_capabilities": {
    "title": "Netlify Team Free",
    "asset_acceleration": true,
    "form_processing": true,
    "cdn_propagation": "partial",
    "domain_aliases": true,
    "secure_site": false,
    "sso_secure_site": false,
    "secure_site_context": false,
    "prerendering": true,
    "proxying": true,
    "ssl": "custom",
    "rate_cents": 0,
    "yearly_rate_cents": 0,
    "ipv6_domain": "cdn.makerloop.com",
    "branch_deploy": true,
    "managed_dns": true,
    "geo_ip": true,
    "split_testing": true,
    "id": "nf_team_dev",
    "cdn_tier": "reg"
  },
  "committer": "AlokGem",
  "skipped_log": null,
  "manual_deploy": false,
  "file_tracking_optimization": true,
  "plugin_state": "none",
  "lighthouse_plugin_scores": null,
  "links": {
    "permalink": "https://65268a46252tlify.app",
    "alias": "https://eclectic-cuctlify.app",
    "branch": null
  },
  "framework": "unknown",
  "entry_path": null,
  "views_count": null,
  "function_schedules": [

  ],
  "public_repo": false,
  "pending_review_reason": null,
  "lighthouse": null,
  "edge_functions_present": null,
  "expires_at": null
}
Sample queries
_sourceCategory="webhook/netlify" "name"
| json "id", "state", "name", "created_at", "updated_at", "user_id", "build_id", "error_message", "branch", "locked", "title", "commit_message", "context", "deploy_time", "manual_deploy", "public_repo", "committer", "published_at" as id, state, name, createdAt, updatedAt, userId, buildId, errorMessage, branch, locked, title, commitMessage, context, deployTime, manualDeploy, publicRepo, committer, publishedAt nodrop
| where name matches "{{siteName}}" and branch matches "{{branch}}" and context matches "{{context}}" and state matches "{{state}}" and manualDeploy matches "{{manualDeploy}}" and publicRepo matches "{{publicRepo}}"
| count_distinct(name)
Setup
This section has instructions for collecting logs for the Sumo Logic Netlify webhook collection.
Source configuration
Follow the below steps to configure the Hosted Collector to receive Netlify events:
- In the Sumo Logic portal, create a new Hosted Collector or use an existing one. Then add a HTTP Logs and Metrics Source.
- Configure Source Category in the HTTP Source - for example,
webhook/netlify- for the Netlify integration. - Copy and save the endpoint URL of the source.
Vendor configuration
Configure the webhook integration in Netlify to send events to the Sumo Logic HTTP source. Once configured, it will be triggered each time the events occur within your Netlify account.
Follow the below steps to configure the Netlify webhook.
- Sign in to the Netlify account.
- Go to Sites, and select a site for which you want to send notifications to Sumo Logic.
- Go to Site configuration, and select Build & deploy.
- Go to Deploy notifications.
- Click Add notification and select HTTP Post Request. The webhook form appears.
- Enter webhook form data as follows:
- Event to listen for. Select the type of events that will cause this webhook to execute.
- URL to notify. Enter the Sumo Logic HTTP endpoint URL (source address) created above.
- Click Save.
- Verify Netlify events are getting ingested in Sumo Logic by executing the following query on Sumo Logic's Log Search panel.
`_sourceCategory=webhook/netlify`
- For detailed information about webhook creation, refer to the Netlify Documentation.
- For support, contact Netlify.
Installing the Netlify app
To install the app, do the following:
- Select App Catalog.
- In the 🔎 Search Apps field, run a search for your desired app, then select it.
- Click Install App.
note
Sometimes this button says Add Integration.
- Click Next in the Setup Data section.
- In the Configure section of your respective app, complete the following fields.
- Key. Select either of these options for the data source.
- Choose Source Category and select a source category from the list for Default Value.
- Choose Custom, and enter a custom metadata field. Insert its value in Default Value.
- Key. Select either of these options for the data source.
- Click Next. You will be redirected to the Preview & Done section.
Post-installation
Once your app is installed, it will appear in your Installed Apps folder, and dashboard panels will start to fill automatically.
Each panel slowly fills with data matching the time range query and received since the panel was created. Results will not immediately be available, but will update with full graphs and charts over time.
Viewing Netlify dashboards
All dashboards have a set of filters that you can apply to the entire dashboard. Use these filters to drill down and examine the data to a granular level.
- You can change the time range for a dashboard or panel by selecting a predefined interval from a drop-down list, choosing a recently used time range, or specifying custom dates and times. Learn more.
- You can use template variables to drill down and examine the data on a granular level. For more information, see Filtering Dashboards with Template Variables.
- Most Next-Gen apps allow you to provide the scope at the installation time and are comprised of a key (
_sourceCategoryby default) and a default value for this key. Based on your input, the app dashboards will be parameterized with a dashboard variable, allowing you to change the dataset queried by all panels. This eliminates the need to create multiple copies of the same dashboard with different queries.
Overview
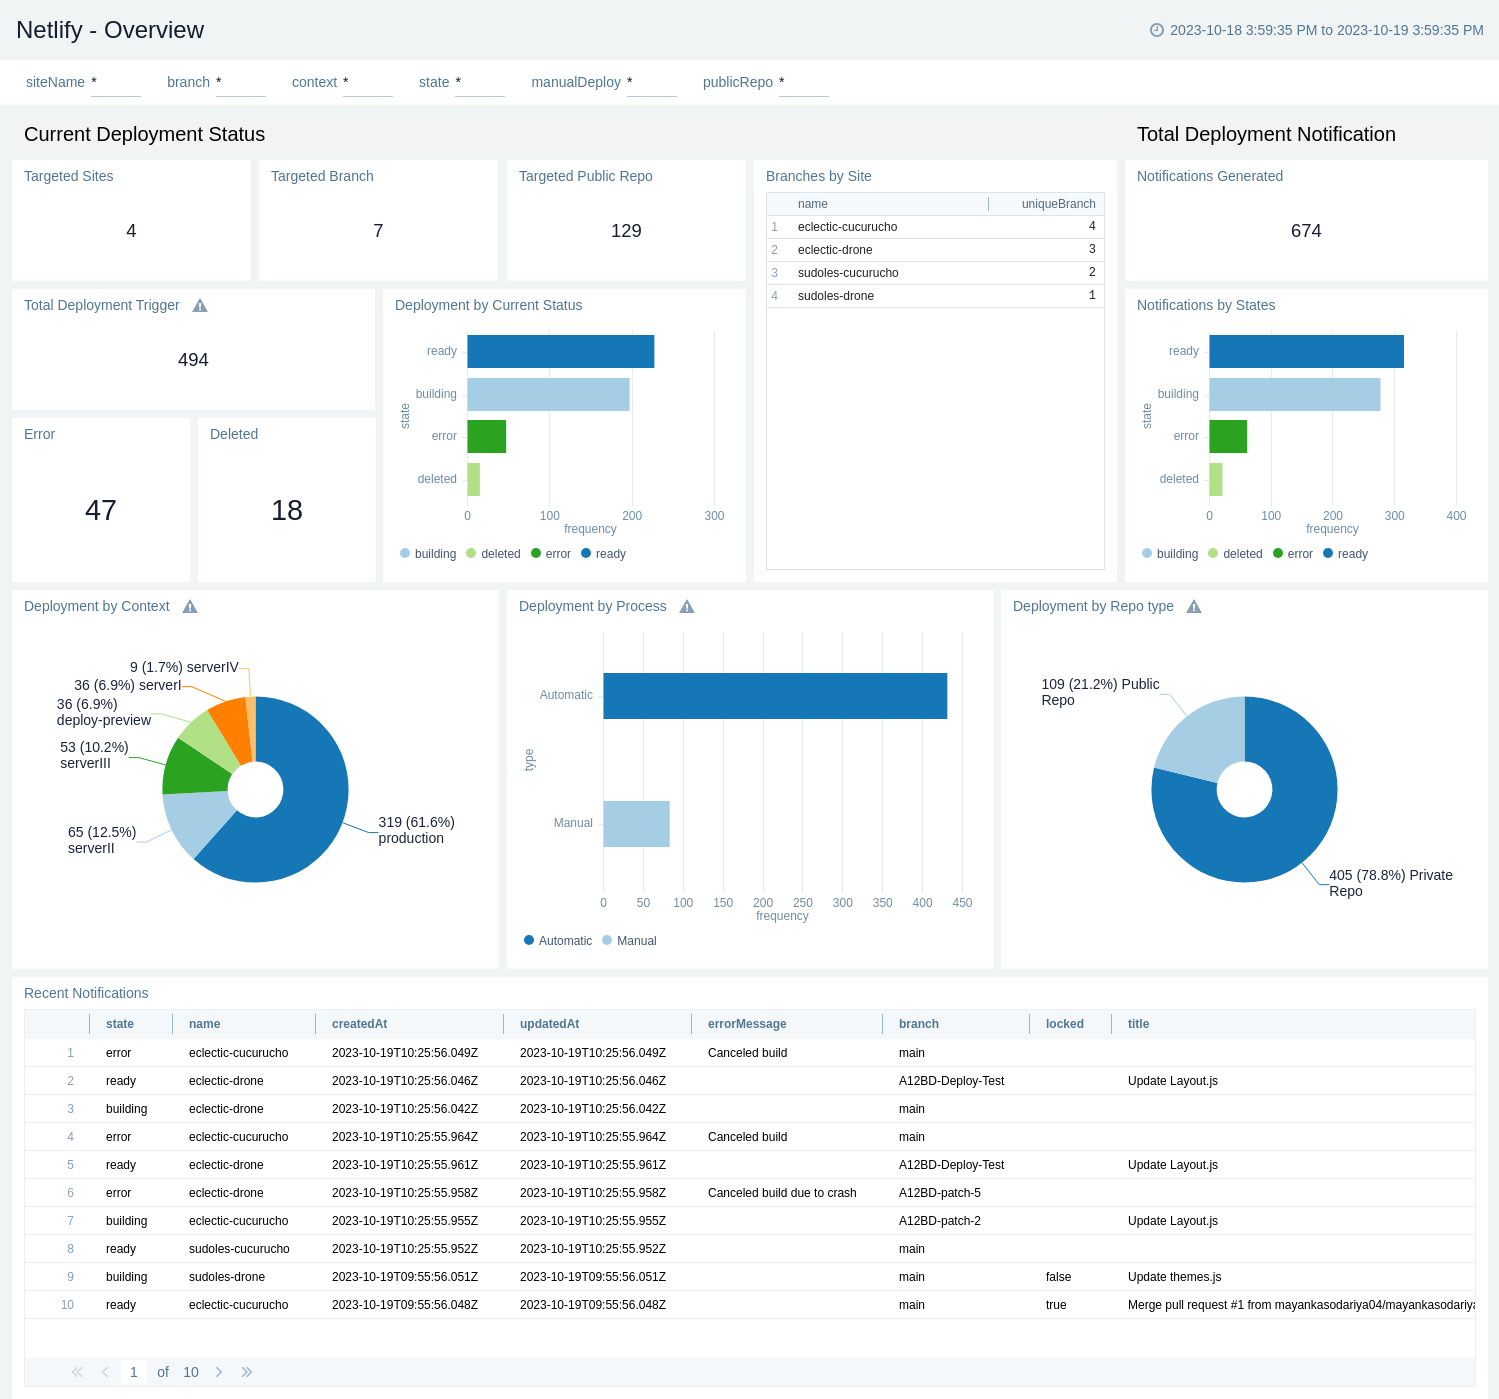
The Netlify - Overview dashboard offers a comprehensive snapshot of your web deployment ecosystem, providing a detailed insight into critical metrics. With panels tracking Targeted Sites, Branches, and Public Repos, you can effectively manage your web projects. Monitor Total Deployment Triggers, deployment status, errors, deletions, and analyze branch-specific data through Branches by Site. Gain valuable insights into Notifications Generated and their distribution by states, while also delving into deployment specifics by context, process, and repository type. This dashboard keeps you informed with real-time updates on Recent Notifications, empowering you to proactively manage and optimize your web development and hosting operations.

Build and Deploy Details
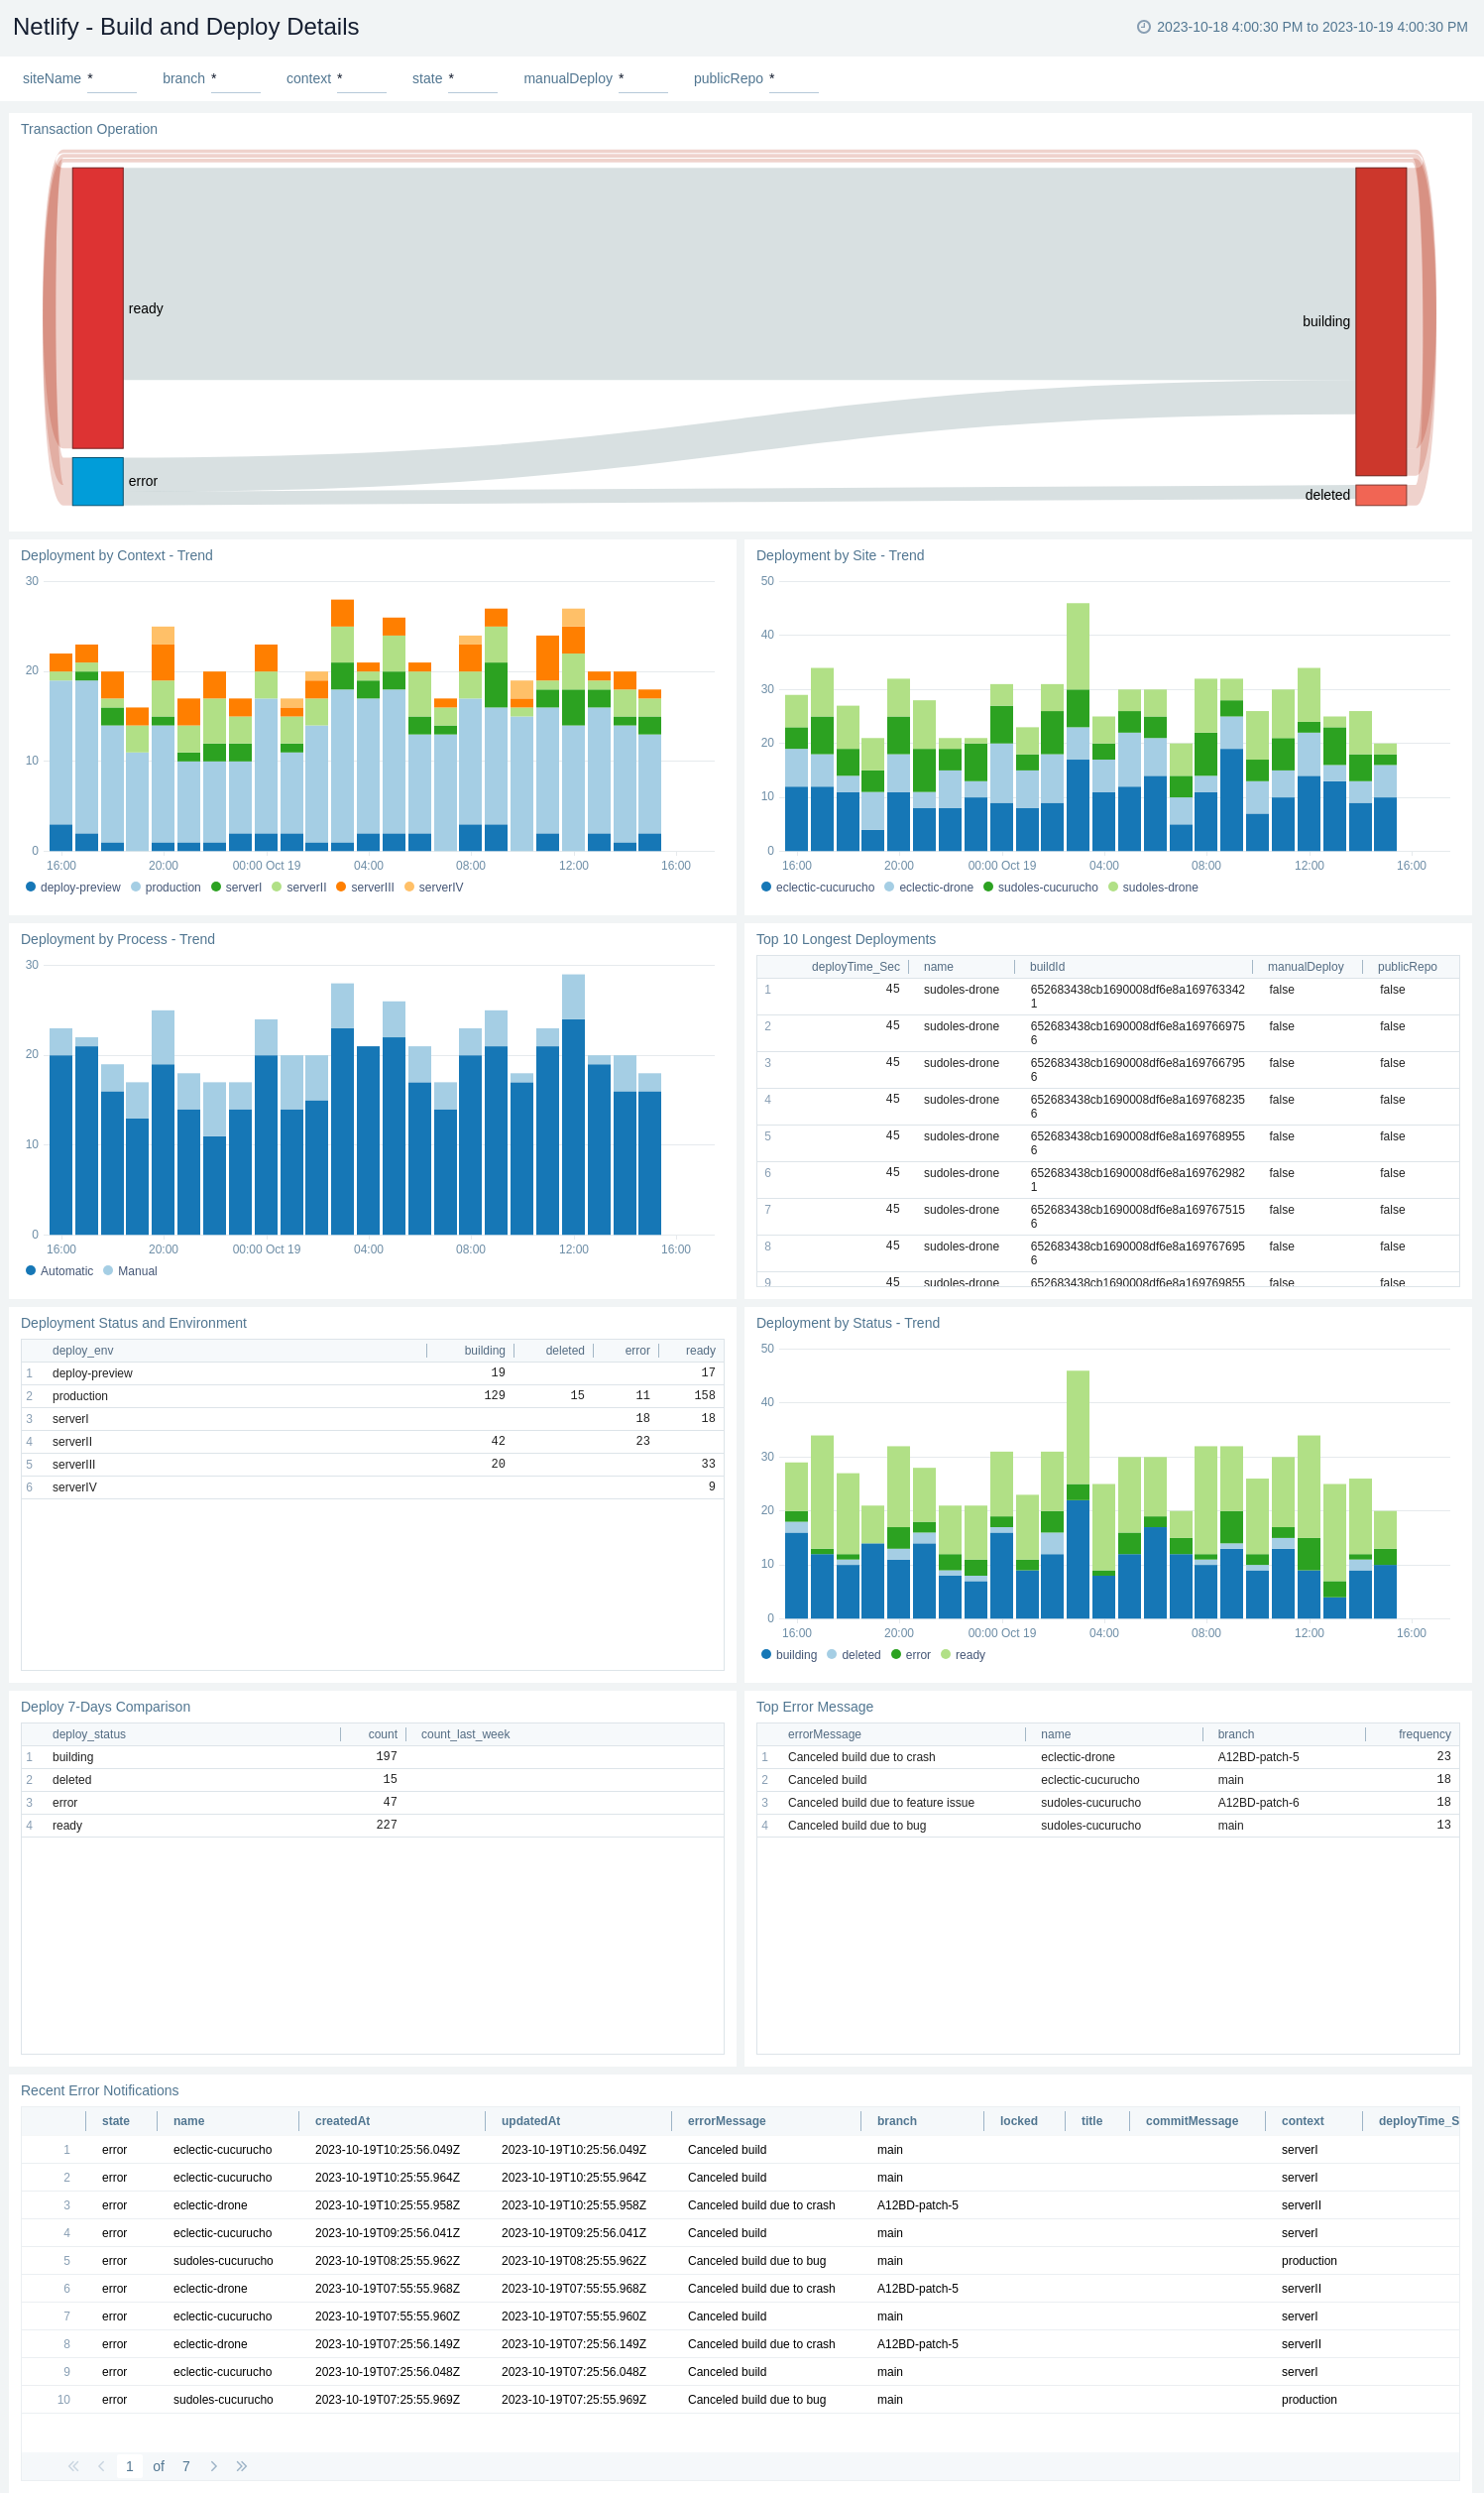
The Netlify - Build and Deploy Details dashboard offers a comprehensive view of deployment operations, allowing efficient management and optimization of web projects. With insights into Transaction Operations, Deployment Trends by Site, Context, Process, and Status, users can closely monitor deployments' performance. Tracking the Top 10 Longest Deployments provides valuable insights into potential bottlenecks and a comprehensive view of the deployment process. Additionally, monitor the Deployment Status and Environment to ensure smooth transitions from development to production. Gain insights into the 7-day comparison of deployment activities, aiding in performance evaluation and future planning. Analysis of error messages facilitates efficient troubleshooting, while Recent Error Notifications keep users informed for real-time issue resolution. This dashboard equips users with the tools to make informed decisions, streamline deployment processes, and ensure the smooth operation of web projects.

Commit Details
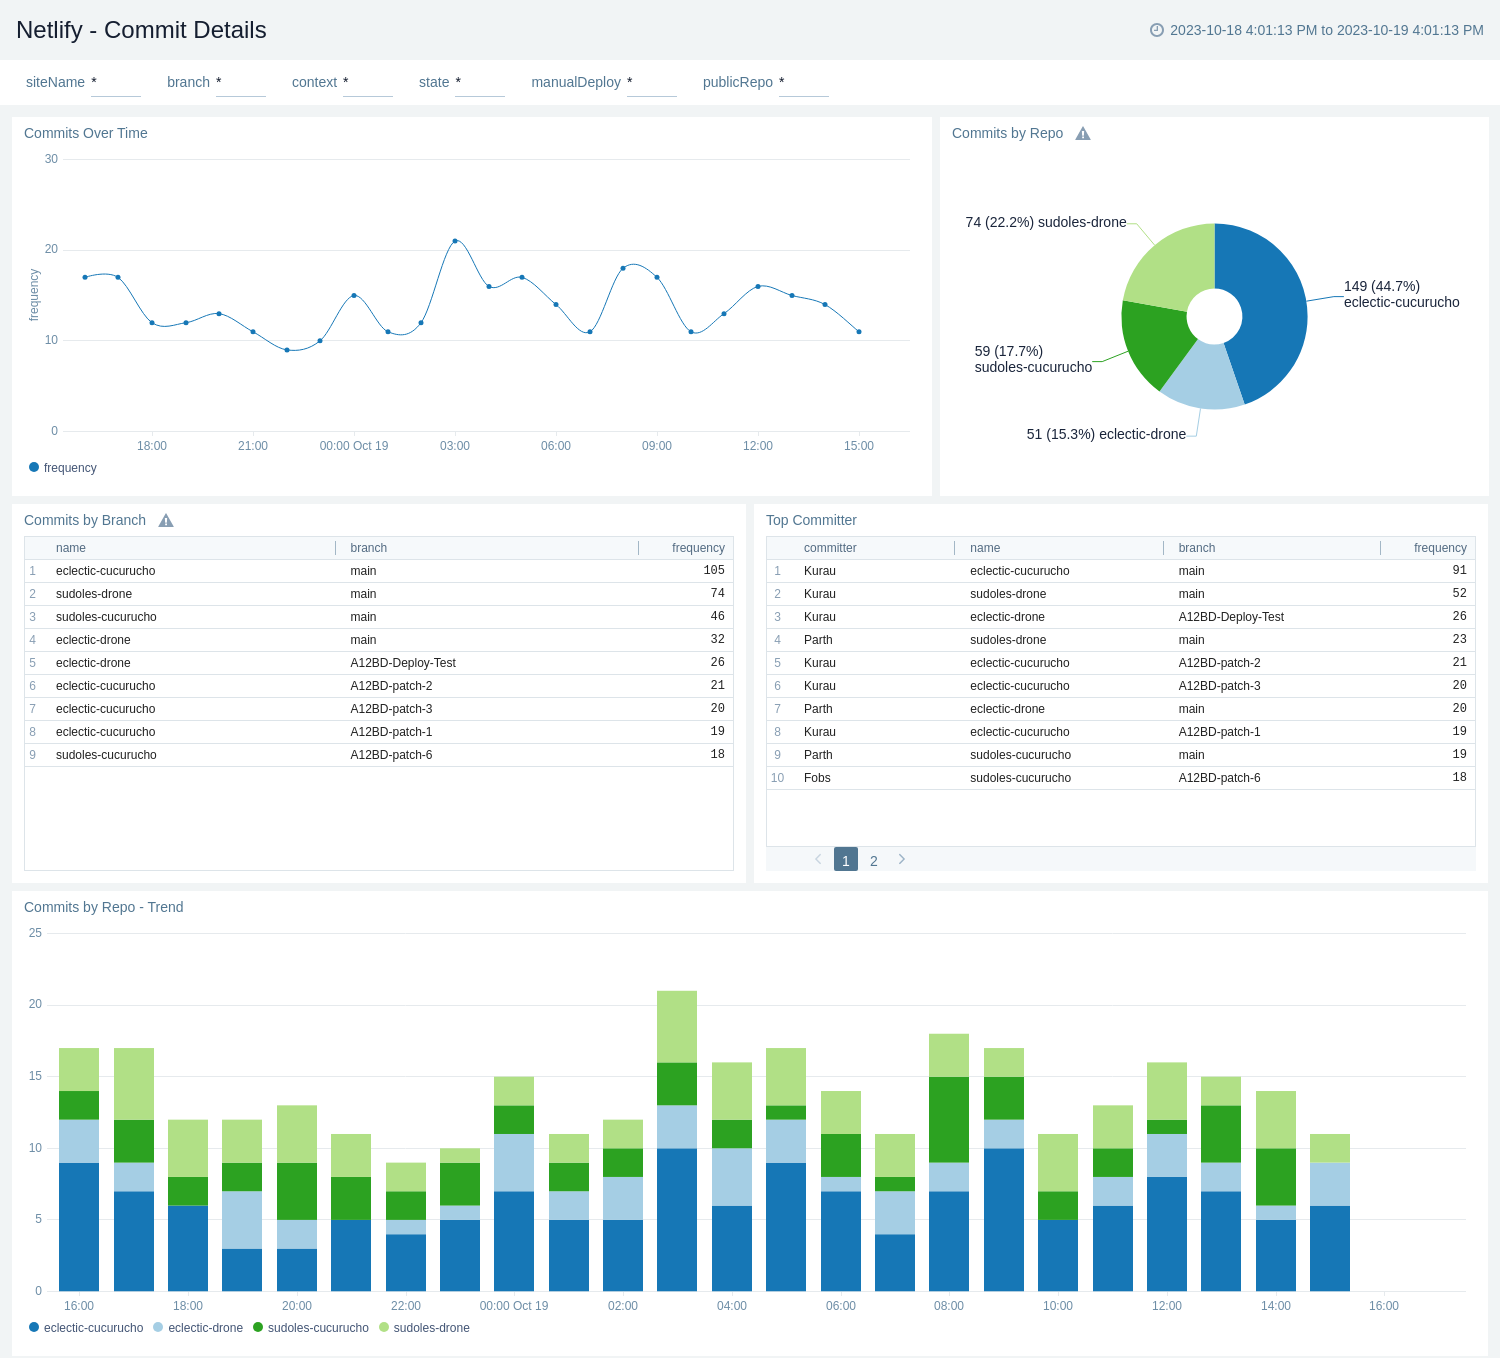
The Netlify - Commit Details dashboard offers a comprehensive insight into your development workflow, focusing on critical aspects of version control and deployment. Keep a close eye on your team's progress and productivity with panels tracking Commits Over Time and Commits by Repo, providing valuable metrics to assess development activity and patterns. Analyze trends in Commits by Repo aiding in performance evaluation and future planning. With visibility into Commits by Branch, this dashboard enables you to fine-tune your development strategies and maintain an efficient and productive development environment.

Upgrading the Netlify app (Optional)
To update the app, do the following:
- Select App Catalog.
- In the Search Apps field, search for and then select your app.
Optionally, you can identify apps that can be upgraded in the Upgrade available section. - To upgrade the app, click Upgrade.
- If the upgrade does not have any configuration or property changes, you will be redirected to the Preview & Done section.
- If the upgrade has any configuration or property changes, you will be redirected to Setup Data page.
- In the Configure section of your respective app, complete the following fields.
- Key. Select either of these options for the data source.
- Choose Source Category and select a source category from the list for Default Value.
- Choose Custom and enter a custom metadata field. Insert its value in Default Value.
- Key. Select either of these options for the data source.
- Click Next. You will be redirected to the Preview & Done section.
- In the Configure section of your respective app, complete the following fields.
Post-update
Your upgraded app will be installed in the Installed Apps folder, and dashboard panels will start to fill automatically.
See our Release Notes changelog for new updates in the app.
Uninstalling the Netlify app (Optional)
To uninstall the app, do the following:
- Select App Catalog.
- In the 🔎 Search Apps field, run a search for your desired app, then select it.
- Click Uninstall.